background image

Working with the Tablet PC

Setting up WLAN access
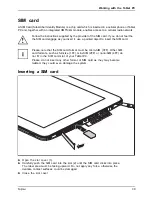
Requirement: A WLAN must be available and you must have the
corresponding access information.

Information on con

fi

guring the WLAN access can be found in the

documentation for your operating system.

Further information on WLAN and Bluetooth

For further information about WLAN or Bluetooth, see "Appendix: Miscellaneous Information".

For WLAN speci

fi

cations, see chapter

"WLAN speci

fi

cations", Page 79

.

Access via UMTS

If you ordered an integrated UMTS module with your system, you can enjoy optimum
reception and maximum energy ef

fi

ciency without awkward cables or antennas. The

optional UMTS module is ready for use immediately.

You will

fi

nd information on establishing the connection with the UMTS network

in the documentation for the hardware used.

Your device can connect to the Internet via UMTS. To do this, use one of
the following types of connection:

Integrated UMTS module (availability dependent on your con

fi

guration)

a USB dongle (a USB stick with your mobile phone provider’s SIM card)

a mobile end-device (e.g. mobile phone with Bluetooth or cable connection)

Access via Wireless WAN

You can purchase the accessories for Wireless WAN reception from your Fujitsu dealer.

If you have ordered a Wireless WAN module, your device will already
be prepared when you receive it.

You will

fi

nd information on establishing the connection with the Wireless WAN

network in the documentation for the hardware you plan to use.

Fujitsu

41

Summary of Contents for STYLISTIC Q584

Page 1: ...System Operating Manual FUJITSU Tablet STYLISTIC Q584 ...

Page 2: ... Avenue Sunnyvale CA 94085 3470 U S A Telephone 800 831 3183 or 408 746 6000 http solutions us fujitsu com http solutions us fujitsu com contact Have a question Email us at AskFujitsu us fujitsu com Copyright 2013 Fujitsu America Inc All rights reserved B5FK 2441 01ENZ0 ...

Page 3: ...ontrols 9 Important notes 12 First time setup of your device 17 Working with the Tablet PC 21 Accessories for your Tablet PC optional 43 Security functions 56 Connecting external devices 63 Settings in BIOS Setup Utility 67 Troubleshooting and tips 70 Technical data 78 Manufacturer s notes 83 Appendix 88 Index 97 ...

Page 4: ...demark or registered trademark of Google Incorporated Bluetooth is a trademark of Bluetooth SIG Inc USA OmniPass is a trademark of Softex Inc Roxio is a trademark of Roxio a division of Sonic Solutions PowerDirector PowerDVD YouCam and MakeDisc are trademarks of CyberLink Corp Adobe Acrobat and Adobe Reader are either a reg istered trademarks or trademarks of Adobe Systems Incorporated in the Unit...

Page 5: ...evice for the first time 19 Installing Bonus Apps 20 Working with the Tablet PC 21 Battery charging indicator 21 Switching the Tablet PC on 22 Programing the ON OFF button 22 Switching the Tablet PC off 23 Handwriting recognition 23 Touchscreen 24 Select display orientation portrait or landscape format 25 Touch commands 25 Calibrate the Dual Digitizer for finger based operation of the device 25 Ac...

Page 6: ... the Tablet PC from the keyboard cover 49 VESA mount optional 50 Shoulder strap optional 51 Folio case optional 53 Micro USB adapters 54 Security functions 56 Configuring the fingerprint sensor 57 Configuring password protection in BIOS Setup Utility 58 Protecting BIOS Setup Utility supervisor HDD password and user HDD password 58 Password protection for booting the operating system 59 Password pr...

Page 7: ...lus movements 72 Stylus input not working 73 The Tablet PC does not start after switch on 73 The Tablet PC stops working 73 The printer does not print 74 The wireless connection to a network does not work 74 The battery discharges too quickly 74 SmartCard reader is not recognized 75 SmartCard PIN forgotten 75 User and or supervisor SmartCard lost 75 SmartCard lost 75 Acoustic warning 76 Error mess...

Page 8: ...ry Image from Hidden Partition 91 RECOVER YOUR SYSTEM WHEN THE HARD DRIVE IS NOT BOOTABLE 92 Restore the Recovery Image for Full Hard Drive 92 Recovering Your Recovery Image Using Recovery and Utility for new hard drive or non bootable hard drive 93 Installing the Software after the Recovery Image is Restored 94 Index 97 6 Fujitsu ...

Page 9: ...e Please go to http www shopfujitsu com store Maintaining Latest Configuration To ensure that you always have the most current driver updates related to your system occasionally access the Fujitsu Software Download Manager FSDM utility The FSDM utility is available from the Fujitsu Support site FSDM will allow you to view a list of the most current drivers utilities and applications to determine w...

Page 10: ...3 or a command used to start a program start exe This font Indicates information that is displayed on the screen by a program e g Installation is complete This font Indicates terms and texts used in a software interface e g Click on Save names of programs or files e g Windows or setup exe This font Indicates cross references to another section e g Safety information cross references to an external...

Page 11: ...dicators and connections of the device Please familiarize yourself with these items before you start to work with the device Front 1 2 3 5 6 4 7 8 1 Ambient light sensor 2 Webcam LED 3 Webcam 4 Battery charging indicator 5 Eyelet for stylus tether 6 Recess for cradle 7 Docking port for cradle or keyboard cover 8 Recess for cradle Fujitsu 9 ...

Page 12: ... 4 Shortcut button 5 Speaker Right hand side with and without covers 2 4 5 6 1 1 2 3 4 5 6 3 1 Speaker 2 Storage card slot protected by cover 3 SIM card slot protected by cover 4 USB port USB 3 0 protected by cover 5 Micro USB port protected by cover 6 DC jack DC IN protected by cover 10 Fujitsu ...

Page 13: ...nts or Smart Card shell with integrated Smart Card reader and screw hole attachment points 5 4 3 2 1 5 7 6 6 4 3 2 1 6 6 1 Stylus holder 2 Fingerprint sensor 3 Webcam 4 Camera light 5 Webcam LED 6 Screw holes device dependent for securing accessories 7 SmartCard reader device dependent Fujitsu 11 ...

Page 14: ...h in California is held to be a possible cause of birth defects and other damage to fertility Wash your hands after using the device This Tablet PC complies with the relevant safety regulations for data processing equipment If you have questions as to whether you can set up the Tablet PC in the intended environment please contact your sales outlet or our hotline service desk Additional safety note...

Page 15: ... will not be using your Tablet PC switch it off Switch off any connected external devices when they are not in use If you use the energy saving functions the Tablet PC uses less power If you do this you will be able to work longer with the Tablet PC before having to recharge the battery The energy efficiency is increased and environmental pollution is reduced You save money and help protect the en...

Page 16: ...eck whether the local AC voltage and the AC cable are compatible If this is not the case buy an AC cable that suits the local conditions Enquire with the appropriate government office of the country you will be travelling in as to whether you may operate the radio component integrated in your Tablet PC there Take the necessary travel adapters with you when traveling abroad Check in the following t...

Page 17: ... jolts and bumps use a suitable Tablet PC carrying case to transport your Tablet PC Storing your Tablet PC If storing your Tablet PC for a month or longer turn it off fully charge the battery then remove and store all Lithium Polymer batteries Store your Tablet PC in a cool dry location Temperatures should remain between 13ºF 25ºC and 140ºF 60ºC Store your Tablet PC and batteries separately If you...

Page 18: ... it off and contact our hotline our service desk see enclosed list of service desks or visit our website at http www fujitsu com us support Cleaning with disinfectant wipes There are many ways of disinfecting surfaces The following disinfectant wipes have been tested successfully with the Tablet PC MG Chemicals Multipurpose Alcohol Wipes alcohol based PROSAT Sterile PS 911EB EtOH Life Sciences Wip...

Page 19: ...he instructions on the screen NEVER switch off your device during the first time setup process The battery must be charged if you want to operate your device using the battery When used on the move the built in battery provides the device with the necessary power You can increase the operating time by using the available energy saving functions For instructions on how to connect external devices e...

Page 20: ...ote that the rubber feet of the device may mark certain types of delicate surfaces Keep other objects at least 100 mm 4 inches away from the device and its AC adapter to ensure adequate ventilation Do not expose the device to extreme environmental conditions Protect the device against dust humidity and heat Connecting the AC adapter Makingreadytouse ACadapter Observe the safety notes in the enclos...

Page 21: ...r about one second to switch the device on During the installation process follow the on screen instructions You can find information and help on the Windows operating system functions on the Internet at http windows microsoft com If a Windows 8 1 operating system is installed on your Tablet PC a tutorial is automatically started when a new user logs on for the first time which shows you how to us...

Page 22: ...e applications you wish to install by selecting the checkbox adjacent to your selection or Click Select All if you would like to install all available applications To confirm your selection click Install Note that in some cases depending upon which application was selected for installation after installation completes the system will prompt you to reboot There are also cases in which if multiple a...

Page 23: ...e to the Tablet PC in the chapter Connecting external devices Page 63 Please refer to the notes in the chapter Important notes Page 12 Battery charging indicator Statusindicators Symbols The battery charging indicator 4 provides information about the status of the power supply 1 2 3 5 6 4 7 8 Status color Description On White The battery is being charged Off The Tablet PC is switched off or in Sav...

Page 24: ... the device on Programing the ON OFF button You can program the ON OFF button Operating system Menu Windows 8 1 Windows 8 1 Desktop Control Panel Hardware and Sound Power Options If you have assigned a password you must enter this when requested to do so in order to start the operating system Detailed information can be found in the chapter Security functions Page 56 22 Fujitsu ...

Page 25: ...ed standby mode or Press the ON OFF button for 2 seconds to 10 seconds to display the Sweep downwards to switch off popup or If the Tablet PC is not switched off automatically press the ON OFF button for about 10 seconds forced shutdown Handwriting recognition For detailed information on handwriting recognition see the documentation for your operating system Under Windows 8 1 you can set the requi...

Page 26: ...d by complete functionality of the display Subpixel A subpixel is a separately addressable internal structure within a pixel that enhances the pixel function Cluster A cluster contains two or more defective pixels or subpixels in a 5 x 5 pixel block Background lighting LCD screens are operated with background lighting The luminosity of the background lighting can decrease over the period of use of...

Page 27: ...n the Tablet PC but also on external monitors that are connected Touch commands You can execute certain commands by using your finger tip on the touchscreen of your device Alternatively everything which you can select or activate using your finger tip can also be selected or activated using the stylus Calibrate the Dual Digitizer for finger based operation of the device If Windows 8 1 is installed...

Page 28: ...nger over the screen from the left hand edge Switch between the most recently used applications equivalent to pressing the Windows button Ctrl Space Working with the mouse Position the mouse pointer at the bottom left hand edge of the screen Wipe your finger over the screen from the top or bottom edge Open the App commands equivalent to pressing the Windows button Z button Wipe from the top to the...

Page 29: ... menu with further options Tap on an object Tap your finger on an object on the screen to open an App or a link or to execute a command Working with the mouse Left click on the object Scroll Move object Swivel object Use this function to scroll through lists or websites or to swivel or move an object Working with the mouse Left click on the object keep the mouse button pressed and move swivel the ...

Page 30: ...program symbol Moving objects windows while holding the left mouse button pressed drag drop Place your finger on the object window keep your fingertip pressed against the touchscreen and move the desired object window Opening a context menu click with the right mouse button Tap your finger on the desired item Keep your fingertip pressed against the touchscreen The context menu appears Moving the c...

Page 31: ...p Action Description Scrolling Place two fingers on the touchscreen Move the fingers up to scroll up or Move the fingers down to scroll down Rotating Position your thumb on the touchscreen and rotate the image clockwise or anticlockwise using your index finger Fujitsu 29 ...

Page 32: ...ngers on the touchscreen and move them apart to increase the size of the zoom or Put two fingers on the touchscreen and move them together to decrease the size of the zoom view Lock context sensitive menus Use two fingers to tap twice in quick succession on the touchscreen 30 Fujitsu ...

Page 33: ...tylus with care Our recommendations for proper handling of the stylus are as follows Do not gesture with the stylus Do not use the stylus as a pointer Do not use the stylus on surfaces other than the screen of the Tablet PC Do not try to turn the grip of the stylus The grip is used to put the stylus into its slot and to take it out of its slot Never store the stylus with its weight on the tip e g ...

Page 34: ...rectly on the screen Stylus location On delivery the stylus is located in the stylus holder 1 Adjusting the stylus Operating system Menu Windows 8 1 Under Windows 8 1 Desktop Control Panel Hardware and Sound Pen and Touch Input you can make various settings for the stylus assignment and function of the stylus button Calibrating the stylus If Windows 8 1 is installed on your Tablet PC your Tablet P...

Page 35: ...tween the two ends of the tool supplied Pinch the two ends of the supplied tool together so that the tip is firmly clasped then pull it from the barrel Replace the tip with one of the new tips that were supplied with your stylus Insert the flat end of the tip into the barrel and exerting gentle pressure push it in until it is firmly in place If the tip is worn or damaged discard it Installing a st...

Page 36: ...s fitted with three tablet buttons Symbol Description Functions Volume button Increase volume Volume button Decrease the volume Shortcut button Call the status area by pressing or start a screenshot function by a long press depends on configuration 34 Fujitsu ...

Page 37: ...m Rechargeable battery Battery Battery Servicelife battery Rechargeablebattery Battery The built in battery provides the Tablet PC with the necessary power for use on the move You can increase the service life of the battery by caring for the battery properly The average battery service life is around 500 charge discharge cycles You can extend the battery service life by taking advantage of the av...

Page 38: ...anel Set the screen saver in your Control Panel or Keep a finger pressed on the desktop to display the context menu Configure the screen saver under Change screen saver If you need further information about an option you can get help with most settings by pressing the symbol in the upper right of the screen to open the Microsoft Help When the Tablet PC is in an energy saving mode you must remember...

Page 39: ...s when handling the memory cards Memorycard Supported formats It supports the following formats Micro Secure Digital SDTM Card Micro SDHC Micro SDXC Inserting the memory card 2 1 Open the slot cover 1 Carefully slide the storage card into the slot 2 The label area must be facing upward Do not apply any force otherwise the delicate contact surfaces could be damaged Memorycard Close the slot cover F...

Page 40: ...y card Memorycard To avoid any loss of data always follow the correct procedure for removing the card see the documentation for your operating system Open the slot cover 1 2 Pull the storage card out of the slot 1 Close the slot cover 2 38 Fujitsu ...

Page 41: ...t the SIM card Please note that the SIM card format must be micro SIM 3FF Other SIM card formats such as full size 1FF mini SIM 2FF or nano SIM 4FF do not fit in the SIM card slot of your Tablet PC Please do not insert any other format of SIM card as they may become twisted they could even damage the system Inserting a SIM card 2 1 Open the slot cover 1 Carefully push the SIM card into the slot 2 ...

Page 42: ...e installation of radio components not approved by Fujitsu will invalidate the certifications issued for this device Switching the wireless components on and off The radio components are switched on and off using the appropriate functions of the operating system To switch radio components on and off individually select Settings Change PC settings Network Airplane mode 40 Fujitsu ...

Page 43: ...odule is ready for use immediately You will find information on establishing the connection with the UMTS network in the documentation for the hardware used Your device can connect to the Internet via UMTS To do this use one of the following types of connection Integrated UMTS module availability dependent on your configuration a USB dongle a USB stick with your mobile phone provider s SIM card a ...

Page 44: ...Area Network 2 1 Connect the network cable to the LAN port of the cradle 1 Connect the network cable to your network connection 2 Your network administrator can help you to configure and use the LAN connections The network cable is not included in the delivery scope This type of cable can be obtained from a specialist dealer GPS GPS Whether your device has this function depends on the chosen equip...

Page 45: ...n handling the accessories Your docking cradle optional As well as fast charging your docking cradle is a device that also allows you to quickly connect your Tablet PC to your peripherals such as a monitor keyboard mouse etc You only need to dock the Tablet PC to be able to work with your peripheral devices Docking cradle components Ports Ports Cradle 1 2 3 3 4 5 6 7 1 Connector on the cradle for ...

Page 46: ...C off first Disconnect the AC adapter from the Tablet PC before connecting the Tablet PC to the cradle When the Tablet PC is connected to the cradle you must connect the AC adapter to the cradle Information for using the docking cradle If your Tablet PC is connected to the docking cradle the micro USB port of the Tablet PC cannot be used Use the alternative ports of the cradle The HDMI and VGA por...

Page 47: ... storage surface of the cradle Push the Tablet PC on to the cradle in the direction of the arrow 1 until you feel it engage on the connector Plug the AC adapter cable into the DC jack DC IN on the cradle 2 Connect the AC cable to the AC adapter 3 Plug the AC cable into the power outlet 4 Fujitsu 45 ...

Page 48: ...hile it is running However to prevent any problems we recommend that you switch the Tablet PC off first or that you execute the appropriate undocking function provided by the operating system Switch the Tablet PC off 1 While holding down the lower part of the cradle lift the Tablet PC from the cradle in the direction of the arrow 1 46 Fujitsu ...

Page 49: ...mized device for the convenient input of text It only needs to be docked with the Tablet PC Keyboard cover ports keyboardcover Ports 3 4 1 2 1 Release button 2 Sliding foot pulled out 3 Connector for the docking port of the Tablet PC 4 Status indicators Num Lock Caps Lock Scroll Lock Fujitsu 47 ...

Page 50: ... toppling of the Tablet PC and resulting damage always pull out the sliding foot when using the keyboard cover Fully pull out the sliding foot cover 1 Press the release button 2 until it firmly remains in pressed position red marking visible Push the Tablet PC on to the keyboard cover in the direction of the arrow until you feel it engage on the connector 3 48 Fujitsu ...

Page 51: ... Tablet PC optional Separating the Tablet PC from the keyboard cover 1 2 Press and hold the release button on the keyboard cover 1 Lift the Tablet PC away from the keyboard cover in the direction of the arrow 2 Fujitsu 49 ...

Page 52: ...you attach the screws use the correct tool and the correct tool size Keep the screws out of the reach of children 1 1 1 1 3 3 3 3 2 Remove the four screws 1 Position the VESA mount on the Tablet PC 2 Make sure that the screw holes of the VESA mount and of the Tablet PC lie exactly on top of each other Secure the VESA mount using the screws 3 50 Fujitsu ...

Page 53: ...the screws use the correct tool and the correct tool size Keep the screws and mounts out of the reach of children Do not use motorized screw driver so to not damage the screws 1 1 3 3 2 2 Remove the screws 1 Position the fittings 2 Secure the fittings using the screws 3 Fujitsu 51 ...

Page 54: ...Accessories for your Tablet PC optional Secure the shoulder strap to the fittings 52 Fujitsu ...

Page 55: ...unit is firmly fitted into the folio case fasteners so it will not fall out This folio case is only designed to contain and carry this unit Do not use it for any other purpose Do not put the folio case in a direct sunlight or expose to high temperature and humidity Position the Tablet PC on the folio case as shown Engage the top edge and then press it down The following illustration shows you the ...

Page 56: ...Accessories for your Tablet PC optional Micro USB adapters 5 USB adapters are available for the device Micro USB to USB adapter Micro USB to HDMI adapter Micro USB to VGA adapter 54 Fujitsu ...

Page 57: ...Accessories for your Tablet PC optional Micro USB to Display Port adapter Micro USB to LAN adapter For technical specifications see chapter USB adapters Page 82 Fujitsu 55 ...

Page 58: ...e forgetting your password you may be locked out of the system and unable to access your data Therefore please note the following information Back up your data on external data carriers at regular intervals Some security functions need you to choose passwords Make a note of the passwords and keep them in a safe place If you forget your passwords you will need to contact our Service Desk Deletion o...

Page 59: ...cord the image of a fingerprint With additional fingerprint software this image can be processed and used instead of a password 1 1 Install the fingerprint software to be able to use the fingerprint sensor 1 You can obtain further information on the fingerprint sensor in the appendix Miscellaneous Information Fujitsu 57 ...

Page 60: ...DD password will only give you access to some of the functions You can only set a user HDD password when a supervisor HDD password has already been assigned Calling and using the BIOS Setup Utility is described in the chapter Settings in BIOS Setup Utility Page 67 Assigning the supervisor and user passwords Start the BIOS Setup Utility and go to the Security menu Select the Set Supervisor Password...

Page 61: ...PC is rebooted and the password is removed Removing the supervisor password simultaneously deactivates the user password Password protection for booting the operating system You can also prevent booting of the operating system with the supervisor HDD password you have set in the BIOS Setup Utility see section Assigning the supervisor and user passwords Page 58 Operatingsystem Activating system pro...

Page 62: ...e way as for the set up of the first hard disk Drive0 The field Password Entry on Boot is set to Enabled by default You can exit the BIOS Setup once you have finished changing the settings From the Exit menu choose the option Exit Saving Changes Press the Enter key and select Yes The Tablet PC reboots and your hard disk is now protected with a password The password prompt is enabled as soon as the...

Page 63: ... In order to be able to take advantage of all the security features of your Tablet PC you will need a CardOS SmartCard from Fujitsu The SmartCard can only be used with a PIN so maximum protection is maintained even when the SmartCard is lost In order to maximize your security the CardOS SmartCard is disabled if three incorrect attempts are made to enter the PIN During first time use of your CardOS...

Page 64: ...ar the holder in the TPM using Clear Security Chip With Enabled all secret keys e g SRK Storage Root Keys AIK Attestation Identity Keys etc generated by applications are deleted Take note that you can then no longer access the data you have encrypted on the holder based keys Select the Exit Saving Changes option in the Exit menu Press the Enter key and select Yes The Tablet PC restarts and the TPM...

Page 65: ...or not devices need to be switched off please refer to the documentation supplied with your external device Some of the external devices require special drivers see the operating system and external device documentation Connecting devices to the Tablet PC or to the docking cradle 1 Switch off the Tablet PC and all the external devices 2 Disconnect the AC plugs for the Tablet PC and all the affecte...

Page 66: ...e and Sound Deactivate the settings for DTS Audio and Dolby Digital to enable playback of HDMI sound VGA monitor port via optional docking cradle An analog monitor is connected to the analog VGA monitor port Screen output is limited to a maximum of two screens at the same time Monitor VGAport Screenconnection Monitorconnection Switch off the Tablet PC and the external monitor Plug the data cable o...

Page 67: ...the documentation for the USB devices Connect the data cable to the external device Connect the data cable to a USB port Tablet PC or docking cradle or micro USB port only on Tablet PC Device drivers USB devices will be automatically recognized and installed by your operating system For optional micro USB accessories cables see chapter Micro USB adapters Page 54 How to remove USB devices correctly...

Page 68: ...e headphone port Connect the audio cable to the external device Connect the audio cable to the headphone port of the Tablet PC The internal speakers are disabled If you buy a cable from a retailer please note the following information The headphone port on your Tablet PC is a 3 5 mm jack socket If you want to connect headphones or speakers you will need a 3 5 mm jack plug 66 Fujitsu ...

Page 69: ... take effect as soon as you save and exit the BIOS Setup Utility The BIOS Setup Utility program contains the following menus About Displays information relating to the BIOS processor and Tablet PC System Advanced system settings Advanced Configuration of various hardware components such as mouse keyboard processor Security Password settings and security functions Boot Configuration of the start up...

Page 70: ...he BIOS Setup Utility With the F9 key you can load the default settings of the BIOS Setup Utility Use the cursor keys or to select the menu you wish to access to make changes The menu is displayed on the screen Select the option you want to change with the cursor keys or Press the Enter key Press the ESC key to exit the selected menu For future reference make a note of the changes you have made fo...

Page 71: ...ndard entries for all menus of the BIOS Setup Utility choose Load Setup Defaults and Yes Discard Changes Discard Changes without exiting BIOS Setup Utility To discard the changes you have made select Discard Changes and Yes The settings in place when BIOS Setup Utility was called remain effective You can now make additional settings in the BIOS Setup Utility If you want to exit the BIOS Setup Util...

Page 72: ...ct Our notebooks have been designed primarily with mobile applications in mind This means that considerable effort has been made to optimize components and equipment in terms of weight space and energy requirements Depending on the particular configuration you have purchased it is possible that functionality may be slightly reduced compared to a desktop PC if you are running processor intensive ga...

Page 73: ...ttery is discharged Charge the battery or Connect the Tablet PC to a power outlet using the AC adapter The Tablet PC s touchscreen remains dark Touchscreen darktouchscreen Cause Troubleshooting Touchscreen is switched off Press a key external keyboard or tap on the touchscreen External monitor or television set connected Check whether the graphics driver settings are correct or whether an external...

Page 74: ...et PC and the external monitor if it is plugged in with a connector Switch on the external monitor and the Tablet PC The external monitor is blank or the image is unstable Monitor Monitor Cause Troubleshooting The wrong external monitor has been selected or the wrong screen resolution has been set for the application program Terminate the application program in Windows If the error persists after ...

Page 75: ... is discharged Charge the battery or Connect the AC adapter to the Tablet PC The AC adapter is not properly connected Check whether the AC adapter is properly connected to the Tablet PC Switch the Tablet PC on The Tablet PC stops working TabletPC Ending Cause Troubleshooting The Tablet PC is in energy saving mode End energy saving mode An application program has caused the malfunction Close the ap...

Page 76: ...ing the wireless components on and off Page 40 The wireless component is switched on Despite this the wireless connection to a network does not work Check whether the wireless connection is enabled by the software Further information on using the wireless component can be found in the help files The battery discharges too quickly Battery Cause Troubleshooting The battery is either too hot or too c...

Page 77: ...or SmartCard lost If you have lost your user SmartCard you can continue working with the supervisor SmartCard and initialize a new user SmartCard or deactivate the SystemLock function If you have lost the supervisor SmartCard you can also continue working but you no longer have all rights and cannot initialize another supervisor SmartCard If you have lost both SmartCards you cannot boot your syste...

Page 78: ...stem configuration information is incorrect Switch the Tablet PC off Switch the Tablet PC on Keep the volume button and the shortcut button pressed and switch the Tablet PC on If you keep the volume button pressed during the boot process you can switch into the BIOS Setup In the BIOS Setup select the Exit menu Select the entry Load Setup Defaults Select OK and press the Enter key Extended memory f...

Page 79: ...t button to boot the operating system Keep the tablet button pressed and switch on the Tablet PC to access BIOS Setup Real time clock error Contact your sales outlet or our customer service center nnnnK Shadow RAM failed at offset xxxx Failing Bits zzzz Contact your sales outlet or our customer service center System battery is dead Replace and run SETUP Contact your sales outlet or our customer se...

Page 80: ...splay with LED background lighting Digitizer and glass panel Dual digitizer with Glare touchscreen Cameras Front HD camera Back 8 megapixels autofocus mobile light Graphics card Chip Intel HD graphics Maximum resolution of external display 1920 x 1080 1080p Dimensions Width x Depth x Height 10 51 in x 7 12 in x 51 in 267 0 x 180 8 x 9 9 mm 16 0 mm depending on the back shell Weight depending on co...

Page 81: ... 11 Mbps 300 ft 91 m 1 Mbps 802 11g 100 ft 30 m 54 Mbps 300 ft 91 m 1 Mbps 802 11n Estimated double the operating distance of 802 11g and 802 11a in their respective frequencies Number of channels 802 11a 8 independent channels 802 11b g 11 channels 3 non overlapping channels 802 11n Channel bonding takes two of the non overlapping 20MHz channels and combines it into one 40MHz channel It is actual...

Page 82: ... 12 V Max rated current 3 A An additional AC adapter or AC cable can be ordered at any time Docking cradle optional Electrical data Safety regulations complied with CE Protection class II Ports HDMI 1 x USB Universal Serial Bus 3 x USB 2 0 Docking port 18 pin VGA monitor port 1 x LAN port 1 x Ambient conditions Environment class DIN IEC 721 7K1 Mechanism class DIN IEC 721 7M2 Operating temperature...

Page 83: ...C 41 F 95 F Transport temperature 15 C 60 C 5 F 140 F VESA mount optional Dimensions Width x Depth x Height 230 mm x 138 mm x 14 1 mm 9 06 in x 5 43 in x 0 56 in Weight 90 g 198 bs Shoulder strap optional Dimensions Width x Depth x Height 49 80 in x 98 in x 0 189 in 1265 mm x 25 mm x 4 8 mm Weight Approx 074 lbs 33 4 g Folio case optional Dimensions Width x Depth x Height 18 11 in x 10 75 in x 0 6...

Page 84: ...x resolution Micro USB to USB adapter 6 inches N A Micro USB to HDMI adapter 6 inches 1920 x 1080 Micro USB to VGA adapter 6 inches 1920 x 1080 Micro USB to Display Port adapter 6 inches 1920 x 1080 Micro USB to LAN adapter 6 inches N A 82 Fujitsu ...

Page 85: ...RC has drop off points at tens of thousands of locations throughout the United States and Canada To find the location nearest you go to www RBRC org or call 1 800 822 8837 If there are no convenient RBRC locations near you you can also go to the EIA Consumer Education Initiative website http EIAE org and search for a convenient disposal location Remember protecting the environment is a cooperative...

Page 86: ...t that is on a different circuit than the receiver Consult the dealer or an experienced radio TV technician for help DOC Industry CANADA notice DOC INDUSTRYCANADA NOTICES Radios and Television This Class B digital apparatus meets all requirements of Canadian Interference Causing Equipment Regulations CET appareil numérique de la class B respecte toutes les exigence du Réglement sur le matérial bro...

Page 87: ...tion If this equipment does cause harmful interference to radio or television reception which can be determined by turning the equipment off and on the user is encouraged to try to correct the interference by one or more of the following measures 1 Reorient or relocate the receiving antenna 2 Increase the distance between the equipment and the receiver 3 Connect the equipment to an outlet on a cir...

Page 88: ... policy regarding use of radio devices in specific environments is not clear e g airports hospitals chemical oil gas industrial plants private buildings obtain authorization to use these devices prior to operating the equipment Regulatory Information Disclaimers Export restrictions This product or software contains encryption code which may not be exported or transferred from the US or Canada with...

Page 89: ...the computer also reduces the speed of any active Ethernet network links To wake the computer from Sleep mode press the Suspend Resume Button Energy saving benefits Fujitsu ENERGY STAR qualified mobile PCs use about half as much electricity as standard equipment saving half in utility costs But more than that ENERGY STAR also makes a difference for the environment Did you know that the average hou...

Page 90: ...all the essential access software using Fujitsu Software Auto Installer To make a copy of the recovery image to DVD disks you will need three or four blank disks to create the copy After creating the copy be sure to label the disks and keep them in a safe place to ensure they do not get damaged Note If your system does not have an internal writable DVD drive connect your system to an external driv...

Page 91: ... save the software packages to the external writable media or drive 4 Click on the Save Packages button 5 Fujitsu Software Extractor copies the zipped software packages and Readme files and extracts the Auto Installer folder to the selected location Note The extracted Auto Installer will later be used to install the software automatically on the system in the event of generic image restoration whe...

Page 92: ...ity to proceed 5 Three tool options appear Diagnostics Recovery and Utility refer to the Recovery and Utility tools section below for instructions on how to use these tools 6 If this was successful please skip the next step and go to Recovery and Utility tools 7 If this was NOT successful please go to the next step Running Recovery and Utility from the Bootable disk To verify change the boot up pr...

Page 93: ... Recovery tool The Recovery tool contains two options Restore C Drive Restore recovery image only C drive Restore Full Hard Drive Restore recovery image full hard drive You can use these tools to restore the Recovery Image from the hidden partition and perform a full hard drive recovery Please refer to instructions above for details on how to create a Recovery Image Restore the Recovery Image from...

Page 94: ... disk including all partitions To delete hard disk data 1 Click the Hard Disk Data Delete button The progress bar appears followed by the EULA screen 2 Agree to the EULA and click Next 3 Choose the hard disk from which the data should be deleted in the list of hard disks and click Next The Partition Creation utility is used to change the C and D drive partition sizes To run this utility This is no...

Page 95: ...ecting Agree option and clicking Next 9 Click Next on the Recovery Disk Check screen to verify that the bootable disk has been inserted into the optical drive 10 The Checking for Recovery Disk screen appears followed by the prompt to insert the first disk Click OK to continue Repeat this step for all disks After all recovery disks have been checked and the check has been completed click Next 11 Fo...

Page 96: ... for Fujitsu Software Auto Installer accept the EULA otherwise continue 5 Then Fujitsu Software Auto Installer user interface will be launched providing ability to auto install the essential access software on the system 6 It is recommended that you install all the software in the listed order You can Select All to install the software in the order listed 7 Click Install to start the installation ...

Page 97: ...llation support for the software downloaded from support website 1 Download FSDM Fujitsu Software Download Manager from the support site and download all the drivers applicable to the model and OS using FSDM if they are not downloaded yet 2 When the software packages are downloaded from web it is important to download the Auto Installer Software package and the model language specific Readme file ...

Page 98: ...l allow you to view and download a list of the most current drivers utilities and applications to determine whether you have the latest versions To download the FSDM Utility go to the Support Site http support fujitsupc com CS Portal support do srch DOWNLOADS If you are planning on downgrading upgrading or changing versions of your operating system during this process please see the User s Guide f...

Page 99: ...dphones 66 Cradle 43 Connecting a Tablet PC 44 D dark touchscreen 71 Date not correct 71 Declaration of conformity 83 Devices connecting 63 disconnecting 63 Display orientation select 25 DOC INDUSTRY CANADA NOTICES 84 E Ending energy saving mode 73 Energy Energy consumption 36 Energy saving 13 Energy saving functions 36 Error messages on the screen 76 Errors Acoustic warnings 76 Screen messages 76...

Page 100: ...oes not print 74 R Radio components Safety notes 12 Rechargeable battery see battery 35 Regulatory information Notebooks with radio device 85 Notebooks without radio device 84 S Safety information 12 Screen connection see VGA port 64 Security functions 56 SmartCard 61 SystemLock 61 Service life battery 35 Set up Device 18 Setup see BIOS Setup Utility 67 Slot Memory cards 37 Status indicators 21 St...

Page 101: ...1 TPM 62 Transport 13 Damage during transportation 17 Troubleshooting 70 Trusted Platform Module 62 U USB ports 65 User HDD password changing 59 User password entering 58 removing 59 V VGA port 64 W Webcam 35 Winter time 71 Wireless LAN Safety notes 12 Wrong date time 71 Fujitsu 99 ...

Reviews: