background image

4.3.3

Collecting


a


Snapshot

A


snapshot


is


used


to


investigate


in


detail


a


hardware


failure.

Before


collecting


a


snapshot,


contact


your


local


Fujitsu


service


center.

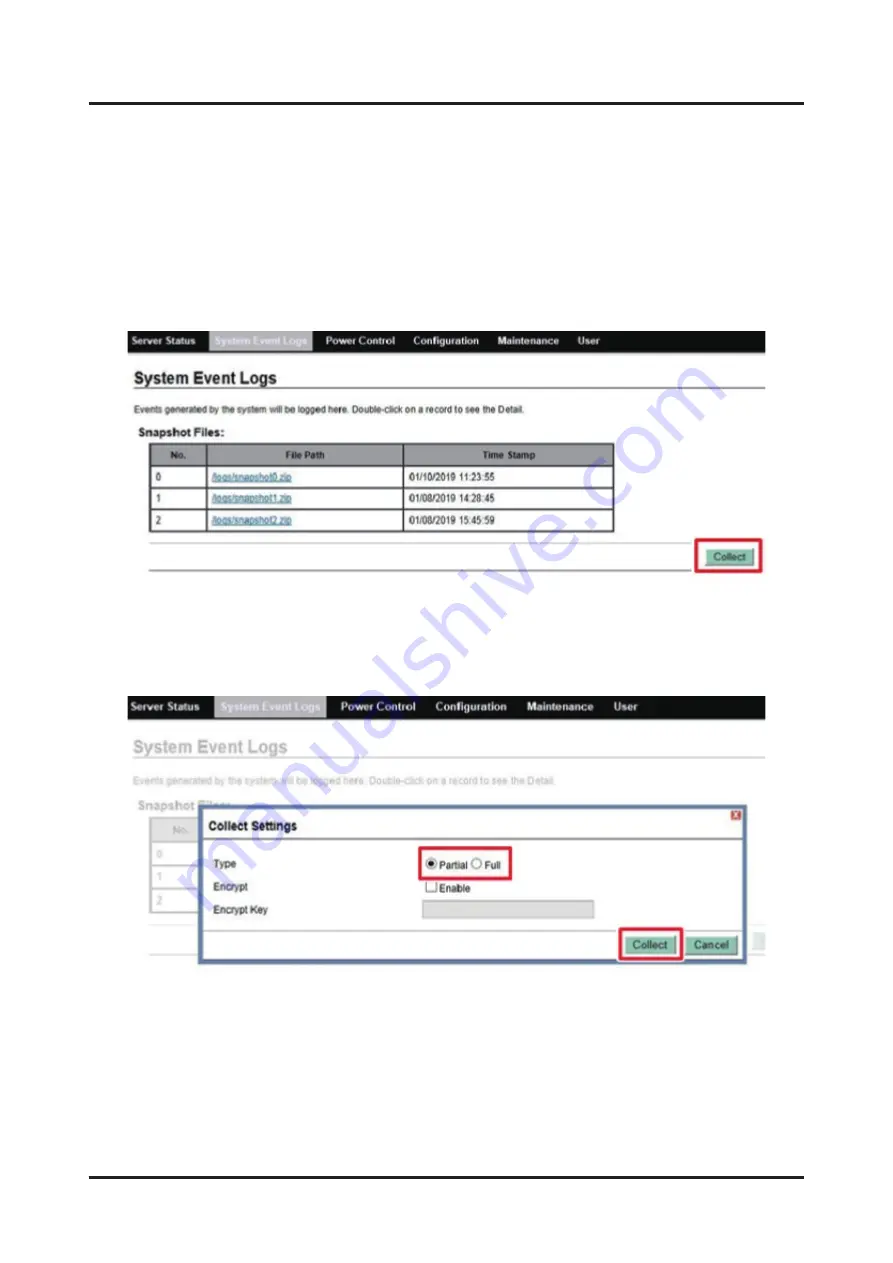
1.

Click


the


[Collect]


button


under


[Snapshot


Files:].

The


[Collect


Settings]


dialog


box


appears.

Figure


4.9


Clicking


the


[Collect]


Button

2.

Specify


settings


in


[Type]


and


[Encrypt],


and


click


the


[Collect]


button.

A


message


appears.

Figure


4.10


Specifying


Settings


in


[Type]


and


[Encrypt]

Chapter


4


Basic


Software


Procedures

C120-0090-04EN

4.3


System


Event


Log


(SEL)

31

Summary of Contents for Supercomputer PRIMEHPC FX700

Page 1: ...FUJI T SUSuper co mpute r PRI M EHPC FX7 00 Upg radeandMa i nt enance Manual FUJITSU Supercomputer PRIMEHPC FX700 Upgrade and Maintenance Manual C120 0090 04EN ...

Page 2: ...Information This chapter contains important information for using this product correctly and safely Chapter 3 Basic Hardware Procedures This chapter describes the use of diagnostic information as well as hardware handling procedures Chapter 4 Basic Software Procedures This chapter describes software procedures related to operation including starting maintenance work updating HCP firmware and colle...

Page 3: ... Chapter 9 Chapter 10 Appendix A Updated Table 1 5 Tools Required and Screws Used for FX700 Maintenance Work Updated 4 2 Updating HCP Firmware Updated 4 4 Controlling Nodes Updated 5 2 6 Final Steps Updated 8 2 Replacing an InfiniBand Card Updated 9 2 4 Final Steps Updated 10 2 4 Final Steps Updated A 2 1 2 Front Panel Buttons This chapter describes the handling of the BMCIFU Appendix A External V...

Page 4: ...els Updated 2 1 Installation Precautions Updated 4 6 2 Displaying Configuration Information Updated 10 1 Basic Information and 10 2 Replacing the BAREBONE Updated A 1 3 LANs of the FX700 Main Unit 1 The numbers titles of the chapters sections to which changes are made are those used in the latest version However the numbers titles of the chapters sections with an asterisk are those used in the old...

Page 5: ...l in a safe and convenient location for quick reference Fujitsu makes every effort to prevent injury to users and bystanders as well as property damage Be sure to use the product in accordance with the instructions in the manual Notes on This Product This product is designed and manufactured for use in standard applications such as office work personal devices and general industrial use The produc...

Page 6: ...2 285 Export Related North America Standard Number IATA Dangerous Goods Regulations 58th Edition 2017 Regulations on transport of lithium lithium ion batteries and electric double layer capacitors Foreign Exchange and Foreign Trade Control Law of Japan North American Free Trade Agreement NAFTA FIPS 140 Federal Information Processing Standardization 140 U S federal standards that specify security r...

Page 7: ...mical regulation REACH No 1907 2006 Directive 2006 66 EC of the European Parliament and of the Council of 6 September 2006 on batteries and accumulators and waste batteries and accumulators and repealing Directive 91 157 EEC Waste Electrical and Electronic Equipment Directive WEEE Directive European Parliament and Council Directive 94 62 EC of 20 December 1994 on packaging and packaging waste Expo...

Page 8: ...nd Services by the State and Other Entities Act on Promoting Green Procurement Act on the Promotion of Effective Utilization of Resources Export Related Japan Standard Number IATA Dangerous Goods Regulations 58th Edition 2017 Regulations on transport of lithium lithium ion batteries and electric double layer capacitors Fundamental notices of customs law Safety Radio and Harmonics South Korea Certi...

Page 9: ... ion batteries and electric double layer capacitors Foreign Exchange and Foreign Trade Control Law of Japan Export Administration Regulations EAR This equipment is Class A information technology equipment Operation of this equipment in a residential area may cause radio interference in which case the user may be required to correct the interference at the user s own expense VCCI A Australia New Ze...

Page 10: ...nnect the equipment into an outlet on a circuit separate from that connected to the receiver Consult a reseller or experienced radio TV technician for support Fujitsu is not responsible for any radio or television interference caused by unauthorized modification of this equipment or the substitution or attachment of connecting cables and equipment other than those specified by Fujitsu The user sha...

Page 11: ...anual is supplied with the product Font or Symbol Meaning Example AaBbCc123 Indicates what is input by users and displayed on screens This font is used to indicate command input examples adduser jsmith AaBbCc123 Indicates the names of commands files and directories output by the computer and displayed on screens This font is used to indicate command output examples in boxes Shell showinfo M 2 Slot...

Page 12: ...arks of their respective owners Trademark indications TM R are omitted for some system and product names in this document This document shall not be reproduced or copied without the permission of the publisher All Rights Reserved Copyright FUJITSU LIMITED 2020 Safety Precautions C120 0090 04EN xi ...

Page 13: ...r other property Notes on Product Handling Maintenance Modifying or Recycling the Product Disposal or Recycling of Products That Have Completed Their Life Cycle Waste must be disposed of in a professional and responsible way in accordance with environmental regulations For details please contact your nearest environmental authority or our sales representative Handling Lithium Batteries This produc...

Page 14: ...ling Optional Equipment 6 2 5 Other Precautions 6 2 6 Regulations 6 2 6 1 CE Compliance 6 2 6 2 FCC Class A Declaration of Conformity 7 2 7 Environmental Protection 7 Chapter 3 Basic Hardware Procedures 9 3 1 Using Diagnostic Information 9 3 1 1 Identifying the FX700 Main Unit 9 3 1 2 Determining the Error Level 9 3 1 3 Identifying a Faulty Part 9 3 2 Shutting Down the FX700 Main Unit 10 3 3 Disco...

Page 15: ...CIE 00 18 3 22 3 Installing the Slot Cover on the Riser Module 21 3 22 4 Removing the Slot Cover From the Riser Module 21 3 23 Removing the Front Bezel 22 3 24 Installing the Front Bezel 22 Chapter 4 Basic Software Procedures 23 4 1 Maintenance Work 23 4 1 1 Setting Maintenance Mode 23 4 1 2 Clearing Maintenance Mode 24 4 1 3 Precaution on Maintenance Mode 25 4 2 Updating HCP Firmware 25 4 2 1 Reg...

Page 16: ...eps 40 5 3 2 Removing the Dummy Blade 41 5 3 3 Installing the Blade 41 5 3 4 Final Steps 41 Chapter 6 PSU Power Supply Unit 42 6 1 Basic Information 42 6 2 Replacing a PSU 43 6 2 1 Preliminary Steps 43 6 2 2 Removing the PSU 43 6 2 3 Installing the PSU 44 6 2 4 Final Steps 45 6 3 Adding a PSU 45 6 3 1 Advance Preparation 45 6 3 2 Removing the Dummy PSU 45 6 3 3 Installing the PSU 46 6 3 4 Final St...

Page 17: ... 2 1 Preliminary Steps 59 9 2 2 Removing the M 2 SSD 59 9 2 3 Installing the M 2 SSD 60 9 2 4 Final Steps 61 9 3 Adding an M 2 SSD 62 9 3 1 Preliminary Steps 62 9 3 2 Installing the M 2 SSD 62 9 3 3 Final Steps 62 Chapter 10 BAREBONE Barebones Server 63 10 1 Basic Information 63 10 2 Replacing the BAREBONE 64 10 2 1 Preliminary Steps 64 10 2 2 Removing the BAREBONE 65 10 2 3 Installing the BAREBON...

Page 18: ...ain Unit 73 A 1 2 Rear Configuration of the FX700 Main Unit 73 A 1 3 LANs of the FX700 Main Unit 74 A 1 4 Internal Configuration of the FX700 Main Unit 75 A 1 5 Internal Blade Configuration 75 A 2 Indicator Lamps and Controls 76 A 2 1 Server Front 76 A 2 2 Server Rear 79 A 2 3 Blade Rear 82 Contents C120 0090 04EN xvii ...

Page 19: ...he Collect Button 31 Figure 4 10 Specifying Settings in Type and Encrypt 31 Figure 4 11 Message Displayed 32 Figure 4 12 Display During Snapshot Collection 32 Figure 4 13 Downloading a Snapshot 33 Figure 4 14 Collecting an Environment Log 33 Figure 4 15 Power Control Screen 34 Figure 4 16 Specifying a Start Mode 34 Figure 4 17 Setting the Date and Time 36 Figure 5 1 Rear Configuration of the FX700...

Page 20: ... Figure A 2 Front Configuration of the FX700 Main Unit Without the Front Bezel 73 Figure A 3 Rear Configuration of the FX700 Main Unit 74 Figure A 4 Rear Locations for the LANs of the FX700 Main Unit 74 Figure A 5 Internal Configuration of the FX700 Main Unit 75 Figure A 6 Internal FX700 Blade Configuration 75 Figure A 7 Front Panel LEDs 76 Figure A 8 Front Panel Buttons 78 Figure A 9 Locations of...

Page 21: ...nce Work 3 Table 4 1 SEL Display Items and Displayed Contents 29 Table 4 2 Specifying Filter Conditions 30 Table 4 3 Specifying Settings in Type and Encrypt 32 Table 4 4 Collecting an Environment Log 33 Table 4 5 Specifying a Start Mode 35 Table 4 6 Display Items on the Power Control Screen 35 Table 4 7 Setting the Date and Time 36 Table 5 1 Mounting Order in Blade Installation 39 Table 9 1 M 2 SS...

Page 22: ...ons thoroughly in Chapter 2 Important Information Confirm that you have all the required manuals See the documentation overview shown in Manuals in This Series If necessary print the PDF files Check the work procedure classification shown in 1 1 Work Procedure Classification Confirm that you have all the required tools according to 1 3 Required Tools 1 1 Work Procedure Classification The work proc...

Page 23: ...ns Remove from rack and disassemble Yes To be able to do the work remove the FX700 main unit from the rack when applicable Transport Carry No The work of moving the FX700 main unit to a workbench as required varies depending on the environment Maintenance work Yes Perform maintenance work including software preparation and post work operations Assemble and mount in rack Yes Assemble the FX700 main...

Page 24: ...2 No 2 To secure top cover To secure expansion card To secure slot cover To secure M 2 SSD To secure riser module M3 Phillips PH2 No 2 To secure chassis To secure front bezel M5 Panel fastener Phillips PH2 No 2 To secure BMCIFU M3 Panel fastener 1 3 Required Tools When preparing for maintenance work confirm that you have all the required tools according to the following table The table lists the t...

Page 25: ...ases and salt spray may corrode the equipment which can lead to malfunctions and damage dramatically shortening the service life of the equipment Therefore measures such as installing an air cleaning system are required Also using the product in an environment exposed to dust may cause malfunctions and shorten the service life of the equipment by damaging memory media or by impeding equipment cool...

Page 26: ...cessory power cord for other equipment or anything other than its intended purpose The supplied power cord is designed to be connected to and used with the FX700 main unit and its safety has been confirmed Never use power cords from other products or for anything other than their intended purpose Otherwise fire or electric shock may result Do not use cleaning spray containing flammable substances ...

Page 27: ...equipment only after disconnecting the power plugs of the FX700 main unit and connected equipment from the outlets Otherwise electric shock may result Only connect Fujitsu recommended products to this product Doing so may cause malfunctions fire or electric shock Do not insert a finger into the connector insertion opening Doing so may cause electric shock Do not use the FX700 main unit in proximit...

Page 28: ...su is not responsible for any radio or television interference caused by unauthorized modification of this equipment or the substitution or attachment of connecting cables and equipment other than those specified by Fujitsu The user shall be responsible for correcting the interference caused by such unauthorized modification substitution or attachment The use of shielded I O cables is required whe...

Page 29: ... EU guidelines batteries must not be disposed of with unsorted domestic waste They can be returned free of charge to the manufacturer the dealer or an authorized agent for recycling or disposal All batteries containing pollutants are marked with a symbol a crossed out garbage can They are also marked with the chemical symbol for the heavy metal that causes them to be categorized as containing poll...

Page 30: ...ink or use an IPMI command to turn on the LED After successfully completing the maintenance work be sure to turn off the identification LED 3 1 2 Determining the Error Level You can determine the error level from level in the format of the SNMP trap notification Using the Web GUI you can also identify the error level from the FRU information screen For details on how to log in see 3 1 1 FRU Inform...

Page 31: ...llowing is the procedure for disconnecting external cables from the blade 1 Disconnect external cables from the blade Remarks If your finger is too big to touch the connector lock when disconnecting a LAN or other cable the cable cannot be removed In that case unlock the connector lock by pushing it with a flathead screwdriver Then remove the cable by pulling it and the screwdriver out together 3 ...

Page 32: ...e PSU in the FUJITSU Supercomputer PRIMEHPC FX700 Operating Manual C120 0089EN To hot swap a PSU see Chapter 6 PSU Power Supply Unit 3 8 Removing the Dummy PSU See 3 12 Installing Removing the Dummy PSU in the FUJITSU Supercomputer PRIMEHPC FX700 Operating Manual C120 0089EN To perform active addition of a PSU see Chapter 6 PSU Power Supply Unit 3 9 Removing the FANU See 3 13 Installing Removing t...

Page 33: ...e FX700 Main Unit From the Rack 1 Disconnect all external cables 2 To remove the chassis from the rack remove all of the blades PSUs and FANUs from the FX700 main unit See 3 5 Removing the Blade 3 7 Removing the PSU and 3 9 Removing the FANU 3 Remove it from the rack and disassemble See 4 2 Removing the Chassis in the FUJITSU Supercomputer PRIMEHPC FX700 Operating Manual C120 0089EN 3 11 Removing ...

Page 34: ...r tools have been left in the chassis See Chapter 2 Important Information 2 Lift 1 and remove 2 the top cover 3 12 Installing the Top Cover 1 Insert the top cover 1 Lower the top cover 2 Chapter 3 Basic Hardware Procedures C120 0090 04EN 3 12 Installing the Top Cover 13 ...

Page 35: ...in unit be careful not to allow the rack to topple 2 Secure the top cover with screws 3 13 Installing the FX700 Main Unit in the Rack Chapter 3 Basic Hardware Procedures C120 0090 04EN 3 13 Installing the FX700 Main Unit in the Rack 14 ...

Page 36: ...ating Manual C120 0089EN 3 16 Installing the PSU See 3 10 Installing Removing the PSU in the FUJITSU Supercomputer PRIMEHPC FX700 Operating Manual C120 0089EN To perform active replacement addition of a PSU see Chapter 6 PSU Power Supply Unit 3 17 Installing the Dummy PSU See 3 12 Installing Removing the Dummy PSU in the FUJITSU Supercomputer PRIMEHPC FX700 Operating Manual C120 0089EN 3 18 Instal...

Page 37: ...anual C120 0089EN 3 21 Powering On the FX700 Main Unit The following is the procedure for powering on the FX700 main unit 1 Press the power button on the front panel 1 The FX700 main unit starts up For details see A 2 Indicator Lamps and Controls 3 22 Handling the Riser Module This section describes the riser modules The two riser modules are PCIECARD 00 and PCIECARD 01 Chapter 3 Basic Hardware Pr...

Page 38: ...Numbers Top View of the Blade 3 22 1 Removing the Riser Module for PCIE 00 1 If necessary remove cables from the blade 2 Remove the fixing screw Circled part 3 Lift and remove the riser module Chapter 3 Basic Hardware Procedures C120 0090 04EN 3 22 Handling the Riser Module 17 ...

Page 39: ...ule for PCIE 00 1 Mount the riser module in the blade and push the green touchpoints down Circled parts 2 Secure it with a fixing screw Circled part Chapter 3 Basic Hardware Procedures C120 0090 04EN 3 22 Handling the Riser Module 18 ...

Page 40: ...e Guide for PCIECARD 00 confirm that the riser module is correctly inserted in the guide Circled part 3 If necessary connect cables to other components Chapter 3 Basic Hardware Procedures C120 0090 04EN 3 22 Handling the Riser Module 19 ...

Page 41: ... the riser module is not suspended Suspended which is not acceptable Figure 3 2 Riser Module Guide for PCIECARD 00 Figure 3 3 Riser Module Suspended Problem Chapter 3 Basic Hardware Procedures C120 0090 04EN 3 22 Handling the Riser Module 20 ...

Page 42: ... opening at the front of the riser module 2 Secure the slot cover to the riser module with a screw Circled part 3 22 4 Removing the Slot Cover From the Riser Module 1 Remove the screw from the riser module Circled part 2 Pull the slot cover out of the riser module in the direction of the arrow Chapter 3 Basic Hardware Procedures C120 0090 04EN 3 22 Handling the Riser Module 21 ...

Page 43: ...ront bezel fixing screws circled parts and remove the front bezel 3 24 Installing the Front Bezel The following is the procedure for installing the front bezel 1 Insert the left and right guide pins into the chassis and secure the bezel with two screws Chapter 3 Basic Hardware Procedures C120 0090 04EN 3 24 Installing the Front Bezel 22 ...

Page 44: ... Mode You can replace every service part from Cold Maintenance Before replacing a part disconnect the power cords For active replacement while nodes are operating configure settings for each CMU PSU FANU For the setting procedure see 4 1 1 Setting Maintenance Mode For precautions on FANU failures see 4 1 3 Precaution on Maintenance Mode 4 1 1 Setting Maintenance Mode 1 Log in to the Web GUI For de...

Page 45: ...irm that the location LED of the device requiring maintenance the one with the selected radio button lights up 4 1 2 Clearing Maintenance Mode 1 Log in to the Web GUI For details on how to log in see 2 1 Login and Logout in the FUJITSU Supercomputer PRIMEHPC FX700 BMC User s Guide C120 0091EN 2 Select Maintenance from the menu The Maintenance screen appears 3 Click the Exit Maintenance button at t...

Page 46: ... settings from the Web GUI Selecting and registering HCP firmware from Firmware Update For the setting procedure see 4 2 1 Registering HCP Firmware For the precaution during updates see 4 1 3 Precaution on Maintenance Mode Applying HCP firmware For the setting procedure see 4 2 2 Applying HCP Firmware Remarks Before selecting Firmware Update confirm that Running Status is Stop for all nodes 4 2 1 ...

Page 47: ...ing the already registered HCP firmware Figure 4 4 Confirmation Dialog Box 5 Click the OK button Registered in HCP Version displays the version number of the registered HCP firmware Remarks HCP firmware registration takes about 5 minutes to complete If the HCP firmware registration fails try again to register it Chapter 4 Basic Software Procedures C120 0090 04EN 4 2 Updating HCP Firmware 26 ...

Page 48: ...nutes to complete 4 The BMC may restart and not be accessible to the Web GUI during HCP firmware application For this reason select Firmware Update in Maintenance from the menu again The Firmware Update screen appears 5 Confirm that both Current in HCP Version and Current Unit Version display the version number of the applied HCP firmware 4 2 3 Precaution During Updates If the uploaded HCP archive...

Page 49: ...he System Event Logs screen displays the 3 000 most recent events that occurred in the FX700 main unit The screen displays 200 events per page 1 Log in to the Web GUI 2 Select System Event Logs from the menu The System Event Logs screen appears and Logs at the bottom of the screen displays a SEL list Chapter 4 Basic Software Procedures C120 0090 04EN 4 3 System Event Log SEL 28 ...

Page 50: ...isplays the error status EAlarm Immediately stop using the part indicated as suspect The suspected unit must be replaced immediately Alarm After the job is completed stop using the part indicated as suspect Then that FRU must be replaced immediately Warning Continue using the part indicated as suspect The suspected unit must be replaced during scheduled maintenance Normal Neither the part indicate...

Page 51: ...one of the check boxes for Specified can be checked If the Specified radio button is selected check the check boxes of the FRUs to display in Logs Multiple selections allowed FRUE If the All radio button is selected none of the check boxes for Specified can be checked If the Specified radio button is selected check the check boxes of the FRUEs to display in Logs Multiple selections allowed Remarks...

Page 52: ...ce center 1 Click the Collect button under Snapshot Files The Collect Settings dialog box appears Figure 4 9 Clicking the Collect Button 2 Specify settings in Type and Encrypt and click the Collect button A message appears Figure 4 10 Specifying Settings in Type and Encrypt Chapter 4 Basic Software Procedures C120 0090 04EN 4 3 System Event Log SEL 31 ...

Page 53: ...ecting appears as shown in Figure 4 12 Display During Snapshot Collection when snapshot collection begins Figure 4 12 Display During Snapshot Collection 4 After collection wait a moment before clicking the Refresh button at the upper right of the screen File Path in Snapshot Files displays the file name for the snapshot on the BMC when snapshot collection is completed 5 Click the BMC file path dis...

Page 54: ...lure Before collecting an environment log contact your local Fujitsu service center 1 Specify a node number and log type in Environment Logs and click the Download button Figure 4 14 Collecting an Environment Log 4 4 Controlling Nodes Control the power of the FX700 main unit and nodes as shown below 4 4 1 Power Operations 1 Log in to the Web GUI 2 Select Power Control from the menu The Power Contr...

Page 55: ...fault Figure 4 15 Power Control Screen 3 Specify an operation in Power Control for a node For a powered off node you can specify either of the following For a powered on node you can specify any of the following Remarks Check the Power On All check box to specify Power On as the selection in Power Control for all nodes 4 Specify a start mode in Boot Script Number Figure 4 16 Specifying a Start Mod...

Page 56: ...arm R ReservedAlarm Alarm RR U ResetRequest U Alarm RR C ResetRequest C Warning W Warning Warning Normal Normal Not Present CMU not mounted Unknown Failed to retrieve status Running Status Displays the operating status of nodes Stop Reset POST UEFI Shell OS Booting OS Running OS Panic OS Shutdown Unknown Failed to retrieve status CMU not mounted Maintenance Status Displays the maintenance status o...

Page 57: ...te and time settings 6 Reset Click to clear the specified values and reload the current date and time settings 4 5 Setting the Time Set the date and time and display the settings as shown below Figure 4 17 Setting the Date and Time 4 6 Checking the I O Configuration 4 6 1 Connecting to the Console To check the I O configuration connect the console For the console connection to the node use an ssh ...

Page 58: ...and supported on this device is the showinfo command The input of a command or characters other than showinfo may interfere with device operation 4 7 Installing the OS See 3 17 Installing the OS in the FUJITSU Supercomputer PRIMEHPC FX700 Operating Manual C120 0089EN 4 8 Installing the InfiniBand Driver See 3 18 Installing the InfiniBand Driver in the FUJITSU Supercomputer PRIMEHPC FX700 Operating...

Page 59: ...ricity from your body such as by touching a grounded object ground Do not touch the electrical circuits and soldered parts of boards Be sure to hold circuit boards by the slot bracket or edge Installation or disassembly of a device in a way not shown in this chapter voids the warranty For details see Chapter 2 Important Information 4 2 3 1 Location Component 1 CMU 00 2 CMU 01 3 CMU 02 4 CMU 03 The...

Page 60: ...ntifying a Faulty Part 2 Shut down that blade See 3 2 Shutting Down the FX700 Main Unit 3 From the Web GUI configure CMU replacement in maintenance mode 4 Remove all external cables from the blade Remarks If your finger is too big to touch the connector lock when disconnecting a LAN or other cable the cable cannot be removed In that case unlock the connector lock by pushing it with a flathead scre...

Page 61: ...t Specify Both Node On in the Power Control pulldown menu and click the Start Power Control button 3 Check the I O configuration See 4 6 Checking the I O Configuration 4 Turn off the power From CMU Maintenance on the Maintenance screen of the Web GUI select the CMU of the replacement Specify Both Node Off in the Power Control pulldown menu and click the Start Power Control button 5 From the Web GU...

Page 62: ... Confirm startup From CMU Maintenance on the Maintenance screen of the Web GUI select the CMU of the replacement Specify Both Node On in the Power Control pulldown menu and click the Start Power Control button 3 Check the I O configuration See 4 6 Checking the I O Configuration 4 Turn off the power From CMU Maintenance on the Maintenance screen of the Web GUI select the CMU of the replacement Spec...

Page 63: ...ain power voltage at the location corresponds to the rated voltage range 3 2 1 Location Component 1 PSU 00 2 PSU 01 3 PSU 02 optional Chapter 6 PSU Power Supply Unit This chapter describes the handling of the PSUs power supply units 6 1 Basic Information In the basic configuration the FX700 main unit has two mounted PSUs The PSUs are automatically adjusted to the main power voltage within a range ...

Page 64: ...D 2 From the Web GUI configure PSU replacement in maintenance mode See 4 1 1 Setting Maintenance Mode 3 From the Web GUI power off the PSU to be replaced Select PSU Off from Power Control in PSU Maintenance on the Maintenance screen 4 Disconnect the power cord from the faulty PSU See 3 3 Disconnecting Power Cords The FX700 main unit does not need to be powered off 6 2 2 Removing the PSU This secti...

Page 65: ...ow to install the PSU 1 Lift up the handle on the PSU halfway in the direction of the arrow 2 Push in the PSU 1 until the latch clicks and locks in place Fold back the handle on the PSU 2 Chapter 6 PSU Power Supply Unit C120 0090 04EN 6 2 Replacing a PSU 44 ...

Page 66: ...SU Work procedure classification Upgrade and repair unit URU Work time 10 minutes for hardware Required tools None required 6 3 1 Advance Preparation 1 To add a PSU check the check box of the PSU on the Maintenance screen of the Web GUI and click the Enter Maintenance button The FX700 main unit does not need to be powered off 6 3 2 Removing the Dummy PSU This section describes how to remove the in...

Page 67: ...b GUI set the newly installed PSU to maintenance mode 2 From the Web GUI power on the newly installed PSU 3 From the Web GUI clear maintenance mode Remarks When reducing the PSUs install a dummy PSU Removing a PSU during warm maintenance and clicking Exit Maintenance causes the System alarm LED on the main unit to blink and the Web GUI screen to display a warning for the chassis However use of the...

Page 68: ... circuit boards by the slot bracket or edge Installation or disassembly of a device in a way not shown in this chapter voids the warranty For details see Chapter 2 Important Information 1 2 3 4 Location Component 1 FANU 00 2 FANU 01 3 FANU 02 4 FANU 03 Chapter 7 FANU Fan Unit This chapter describes the handling of the FANUs fan units 7 1 Basic Information The chassis has four mounted hot plug FANU...

Page 69: ... FANU lock while the device is running because the FANU may then be ejected with great force Even after you remove the FANU from the FX700 main unit the fan is still spinning from momentum Do not insert your fingers hands etc into the unit 7 2 1 Preliminary Steps 1 From the Web GUI configure FANU replacement in maintenance mode See 4 1 1 Setting Maintenance Mode 2 Remove the front bezel fixing scr...

Page 70: ... with right hand C B Operation with left hand B A The following shows the places to hold a FANU when removing it 2 While the second lock for fall prevention is unlocked 3 pull out the FANU Chapter 7 FANU Fan Unit C120 0090 04EN 7 2 Replacing a FANU 49 ...

Page 71: ...ll spinning from momentum Do not insert your fingers hands etc into the unit 60N Flap 7 2 3 Installing the FANU in the Chassis The flap is kept firmly closed with a force of 60 N by air blowing out during the operation of the device The following is the procedure for installing the FANU in the chassis 1 Install the FANU in the chassis Chapter 7 FANU Fan Unit C120 0090 04EN 7 2 Replacing a FANU 50 ...

Page 72: ...uring warm maintenance push the FANU forcefully 60 N or more and quickly within about 1 second into the chassis 2 Check the status of the FAN alarm LED If the FAN alarm LED does not light up for 30 seconds go to the next step If the FAN alarm LED lights up before 30 seconds elapse pull out this FANU immediately and try again See 7 2 2 Removing the FANU Chapter 7 FANU Fan Unit C120 0090 04EN 7 2 Re...

Page 73: ... FAN alarm LED 3 Install the front bezel 7 2 4 Final Steps 1 From the Web GUI clear maintenance mode See 4 1 2 Clearing Maintenance Mode Chapter 7 FANU Fan Unit C120 0090 04EN 7 2 Replacing a FANU 52 ...

Page 74: ... sure to hold circuit boards by the slot bracket or edge Installation or disassembly of a device in a way not shown in this chapter voids the warranty For details see Chapter 2 Important Information Chapter 8 InfiniBand Card This chapter describes the handling of InfiniBand cards 8 1 Basic Information The blade has two mounted PCIe card slots For details see Figure 3 1 Riser Module Numbers Top Vie...

Page 75: ...he Riser Module for PCIE 00 8 2 2 Removing an InfiniBand Card This section describes how to remove an InfiniBand card 1 Remove the screw securing the InfiniBand card 1 Figure 8 1 Removing an InfiniBand Card 2 Pull out the InfiniBand card from the riser card connector 2 8 2 3 Installing an InfiniBand Card 1 If a slot cover is installed on the riser card module remove the slot cover See 3 22 4 Remov...

Page 76: ...hassis in the FUJITSU Supercomputer PRIMEHPC FX700 Operating Manual C120 0089EN 3 Connect all the external cables See 3 19 Connecting External Cables 4 Confirm startup From CMU Maintenance on the Maintenance screen of the Web GUI select the CMU of the replacement Specify Both Node On in the Power Control pulldown menu and click the Start Power Control button 5 Check the I O configuration See 4 6 C...

Page 77: ...InfiniBand card addition 1 Shut down that blade See 3 2 Shutting Down the FX700 Main Unit 2 From the Web GUI configure CMU replacement in maintenance mode See 4 1 1 Setting Maintenance Mode 3 Remove all external cables from the blade 4 Remove the blade from the chassis See 3 9 2 Removing the Blade From the Chassis in the FUJITSU Supercomputer PRIMEHPC FX700 Operating Manual C120 0089EN 5 Remove th...

Page 78: ...8 3 4 Final Steps See 8 2 4 Final Steps Chapter 8 InfiniBand Card C120 0090 04EN 8 3 Adding an InfiniBand Card 57 ...

Page 79: ...andling an electrostatic sensitive device ESD be sure to first discharge static electricity from your body such as by touching a grounded object ground Do not touch the electrical circuits and soldered parts of boards Be sure to hold circuit boards by the slot bracket or edge Installation or disassembly of a device in a way not shown in this chapter voids the warranty For details see Chapter 2 Imp...

Page 80: ...rmation 2 Shut down that blade See 3 2 Shutting Down the FX700 Main Unit 3 From the Web GUI configure CMU replacement in maintenance mode See 4 1 1 Setting Maintenance Mode 4 Remove all external cables from the blade 5 Remove the blade from the chassis See 3 9 2 Removing the Blade From the Chassis in the FUJITSU Supercomputer PRIMEHPC FX700 Operating Manual C120 0089EN 6 Remove the riser module fr...

Page 81: ...igure 9 3 M 2 SSD 1 With the M 2 SSD slightly tilted and the label facing up insert the M 2 SSD into the M 2 slot Figure 9 4 Installing the M 2 SSD 2 Secure the M 2 SSD to the standoff spacer with one screw Chapter 9 M 2 SSD C120 0090 04EN 9 2 Replacing an M 2 SSD 60 ...

Page 82: ... select the CMU of the replacement Specify Both Node On in the Power Control pulldown menu and click the Start Power Control button 5 Check the I O configuration See 4 6 Checking the I O Configuration 6 Turn off the power From CMU Maintenance on the Maintenance screen of the Web GUI select the CMU of the replacement Specify Both Node Off in the Power Control pulldown menu and click the Start Power...

Page 83: ...UI configure CMU replacement in maintenance mode See 4 1 1 Setting Maintenance Mode 3 Remove all external cables from the blade 4 Remove the blade from the chassis See 3 9 2 Removing the Blade From the Chassis in the FUJITSU Supercomputer PRIMEHPC FX700 Operating Manual C120 0089EN 5 Remove the riser module from the blade See 3 22 1 Removing the Riser Module for PCIE 00 9 3 2 Installing the M 2 SS...

Page 84: ...rst discharge static electricity from your body such as by touching a grounded object ground Do not touch the electric circuits of boards and soldered components Be sure to hold circuit boards by the slot bracket or edge Installation or disassembly of a device in a way not shown in this chapter voids the warranty For details see Chapter 2 Important Information Chapter 10 BAREBONE Barebones Server ...

Page 85: ...minutes for hardware Tools Phillips PH2 No 2 screwdriver 10 2 1 Preliminary Steps 1 Look for the target BAREBONE See 3 1 Using Diagnostic Information 2 Shut down the FX700 main unit See 3 2 Shutting Down the FX700 Main Unit 3 From the Web GUI configure chassis replacement in maintenance mode 4 Disconnect power cords See 3 3 Disconnecting Power Cords Chapter 10 BAREBONE Barebones Server C120 0090 0...

Page 86: ...e 3 11 Removing the Top Cover 10 2 3 Installing the BAREBONE 1 Install the removed BMCIFU from the faulty chassis in the new chassis See Chapter 11 BMCIFU 2 Install the removed top cover from the faulty chassis on the new chassis See 3 12 Installing the Top Cover 3 Install the new chassis in the rack See 3 13 Installing the FX700 Main Unit in the Rack 4 Install each unit in the new chassis See 3 1...

Page 87: ...et go to the next step See 4 1 1 Setting Maintenance Mode 3 Confirm startup Start the node from the power button on the operation panel 4 Check the I O configuration 5 Turn off the power Stop all nodes by long pressing the power button on the operation panel 6 Clear maintenance mode Chapter 10 BAREBONE Barebones Server C120 0090 04EN 10 2 Replacing the BAREBONE 66 ...

Page 88: ...icity from your body such as by touching a grounded object ground Do not touch the electric circuits of boards and soldered components Be sure to hold circuit boards by the slot bracket or edge Installation or disassembly of a device in a way not shown in this chapter voids the warranty For details see Chapter 2 Important Information Chapter 11 BMCIFU This chapter describes the handling of the BMC...

Page 89: ... power cords See 3 3 Disconnecting Power Cords 5 Remove each mounted unit See 3 5 Removing the Blade See 3 6 Removing the Dummy Blade See 3 7 Removing the PSU See 3 8 Removing the Dummy PSU See 3 9 Removing the FANU 6 Remove the FX700 main unit from the rack See 3 10 Removing the FX700 Main Unit From the Rack 7 Remove the top cover from the FX700 main unit See 3 11 Removing the Top Cover 11 2 2 Re...

Page 90: ...icient care not to damage the parts around the connector when disconnecting the connector Figure 11 2 Removing the BMCIFU Top View of the FX700 Main Unit 2 Remove the BMCIFU fixing screw 2 3 From the rear of the FX700 main unit pull out the BMCIFU Figure 11 3 Removing the BMCIFU Chapter 11 BMCIFU C120 0090 04EN 11 2 Replacing the BMCIFU 69 ...

Page 91: ... the BMCIFU cable does not get caught when you insert the BMCIFU 11 2 3 Installing the BMCIFU 1 From the rear of the FX700 main unit insert the BMCIFU Figure 11 4 Installing the BMCIFU 2 Install the BMCIFU fixing screw 1 Chapter 11 BMCIFU C120 0090 04EN 11 2 Replacing the BMCIFU 70 ...

Page 92: ...t everything back together 1 Install the top cover on the FX700 main unit See 3 12 Installing the Top Cover 2 Install the FX700 main unit in the rack See 3 13 Installing the FX700 Main Unit in the Rack 3 Install each unit in the chassis See 3 14 Installing the Blade See 3 15 Installing the Dummy Blade See 3 16 Installing the PSU See 3 17 Installing the Dummy PSU See 3 18 Installing the FANU 4 Conn...

Page 93: ...etting Maintenance Mode 7 Confirm startup Start the node from the power button on the operation panel 8 Check the I O configuration See 4 6 Checking the I O Configuration 9 Turn off the power Stop all nodes by long pressing the power button on the operation panel 10 Clear maintenance mode See 4 1 2 Clearing Maintenance Mode Chapter 11 BMCIFU C120 0090 04EN 11 2 Replacing the BMCIFU 72 ...

Page 94: ...1 1 Front Configuration of the FX700 Main Unit This section shows the front of the FX700 main unit Figure A 1 Front Configuration of the FX700 Main Unit With the Front Bezel Figure A 2 Front Configuration of the FX700 Main Unit Without the Front Bezel A 1 2 Rear Configuration of the FX700 Main Unit This section shows the rear of the FX700 main unit Appendix A External Views of the Device C120 0090...

Page 95: ...ected to the BMC and used for hardware status monitoring failure notification and power control 3 Management port Used to connect nodes Figure A 3 Rear Configuration of the FX700 Main Unit A 1 3 LANs of the FX700 Main Unit This section shows the locations of the BMC maintenance port BMC control port and node management ports Figure A 4 Rear Locations for the LANs of the FX700 Main Unit Appendix A ...

Page 96: ... Main Unit This section shows the internal configuration of the FX700 main unit Figure A 5 Internal Configuration of the FX700 Main Unit A 1 5 Internal Blade Configuration This section shows the configuration of components inside the blade Figure A 6 Internal FX700 Blade Configuration Appendix A External Views of the Device C120 0090 04EN A 1 External Views of the Device 75 ...

Page 97: ...eat sink 4 CPU 00 M 2 SSD not visible because it is under riser module 5 CPU 00 riser module 6 CPU 00 and heat sink 1 2 3 4 A 2 Indicator Lamps and Controls A 2 1 Server Front A 2 1 1 Front Panel LEDs Figure A 7 Front Panel LEDs Appendix A External Views of the Device C120 0090 04EN A 2 Indicator Lamps and Controls 76 ...

Page 98: ...lure On orange This device contains part requiring immediate replacement Blinking orange This device contains part requiring preventive replacement 3 System power LED Off All nodes powered off On green At least 1 node powered on 4 BMC ready LED Off AC off BMC stopped On green BMC initialization completed Blinking green BMC initializing Fast blinking green BMC failed Appendix A External Views of th...

Page 99: ...es only if all the nodes in the device are off Long press the button 4 seconds or longer to start shutdown of the operating systems on all nodes 2 BMC reset button You can reset the BMC by pressing this button Use the button for maintenance purposes when the BMC is inaccessible A 2 1 2 Front Panel Buttons Figure A 8 Front Panel Buttons Appendix A External Views of the Device C120 0090 04EN A 2 Ind...

Page 100: ...lure On orange This FANU failed 1 A 2 1 3 FANU LED Figure A 9 Locations of the Front LEDs on the FX700 Main Unit A 2 2 Server Rear A 2 2 1 BMCIFU LEDs Figure A 10 BMCIFU LED ID Appendix A External Views of the Device C120 0090 04EN A 2 Indicator Lamps and Controls 79 ...

Page 101: ...ed LED On orange Indicates data traffic at a transmission speed of 1 Gbit s On green Indicates data traffic at a transmission speed of 100 Mbit s Off Indicates data traffic at a transmission speed of 10 Mbit s 2 LAN link transmission LED On green A LAN connection has been established Off The LAN is not connected Blinking green LAN data is being transmitted Figure A 11 BMCIFU LAN LEDs Appendix A Ex...

Page 102: ...ates Output stopped due to PSU failure No AC connection to other PSUs mounted in device or no AC input to this PSU Blinking Off AC input to PSU and output stopped On Off PSU currently operating normally A 2 2 2 Hot Plug PSU LED Figure A 12 Hot Plug PSU LED AC PSU Appendix A External Views of the Device C120 0090 04EN A 2 Indicator Lamps and Controls 81 ...

Page 103: ...e This blade contains part requiring preventive replacement 3 Identification LED Off This blade not selected as maintenance target On blue This blade selected as maintenance target 1 2 1 2 A 2 3 Blade Rear A 2 3 1 Rear LEDs on the Blade Figure A 13 Rear LEDs on the Blade A 2 3 2 Rear LAN LEDs on the Blade Figure A 14 Rear LAN LEDs on the Blade Appendix A External Views of the Device C120 0090 04EN...

Page 104: ...fic at a transmission speed of 100 Mbit s Off Indicates data traffic at a transmission speed of 10 Mbit s 2 LAN link transmission LED On green A LAN connection has been established Off The LAN is not connected Blinking green LAN data is being transmitted Appendix A External Views of the Device C120 0090 04EN A 2 Indicator Lamps and Controls 83 ...

Page 105: ......

Reviews: