background image

En-5

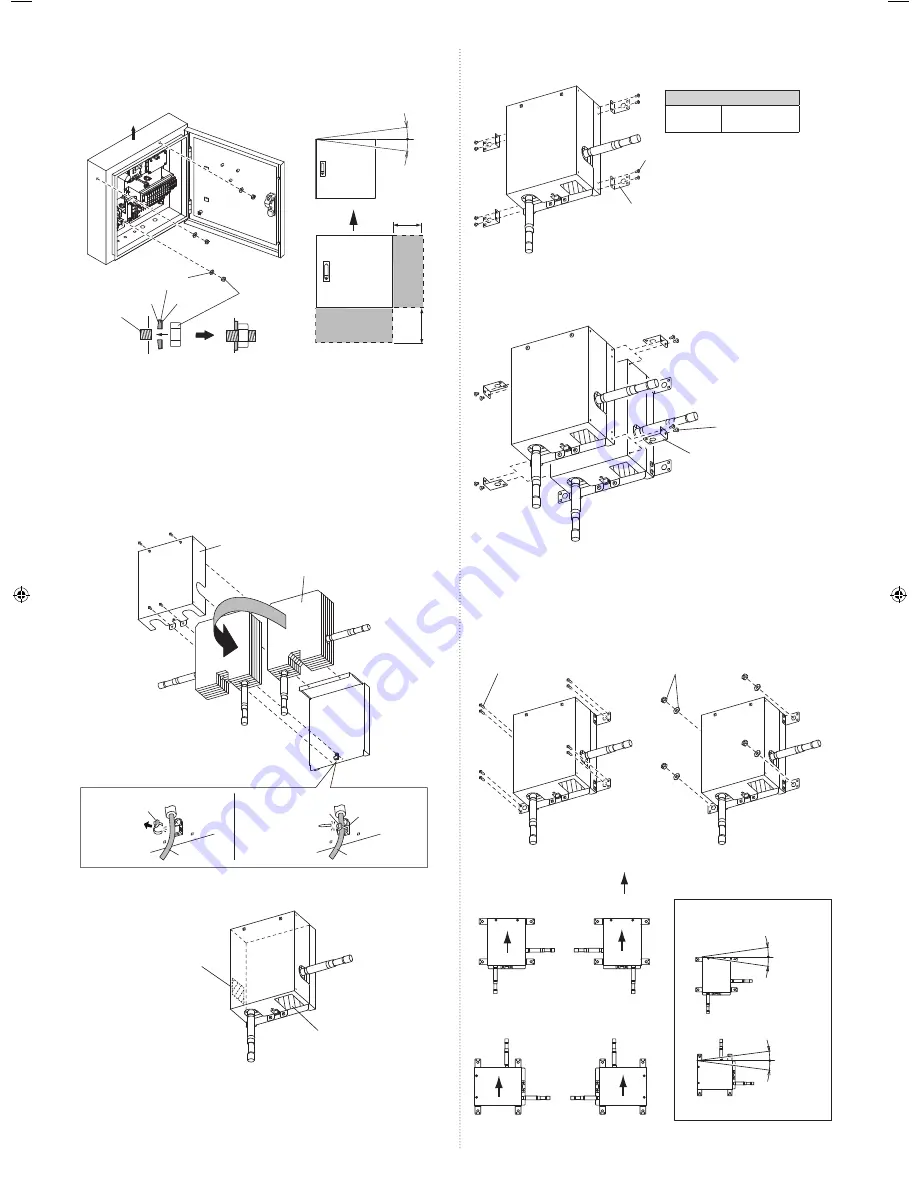
4.3.2.3. Mounting Secure Fittings (If Using 1 EEV unit)

(1)  Use the 8 screws (accessories) to secure the secure 

fi

 ttings (accessories).

Secure 

fi

 tting (Accessories)

Screws M4×L10 (Accessories)

Tightening torque

M4 screw

0.8 to 2.8 Nm

(8 to 28 kgf·cm)

4.3.2.4. Mounting Secure Fittings (If Using 2 EEV units)

(1)  If using 2 EEV units, stacking the 2 kits is recommended.
 

If stacking 2 EEV units, secure using the secure 

fi

 ttings (accessories) and screws 

(accessories).

Secure 

fi

 tting (Accessories)

Screws M4×L10 
(Accessories)

4.3.2.5. Installing EEV units

Mount the EEV unit to the wall.
Select the securing method according to the installation environment.

Method 1: Use the 8 screws (accessories) to secure the unit.
Method 2: Mount the 4 anchor bolts (

fi

 eld supply) to the wall, and then secure the unit.

Screws M4×L16 
(Accessories)

Method 1

Method 2

Nuts and washers 
(Field supply)

Installable EEV unit orientations

A

A

A

A

B

B

B

B

Orient the arrow upwards

Installable both indoors and outdoors

Installable indoors only

(Cannot be installed outdoors)

EEV unit inclination limits

±10° or 
less

±10° or 
less

4.3.1. Installing the Control unit

•  If installing outdoors, make sure to orient A upwards.
•  Using a template (accessory) is recommended when positioning the holes for mounting 

the control unit.

±5° or 
less

Inclination limits

Sealing washers 

(×3, Accessories)

M8 Nuts 

(×3, Accessories)

A

A

Contorl 

unit

200 mm or more

Service 

space

200 mm or more

Service 

space

Rubber inside the washer is contacted 
tightly with the Control unit.

anchor 

bolt

Rubber

Steel

4.3.2. Installing the EEV unit

4.3.2.1. Changing Pipe Orientation

•  EEV unit pipe orientation can be changed according to the installation conditions.
(1)  Remove the 4 screws and remove the cover.
(2)  Cut the cable tie 

fi

 xing the cable.

(3)  Invert both the pipes and heat insulation.
(4)  Pass the cable tie (accessory) through the cable clamp, and 

fi

 rmly secure the cable, 

and then cut any unnecessary part of cable tie.

(5)  Use the 4 screws to mount the cover.

Cable

Cable

Cable clamp

Cable tie

Cable tie 
(accessory)

(2)

(1), (5)

Cover

Heat insulation

(4)

(3)

4.3.2.2. Pasting Seals to the piping holes

Use the seals (accessories) to cover any unused piping holes.

Seal 
(Accessories)

Seal 

(Accessories)

9381279005_IM.indb   5

9381279005_IM.indb   5

6/30/2014   11:31:18 AM

6/30/2014   11:31:18 AM

Summary of Contents for UTP-VX30A

Page 1: ...PART NO 9381279005 Original instructions INSTALLATION MANUAL DX kit For authorized service personnel only UTY VDGX UTP VX30A UTP VX60A UTP VX90A TM ...

Page 2: ...his unit contains no user serviceable parts Always consult authorized service personnel to repairs When moving consult authorized service personnel for disconnection and installation of the unit 2 ABOUT THIS PRODUCT 2 1 Precautions for using R410A refrigerant WARNING Do not introduce any substance other than the prescribed refrigerant into the refrigeration cycle If air enters the refrigeration cy...

Page 3: ...or Inlet air and Outlet air 2 For measuring the room temperature Thermistor Label GAS 1 For measuring the gas pipe temperature For gas pipes Thermistor Label LIQ 1 For measuring the liquid pipe temperature For liquid pipes Thermistor holder pipe Small 1 For mounting the thermistor Thermistor holder pipe Large 1 For mounting the thermistor Name and Shape Q ty Application Thermistor spring For small...

Page 4: ... temperature Refer to the Design Technical manual Condensation temperature Refer to the Design Technical manual Capacity Class kW 14 0 20 0 25 0 40 0 50 0 EEV unit model No 60 90 90 90 90 90 90 Cooling capacity kW 14 22 4 25 40 50 4 Heating capacity kW 16 25 28 45 56 5 Heat exchanger capacity Refer to the Design Technical manual Airflow rate Reference m3 h 2 240 3 560 4 000 6 400 8 000 Capacity ra...

Page 5: ...n below System Configuration Diagram Fujitsu general approved devices Outdoor unit Indoor unit Control unit Liquid pipe Gas pipe Control line Thermistor 4 Wired remote controller Piping Wiring EEV unit 3 2 3 Pipe Conditions EEV unit Heat Exchanger R Straight pipe 200 mm or more Liquid pipe Gas pipe 4 INSTALLATION WORK Correct initial installation location is important because it is difficult to mo...

Page 6: ...nly Cannot be installed outdoors EEV unit inclination limits 10 or less 10 or less 4 3 1 Installing the Control unit If installing outdoors make sure to orient A upwards Using a template accessory is recommended when positioning the holes for mounting the control unit 5 or less Inclination limits Sealing washers 3 Accessories M8 Nuts 3 Accessories A A Contorl unit 200 mm or more Service space 200 ...

Page 7: ...tion location of the refrigerant piping is expected to exceed 70 install heat insulation around the refrigerant piping If the expected humidity level is 70 to 80 use heat insulation that is 15 mm or thicker and if the expected humidity exceeds 80 use heat insulation that is 20 mm or thicker If heat insulation is used that is not as thick as specified condensation may form on the surface of the ins...

Page 8: ...round cable Improper earthing grounding work can cause electric shocks Install the remote controller cables so as not to be direct touched with your hand Perform wiring work in accordance with standards so that the DX kit can be operated safely and positively Connect the connection cable firmly to the terminal board Imperfect installation may cause a fire If the supply cable is damaged it must be ...

Page 9: ...ent breaker requirements Model MCA MFA UTY VDGX 0 096 A 20 A MCA Minimum Circuit Ampacity MFA Main Fuse Ampacity When the power crossover wiring is done make it so that the total of the MCA of the connected DX kits RB units and indoor units does not exceed the 15 A For indoor unit MCA and RB unit MCA refer to the indoor unit and RB unit installation manual If the capacity of connected DX kits RB u...

Page 10: ...therwise the screw heads may be damaged and prevent the screws from being properly tightened 5 Do not tighten the terminal screws too much otherwise the screws may break 6 See the table for the terminal screw tightening torques 7 Please do not fix 2 power supply cables with 1 screw Sleeve Strip 10 mm Screw with special washer Screw with special washer Ring terminal Cable Terminal block Cable Ring ...

Page 11: ...G20 Type245 IEC57 or equivalent T1 THERMISTOR GAS H5 Thermistor mounted to the gas pipe 0 33 AWG22 Sheathed PVC cable Relay the multi conductor cable and pass it through the designated hole T2 THERMISTOR LIQUID Thermistor mounted to the liquid pipe T3 THERMISTOR INLET AIR Thermistor mounted to the inlet T4 THERMISTOR OUTLET AIR Thermistor mounted to the outlet EV1 EEV1 1 Red 2 Brown 3 Black 4 Gree...

Page 12: ...le gland recommended value A B For M10 0 5 N m 0 5 N m For M16 1 0 N m 1 5 N m For M20 1 0 N m 2 0 N m Outdoor cable connections 1 Thermistor cable connections Connect the thermistor cables to the relay multi conductor cables as shown in the diagram before passing through the hole Make sure to use only weatherproof relay cables Terminal block Thermistor Relay cable Cable connector 2 Electronic exp...

Page 13: ...R SIGNAL INPUT CNA06 CNA07 COOL HEAT SIGNAL CNA03 CNA04 FLOAT SW SIGNAL Incompatible CNA05 External input terminal Dry contact terminal External input terminal Apply voltage terminal External output terminal CNA01 CNA04 CNA02 CNA07 CNB01 Controller PCB CNA03 CNA06 Use an external input and output cable with appropriate external dimension depending on the number of cables to be installed The wire c...

Page 14: ...e Pulse input method Terminal block Input signal Command ON OFF SIGNAL INPUT Pin1 to Pin2 OFF ON Operation Pin1 to Pin3 OFF ON Stop The last command has priority The indoor units within the same remote controller group operates in the same mode 2 ERROR SIGNAL INPUT If an error signal is input perform protection operation Thermostat OFF mode Make sure to install so that the input signals during nor...

Page 15: ...her than the DX kit Connected unit etc 1 2 3 4 5 6 Power supply Terminal Relay PC board Control unit DX kit Connected unit Connected device 1 Connected device 2 Connected device 3 Connected device 4 Connected device 5 Drain pump PC board Power supply for drain pump AC 220 to 240 V 1A max DC 30 V max 1A max When using a drain pump connect relay that is compatible with AC power supply field supply P...

Page 16: ...t where the wireless remote controller can be used the addresses can also be set using the remote controller If setting the addresses using the wireless remote controller set the indoor unit address and refrigerant circuit address to 00 For information on setting using the wireless remote controller Table A Address Rotary Address Rotary Switch Setting Switch Setting Refrigerant circuit REF AD SW I...

Page 17: ...FF ON ON Precautions if using the DX kit as the administrative indoor unit If the Administrative indoor unit setting is ON for another indoor unit connected to the same refrigerant system or RB unit make sure to turn OFF that setting For details see the wired remote controller installation manual When connecting the wired remote controller to the DX kit set this switch to OFF Set the Administrativ...

Page 18: ...R CODES When an error occurs the LED on the PC board LED name LED1 flashes Error code can be viewed by connecting the optional wired remote controller group remote controller and IR receiver unit etc If you use a wired type remote controller Optional parts error codes will appear on the remote controller display If you use a wireless remote controller IR receiver unit of optional parts the lamp on...

Page 19: ...he operation temperature using analog external inputs Connected unit Connected device Control unit DX kit Analog signal The operation temperature is set by changing the voltage of the input signals If using this function set the DIP switch SET3 2 to OFF Formula Operation temperature T C 2 5 Ain 7 5 Ain Input voltage 1 0 to 9 0V See the following diagram for the advanced input conditions a Using th...

Reviews: