03-24
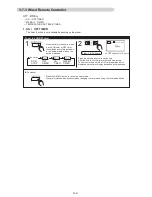
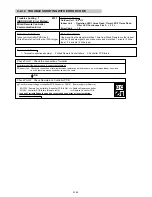
3. TEMPERATURE SET BACK TIMER
The timer function is not available depending on the model.
Press the SET BACK button to change to the SET BACK con-
firmation display.
The SET BACK operating time and the set temperature will
be displayed.
2
Press the SET button for 2
seconds or more.
1
3
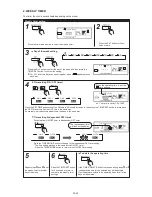
Day setting
Operating time setting
Follow step and in "To set the WEEKLY timer". The DELETE button is also used as described in the
procedures for the weekly timer.
4
NOTES
The SET BACK timer only changes the set temperature, it cannot be used to start or stop air conditioner operation.
The SET BACK timer can be set to operate up to two times per day but only one temperature setting can be used.
The SET BACK timer can be used together with the ON, OFF, and weekly timer functions.
The SET BACK operating time is displayed only in the SET BACK confirmation display.
(Refer to step 1 for the SET BACK confirmation display. )
During the COOL/DRY mode, the air conditioner will operate at a minimum of 18°C even if the SET BACK temperature
is set to 17°C or lower.
Room temperatures as low as 10, 12, and 14°C cannot be set depending on the model.
SET BACK
SU MO TU WE TH FR SA
3 6 9 12 15 18 21
SU MO TU WE TH FR SA
3 6 9 12 15 18 21
ex. When setting all days together
Temperature setting
Press the set temperature buttons to set
the temperature. (The temperature setting
range is the same as the range for the
operation mode.)
ex. Operating time 15:00 - 22:00
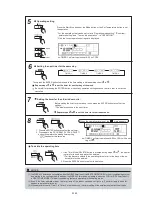
5
Repeat steps and .
Press the SET button for 2 sec-
onds or more to complete the
temperature SET BACK timer
settings.
3
4
ON
OFF
24°C
24°C
28°C
SET BACK temperature
Normal temperature
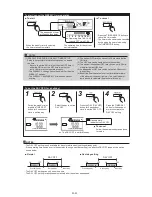
To start
SET BACK
Press the SET BACK button. The SET BACK confirmation display appears
for 5 seconds, and then the timer starts automatically.
ex. Display during SET BACK timer operation
(The operating time will not be displayed.)
To cancel
Press the SET BACK button, and then
press the DELETE button while the
SET BACK confirmation display is dis-
played. Even if the SET BACK button
is pressed again, the SET BACK timer
will be cancelled.
SU MO TU WE TH FR SA
3 6 9 12 15 18 21
If there is no existing
SET BACK tempera-
ture setting, " - - " will
be displayed for the
temperature.
SU MO TU WE TH FR SA
1
3
2
4
1
2
Temperature SET BACK timer setting
To start /cancel the temperature SET BACK timer operation
3
4
Summary of Contents for UTP-VX30A
Page 1: ...SERVICE MANUAL ...
Page 5: ...1 TEST RUN ...
Page 27: ...2 OUTDOOR UNIT OPERATION CONTROL ...
Page 40: ...3 INDOOR UNIT OPERATION ...
Page 70: ...4 TROUBLE SHOOTING ...
Page 205: ...5 APPENDING DATA ...
Page 210: ...05 04 1 MODELS AUXK018 024 030 034 036 045 054GLAH AUXM018 024 030GLAH CASSETTE TYPE ...
Page 214: ...05 07 LOW STATIC PRESSURE DUCT TYPE MODEL ARXB24GALH ARXB30GALH ARXB36GALH MODEL ARXB45GALH ...
Page 217: ...05 10 MODEL ARXC36GBTH MODELS ARXC72GBTH ARXC90GBTH ...
Page 218: ...05 10 1 MODELS ARXK04 07 09 12 14 18 24GCLH COMPACT SLIM DUCT TYPE ...
Page 219: ...FLOOR CEILING TYPE MODELS AB A12GATH AB A14GATH AB A18GATH AB A24GATH 05 11 ...
Page 220: ...CEILING TYPE MODELS AB A30GATH AB A36GATH AB A45GATH AB A54GATH 05 12 ...
Page 222: ...05 14 WALL MOUNTED TYPE MODELS AS A04GACH AS A07GA H AS A09GA H AS A12GA H AS A14GA H ...
Page 223: ...05 15 MODELS AS A18GA H AS A24GA H AS A30GA H ...
Page 224: ...05 15 1 MODELS ASYA004 007 009GTAH ASHA004 007 009GTAH COMPACT WALL MOUNTED TYPE EEV internal ...
Page 225: ...05 15 2 MODELS ASYE004 007 009GTAH ASHE004 007 009GTAH COMPACT WALL MOUNTED TYPE EEV external ...
Page 227: ...05 15 4 MODELS ASYA030 034GTAH ASHA030 034GTAH ...
Page 230: ...05 16 MODEL ARXH054GTAH OUTDOOR AIR UNIT MODEL ARXH072GTAH ...
Page 231: ...05 17 MODEL ARXH096GTAH ...
Page 232: ...MODELS AJ 072LELAH AJ 090LELAH UNITS 5 2 2 Outdoor Unit 05 18 ...
Page 233: ...MODEL AJ 108LELAH OUTDOOR 05 19 ...
Page 240: ...6 DISASSEMBLY PROCESS ...

