3-3-3
Individual Hold
“Individual Hold” can be used only with cassette type indoor
unit which supports this function. The air flow direction can
be set for each outlet of single or multiple indoor units con-
nected to this remote controller.
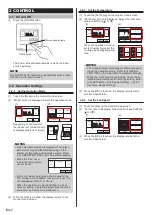
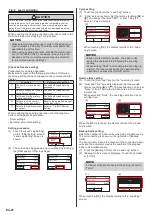
(1) Touch the [Individual Hold] on
the “Air Flow Direction Setting”
screen.
1
Air Flow Direction Setting
Back
Individual Hold
VT
Setting
Swing
HZ
Setting
(2) Touch the unit number you
want to set on the “Individual
Hold” screen.
01-01
01-05
01-02
01-06
01-03
01-07
01-04
01-08
Individual Hold
Page 1/ 2
Back
Reset
Next
Page
Unit 1
Unit 5
Unit 2
Unit 6
Unit 3
Unit 7
Unit 4
Unit 8
* [Comfort] is set to the shaded indoor unit as shown (2a)
below. When it is touched, the message is displayed
as shown (2b) below.
(2a)
(2b)
01-01
01-05
01-02
01-06
01-03
01-07
01-04
01-08
Individual Hold
Page 1/ 2
Back
Reset
Next
Page
Unit 1
Unit 5
Unit 2
Unit 6
Unit 3
Unit 7
Unit 4
Unit 8
Close
Individual Hold
Air flow direction setting cannot be performed.
Set the Comfort to "Disable".
* When multiple indoor units are connected to this
remote controller,the indoor unit selection screen is
displayed. When the screen (2) has 2 pages, they can
be switched by touching the [Next Page] or [Previous
Page]. When this remote controller is connected to
multiple indoor units, the address (XX-XX) is displayed
for each indoor unit. Touch the indoor unit to be set. [
✓
]
is displayed at the set indoor units.
NOTES
•
To clear the air flow direction setting of all the
displayed indoor units, touch [Reset]. When [Yes]
of the confirmation screen is touched, the setting is
cleared and switches to the air flow direction setting
of “VT setting” (Refer to 3-3-1).
• When you want to change the order of the indoor
units displayed on the indoor unit selection screen,
consult your installer or service personnel.
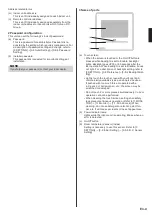
(3)
The outlet port selection screen that sets the air flow
direction is displayed. Touch the outlet port to be set.
•
Cassette type
Check the position of each outlet port based on “ ”
mark of the indoor unit body.
Position of the mark
Indoor Unit 1 (00-00)
Back
Reset
Outlet 1
Outlet 2
Outlet 3
Outlet 4
NOTE
• To clear all outlet port settings of selected indoor
units, touch [Reset]. When [Yes] of the confirma
-
tion screen is touched, the setting is cleared and
switches to the air flow direction setting of “VT set
-
ting” (Refer to 3-3-1).
•
3D flow cassette type
The number of outlet port differs depending on the model
.
Indoor Unit 1 (00-00)
Left
Right
Center 2
Center 1
Back
Reset
Indoor Unit 1 (00-00)
Left
Right
Center
Back
Reset
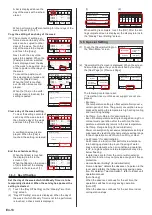
(4)
The air flow direction setting screen is displayed. Touch
[VT] or [HZ].
When the indoor unit does not have a flow direction
adjustment function(vertical/horizontal),[VT Setting]/[HZ
Setting] is not displayed and the air flow direction cannot
be set.
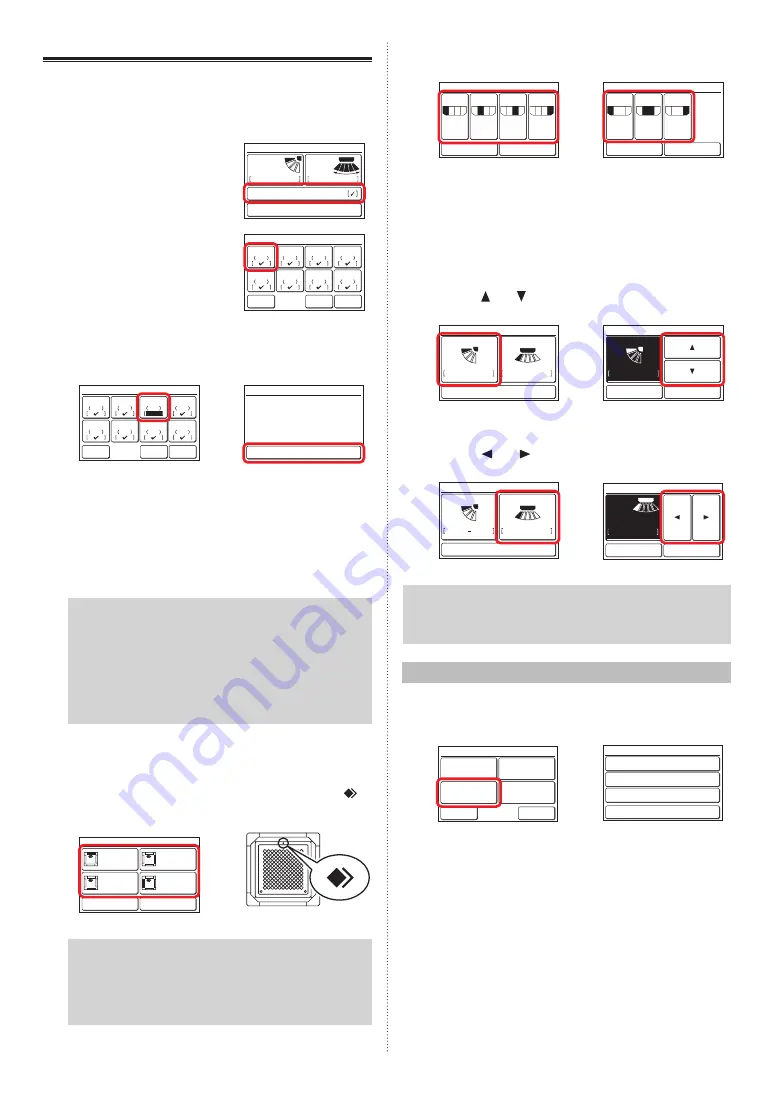
•
VT Setting
“VT Air Flow Direction Setting” screen is displayed.
Touch [ ] or [ ]
and set the air flow direction or
“Swing”.
Indoor Unit 1 (00-00)
1
VT
1
HZ
Back
1
Indoor Unit 1 (00-00)
Cancel
OK
Outlet 1
•
HZ Setting
“HZ Air Flow Direction Setting” screen is displayed.
Touch [ ] or [
] and set the air flow direction or
“Swing”.
Indoor Unit 1 (00-00)
VT
1
HZ
Back
11
1
Indoor Unit 1 (00-00)
Cancel
OK
Center
HZ
Setting
NOTE
•
When the air flow direction setting of “VT setting”(Refer
to 3-3-1) or “HZ setting”(Refer to 3-3-2) is set at the
outlet port, “—” is displayed at the outlet port screen.
3-4 Timer Setting
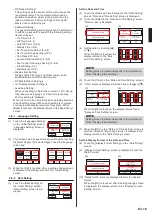
(1) Touch the [Timer Setting] on the “Main Menu” screen.
(2) “Timer Setting” screen is displayed.
(1)
(2)
Monitor
Next
Page
Page 1/ 3
Main Menu
Air Flow Direction
Setting
Weekly Timer
Setting
Timer Setting
Comfort
Back
On Timer
[Disable]
[Disable]
[Disable]
Off Timer
Auto Off Timer
Timer Setting
The following timer settings are possible:
•
On Timer:
The stopped indoor unit starts to operate after the set
time.
•
Off Timer:
The operating indoor unit stops to operate after the set
time.
•
Auto Off Timer:
When indoor unit operation is started by the On/Off
button of this unit, operation stops after the set time.
When the item to be set is touched, the display switches
to each setting screen. When each setting is complete
or canceled, the display returns to this screen. When
[Back] is touched, the display returns to the “Main
Menu” screen.
En-9
Summary of Contents for UTY-RNRGZ5
Page 27: ......


