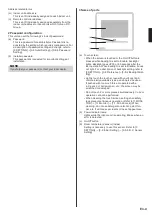
When the [Back] on the “Human Sensor Setting” is
touched, the display returns to the “Special Setting”
screen.
3-6-6
Fan Control for Energy Saving
(for administrator)
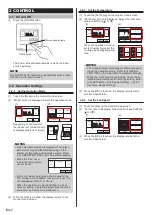
(1) Touch the [Fan Control for Energy Saving] on the “Spe-
cial Setting” screen. When the “Password Verification”
screen is displayed, enter the password and touch the
[OK].
(2) “Fan Control for Energy Saving” screen is displayed.
Touch the [Enable] on the “Fan Control for Energy Sav-
ing” screen.
(1)
(2)
Back
Previous
Page
Page 2/ 2
Special Setting
Human Sensor
Setting
Fan Control for
Energy Saving
Fan Control for Energy Saving
Cancel
OK
Enable
Disable
When the [OK] is touched, the display returns to the
“Special Setting” screen.
3-7
Summer Time (Daylight Saving Time)
Setting (for administrator)
The time display and timer operation are 1 hour earlier than
usual.
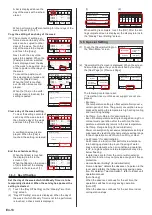
(1) Touch the [Summer Time
Setting] on the “Main Menu”
screen.
Monitor
Previous
Page
Page 2/ 3
Main Menu
Summer Time
Setting
Initial Setting
Preference
Special Setting
Next
Page
Enable or Disable the Summer Time Setting
(1) “Summer Time Setting” screen
is displayed. Select the [En-
able] or [Disable] on the “Sum-
mer Time Setting” screen.
Summer Time Setting
Cancel
OK
Enable
Disable
When the [OK] is touched, after the setting change
screen is displayed, the display returns to the “Main
Menu” screen.
3-8 Preference (for administrator)
Settings of the Touch screen
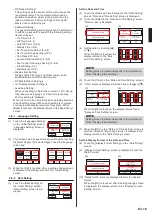
(1) Touch the [Preference] on the “Main Menu” screen.
(2) “Preference” screen is displayed.
(1)
(2)
Monitor
Previous
Page
Page 2/ 3
Main Menu
Summer Time
Setting
Initial Setting
Preference
Special Setting
Next
Page
Back
Preference
Panel
Calibration
Backlight
Setting
Contrast
The following contents are set:
•
Panel Calibration:
When the touched position and the corresponding posi-
tion does not match on the screen, perform this setting.
•
Backlight Setting:
Backlight enable/disable, brightness, and off time can
be set.
•
Contrast:
Adjusts the contrast of the screen.
When the item to be set is touched, the display switches
to each setting screen. When each setting is complete
or canceled, the display returns to this screen. When
[Back] is touched, the display returns to the “Main Menu”
screen.
3-8-1 Panel Calibration
(1) Touch the [Panel Calibration] on the “Preference”
screen.
(2) “Panel Calibration” screen is displayed. Touch the [Start]
on the “Panel Calibration” screen.
(1)
(2)
Back
Preference
Panel
Calibration
Backlight
Setting
Contrast
Panel Calibration
Cancel
Start
Calibrate the touch panel screen by touching
the 3 [+] marks displayed on the screen.
Press the [Start] button to start the
calibration.
(3) Touch the center of the [+] mark.
(4) The [+] mark is displayed at the bottom left side of the
screen. Touch the center of this mark.
(3)
(4)
Touch the center of the [+] mark.
Touch the center of the [+] mark.
(5) The [+] mark is displayed at
the bottom right side of the
screen. Touch the center of
this mark.
Touch the center of the [+] mark.
(6) The [+] marks are sequentially displayed at 3 points on
the screen again. Touch the center of each mark.
For confirmation, touch the 3 [+] marks
again.
Touch the center of the [+] mark.
For confirmation, touch the 3 [+] marks
again.
Touch the center of the [+] mark.
For confirmation, touch the 3 [+] marks
again.
Touch the center of the [+] mark.
(7) When calibration was successful, the display returns to
the “Preference” screen.
If the Panel Calibration has failed
Screen shows that calibration
failed. To repeat calibration,
touch [Retry] and repeat (2) to
(6).
Cancel
Retry
Calibration failed. If you repeat it, press the
[Retry] button.
En-16
Summary of Contents for UTY-RNRGZ5
Page 27: ......


