background image

ENGLISH

Installation Manual

6


Cooktop Installation


 WARNING 

Excessive Weight Hazard 

Use two or more people to move and install 
cooktop. 
Failure to do so can result in back or other injury. 

Cut Hazard 

Beware of sharp edges. Use the polystyrene ends 
when carrying the product. Failure to use caution 
could result in minor injury or cuts. 


Always consult the countertop manufacturer for 
specific instructions. 

Ensure the countertop is square and level and 
ensure no structural members interfere with space 
requirements. 

Prepare the cut-out according to the instructions 
(see cut-out dimensions). 

Make sure the wall coverings, countertop and 
cabinets around the cooktop can withstand heat 
(up to 200 °F / 93 °C). 


Figure 4.  Tools you will need 


Step 1 

Remove packaging materials and literature package 
from the cooktop before beginning installation.  
Remove Installation Manual from literature pack and 
read them carefully before you begin. 
 

Figure 5.  Parts 

COOKTOP

CARDBOARD

TOP-CARDBOARD

MANUAL

TOP PACKAGING

GASKET

SCRAPER

BOTTOM PACKAGING

MANUAL

GASKET

SCRAPER

CARDBOARD

TOP PACKAGING

COOKTOP

SIDE 

PACKAGING

Figure 5b.  Parts

ENGLISH

Installation Manual

7


Cooktop Installation


 WARNING 

Excessive Weight Hazard 

Use two or more people to move and install 
cooktop. 
Failure to do so can result in back or other injury. 

Cut Hazard 

Beware of sharp edges. Use the polystyrene ends 
when carrying the product. Failure to use caution 
could result in minor injury or cuts. 


Always consult the countertop manufacturer for 
specific instructions. 

Ensure the countertop is square and level and 
ensure no structural members interfere with space 
requirements. 

Prepare the cut-out according to the instructions 
(see cut-out dimensions). 

Make sure the wall coverings, countertop and 
cabinets around the cooktop can withstand heat 
(up to 200 °F / 93 °C). 


Figure 4.  Tools you will need 


Step 1 

Remove packaging materials and literature package 
from the cooktop before beginning installation.  
Remove Installation Manual from literature pack and 
read them carefully before you begin. 
 

Figure 5.  Parts 

COOKTOP

CARDBOARD

TOP-CARDBOARD

MANUAL

TOP PACKAGING

GASKET

SCRAPER

BOTTOM PACKAGING

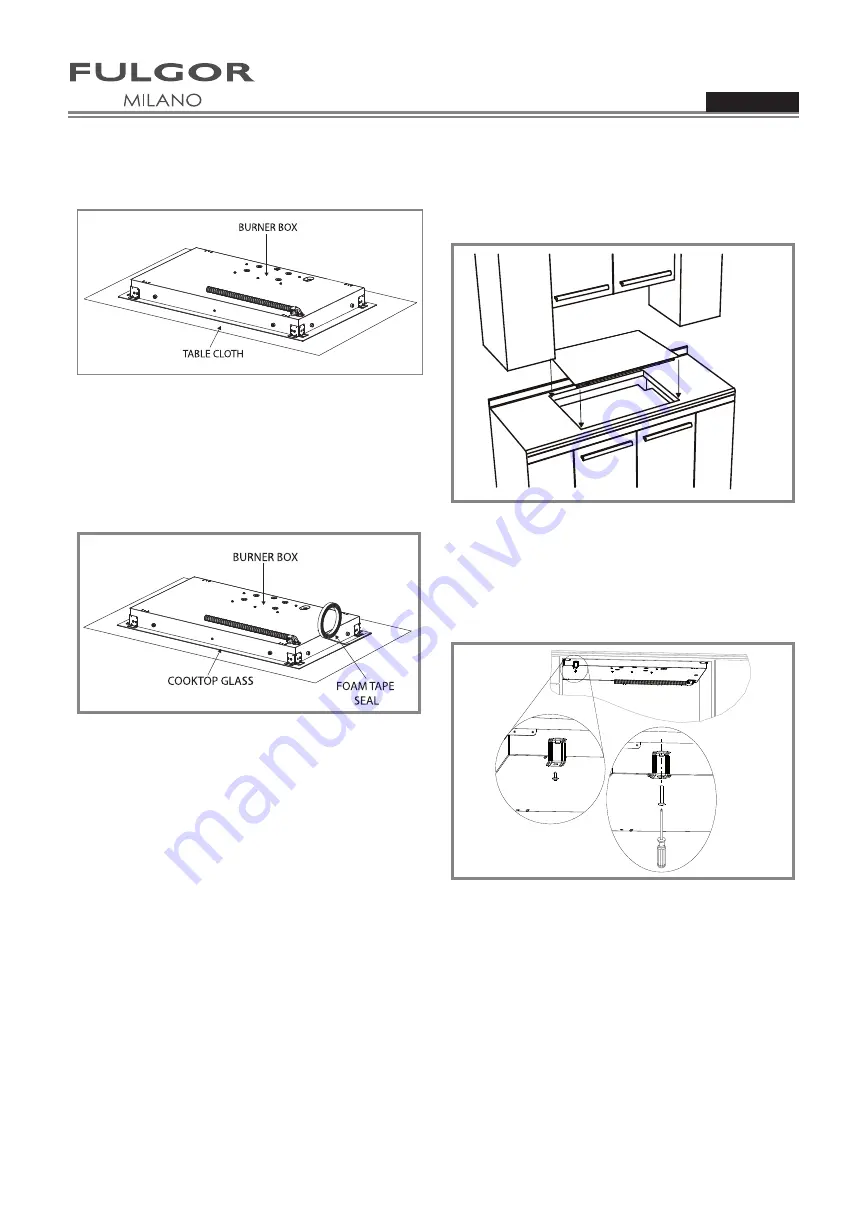
Step 2

Place a towel or table cloth onto the counter top. Lay 

the cooktop upside down onto the protected surface.


Figure 6

Step 3

A foam tape is provided to seal the cooktop edges to the 

countertop. Apply tape approximately 1/16” (1.5 mm) 

from the glass edge to the underside of the cooktop 

glass. Use tape around the entire glass perimeter. Cut 

off excess where tape ends butt.


Figure 7

Step 4

Insert the cooktop centered into the cutout opening. 

Make sure the front edge of the counter top is parallel 

to  the  cooktop.  Make  final  check  that  all  required 

clearances are met.


Figure 8

Step 5

Four clamp brackets are provided to clamp the cooktop 

to the countertop. Tighten screws just enough to hold 

brackets in place when cooktop is put into cutout. 

Tighten screws securely.

Figure 9

Summary of Contents for F6RT30S2

Page 1: ...F6RT24 F6RT30 F6RT36 EN INSTALLATION INSTRUCTIONS FR INSTRUCTIONS D INSTALLATION ES INSTRUCCIONES DE INSTALLACIÓN ELECTRIC COOKTOP CUISINIER ÉLECTRIQUE COCINA ELÉCTRICA ...

Page 2: ......

Page 3: ...al with owner for future reference OWNER Please keep this manual for future reference ENGLISH Installation Manual 3 Table of Contents Page Special Warnings Product Dimensions and Cutout Requirements Important Preparation Suggestions Cooktop Installation Electrical Connections General information 3 Wire branch circuit 1 4 Wire branch circuit 1 Pay attention to these symbols present in this manual D...

Page 4: ...2 cm Canadian COTOUT DIMENSION 2 1 4 5 7cm US Figure 1 30 3 8 77 1 cm 21 3 16 53 8 cm 3 1 8 7 9 cm 24 61 cm 21 53 3 cm 3 1 8 7 9 cm 36 3 16 91 9 cm 21 3 16 53 8 cm 3 1 8 7 9 cm 30 24 36 Figure LENGTH OFF CUT A LENGTH OFF CUT B 1 1 2 3 8CM MIN CLEARANCE SEE NOTE R FROM EDGE OF CUTOUT AND FRONT EDGE OF COUNTERTOP 2 1 2 6 5 cm SLOT FOR CABLE ROUTING 3 1 2 9 cm 2 1 2 6 5 cm 1 1 4 3 2 cm Canadian COTOU...

Page 5: ...than 1 4 0 6 cm flame retardant millboard covered with no less than No 28 MSG sheet steel 0 015 0 04 cm stainless steel or 0 024 0 06 cm aluminum or 0 020 0 05cm copper 30 76 2 cm min clearance between top of cooking platform and bottom of unprotected wood or metal cabinet Important Preparation Suggestions 1 Chamfer all exposed edges of decorative laminate to prevent damage from chipping 2 Radius ...

Page 6: ...sure no structural members interfere with space requirements Prepare the cut out according to the instructions see cut out dimensions Make sure the wall coverings countertop and cabinets around the cooktop can withstand heat up to 200 F 93 C Figure 4 Tools you will need Step 1 Remove packaging materials and literature package from the cooktop before beginning installation Remove Installation Manua...

Page 7: ...e of the cooktop glass Use tape around the entire glass perimeter Cut off excess where tape ends butt Figure 7 Step 4 Insert the cooktop centered into the cutout opening Make sure the front edge of the counter top is parallel to the cooktop Make final check that all required clearances are met Figure 8 Step 5 Four clamp brackets are provided to clamp the cooktop to the countertop Tighten screws ju...

Page 8: ...tant For solid surface material installations such as Surel and Corian consult with solid surface manufacturer Apply heat reflective tape such as Scotch Aluminum Foil Tape 425 or 427 around the cutout so that it folds over on the top and sides Do not wrap the tape underneath the cooktop Be sure the tape extends beyond the outermost flange of the cooktop All corners should be covered with tape ...

Page 9: ...ed at 240V or 208V This cooktop does not require a neutral connection If the cooktop is to be completely enclosed in a cabinet feed the cooktop cable through the opening in the cabinet Make the electrical connection following the appropriate steps for your installation Your cooktop must be connected to the proper electrical voltage and frequency as specified in the table on the right Figure 12 Loc...

Page 10: ...course take precedence over these instructions Complete electrical connections according to local codes and ordinances DANGER Risk of Electric Shock frame grounded to neutral of appliance through a link Grounding through the neutral conductor is prohibited for new branch circuit installations 1996 NEC mobile homes and recreational vehicles or in an area where local codes prohibit grounding through...

Page 11: ...utures références PROPRIETAIRE Veuillez garder ce manuel pour de futures références FRANÇAIS Manuel d Installation 11 Tables des matieres Page Avertissement Spéciaux 1 Dimensions du Produit et Découpe 1 Conseils importants de préparation 1 Installation de la Table de Cuisson Connexions Electriques Informations générales Connexion à 3 fils Connexion à 4 fils Veuillez prêter attention à ces symboles...

Page 12: ...E LA DÉCOUPE 1 1 4 3 2 cm Canada 2 1 4 5 7cm US 30 3 8 77 1 cm 21 3 16 53 8 cm 3 1 8 7 9 cm 24 61 cm 21 53 3 cm 3 1 8 7 9 cm 36 3 16 91 9 cm 21 3 16 53 8 cm 3 1 8 7 9 cm Figure 1 30 24 36 Figure 2 LONGUEUR DE DÉCOUPE A LONGUEUR DE DÉCOUPE B 1 1 2 3 8CM ESPACE MINIMUM VOIR NOTE R DU BORD DE LA DÉCOUPE AU BORD ANTÉRIEUR DU PLAN DE TRAVAIL 2 1 2 6 5 cm SLOT POUR CABLES 3 1 2 9 cm 2 1 2 6 5 cm DIMENSI...

Page 13: ...étal est protégée par au moins 1 4 0 6 cm de carton reliure ignifuge avec une tôle d acier inoxydable No 28 MSG d au moins 0 015 0 04 cm ou d aluminium 0 024 0 06 cm ou de cuivre 0 020 0 05cm 30 76 2 cm d espace min entre le haut de la plate forme de cuisson et le bas du meuble non protégé en bois ou métal Conseils importants de préparation 1 Biseautez tous les bords exposés du contre plaqué décor...

Page 14: ...us qu aucun élément de structure n interfère avec les exigences d espace Préparez la découpe selon les instructions voir dimensions découpe Bien vérifier que les éléments suspendus le plan de travail et les meubles autour de la table de cuisson résistent à la chaleur jusqu à 200 F 93 C Figure 4 Les outils dont vous aurez besoin Étape 1 Enlevez les matériaux d emballage et les manuels d explication...

Page 15: ...la table de cuisson Utilisez un ruban tout autour du périmètre du verre Coupez le ruban en trop Figure 7 Étape 4 Insérez la table de cuisson centre de l ouverture de la découpe Vérifiez que le bord avant du plan de travail est parallèle à la table de cuisson Faites la dernière vérification que vous avez laissé tous les espaces nécessaires Figure 8 Étape 5 Quatre supports de fixation sont fournis p...

Page 16: ...iau solide comme le Surei et le Corian consultez le fabricant de surface solide Appliquez du ruban thermo réfléchissant comme le Scotch feuille de ruban aluminium 425 ou 427 autour de la découpe de sorte qu il déborde et se replie sur le dessus et les côtés N enveloppez pas le ruban en dessous de la ta ble de cuisson Vérifiez bien que le ruban aille au delà du rebord le plus externe de la table de...

Page 17: ...ge pas de branchement neutre Si la table de cuisson doit être complètement fermée dans un meuble alimentez le câble de la table de cuisson à travers l ouverture du meuble Faites les branchements électriques selon les étapes appro priées pour votre installation Votre table de cuisson doit être connecté au voltage électrique correct et au fréquence spécifié à droite Figure 12 Numéro de série Connexi...

Page 18: ...res sur ces ins tructions Effectuez les connexions électriques conformément aux codes locaux et les règlements DANGER Risque d électrocution cadre à la masse à une position neutre d un appareil par une liaison Mettre à la masse par un conducteur neutre est interdit pour les nouvelles installations de circuit électrique 1996 NEC les mobile homes et les véhicules de parc ou dans les régions où les c...

Page 19: ... futuras consultas PROPIETARIO Por favor conserve este manual para futuras consultas ESPAÑOL Manual de Instalación 19 Tabela de Contenido Pagina Advertencias Especiales Dimensiones del Producto y de Encastre 2 Importantes Consejos de Preparación Instalación de la Placa de Cocción Conexiones Eléctricas Informaciones generales Circuito de conexión de 3 hilos Circuito de conexión de 4 hilos Preste la...

Page 20: ... DE ENCASTRE 1 1 4 3 2 cm Canada 2 1 4 5 7cm US 30 3 8 77 1 cm 21 3 16 53 8 cm 3 1 8 7 9 cm 24 61 cm 21 53 3 cm 3 1 8 7 9 cm 36 3 16 91 9 cm 21 3 16 53 8 cm 3 1 8 7 9 cm Figura 1 30 24 36 Figura 2 LONGUITUD DEL CORTE A LONGUITUD DEL CORTE B 1 1 2 3 8CM ESPACIO MINIMO VER NOTA R DESDE EL BORDE DEL CORTE AL BORDE FRONTAL DE LA ENCIMINERA 2 1 2 6 5 cm SLOT PARA CABLE 3 1 2 9 cm 2 1 2 6 5 cm DIMENSION...

Page 21: ... o metal del armario está protegida como mínimo por 0 6 cm de cartón grueso re sistente al fuego cubierto por una lámina de acero inoxidable de 28 MSG mín 0 04 cm o de aluminio 0 06 cm o de cobre 0 05 cm Si la base del armario es de madera o metal sin protección la distancia entre esta y la encimera será de 76 2 cm Importantes Consejos de Preparación 1 Bisele todos los bordes expuestos de laminado...

Page 22: ...cas Asegúrese de que la encimera está bien equilibrada y de que ningún elemento interfiera o limite las con diciones de espacio Prepare los cortes de la encimera de acuerdo con las instrucciones vea Dimensiones de encastre Asegúrese de que el revestimiento de la pared la encimera y los armarios que rodeen la placa de cocción sean resistentes al calor hasta 200 F 93 C Figura 4 Herramientas necesari...

Page 23: ...aproximadamente a 1 5 mm del borde de cristal Recorte los extremos sobrantes Figura 7 Paso 4 Inserte la placa de cocción bien centrada en el hueco de encastre Asegúrese de que el borde frontal de la encimera esté paralelo a la placa Compruebe que una vez instalada la placa respeta las distancias de seguridad Figura 8 Paso 5 En el embalaje encontrará también cuatro grapas de fijación Apriete los to...

Page 24: ...aciones en encimeras con su perficie sólida como Surei y Corian consulte con el fabricante de la encimera Aplique cintas adhesivas de gran resistencia al calor como la cinta de Aluminio Scotch 425 o 427 alrededor del hueco de forma que se doble sobre la enci mera y los laterales No pegue la cinta por debajo de la placa de coc ción asegúrese de que la cinta se extiende más allá del borde exterior d...

Page 25: ...0V o 208V Esta placa de cocción no requiere conexión del neu tro Si va a colocar la placa en un armario asegúrese de que en él hay una abertura para pasar el cable de alimentación Efectúe la conexión eléctrica siguiendo los pasos adecuados para su instalación La placa debe estar conectada al voltaje y la frecuen cia adecuados tal y como se indica a la derecha Figura 12 Locacion numero di serie Uti...

Page 26: ...exiones eléctricas en conformidad con las normas y disposiciones locales PELIGRO Riesgo de electrocución marco conectado a tierra al neutro del aparato por medio de un enlace La puesta a tierra por medio de un conductor neutro está prohibida para las instalaciones de nuevos circui tos de conexión 1996 NEC casas móviles vehícu los recreativos o en áreas en donde las normas loca les prohíben la cone...

Page 27: ......

Page 28: ...DOC COD 09FL5092 06 20 ...

Reviews: