background image


Operating Instructions 

Ch.6


TRACKMASTER


42 

TMX428 Owner’s Manual


317-160-284 Rev 6 


February 2021 


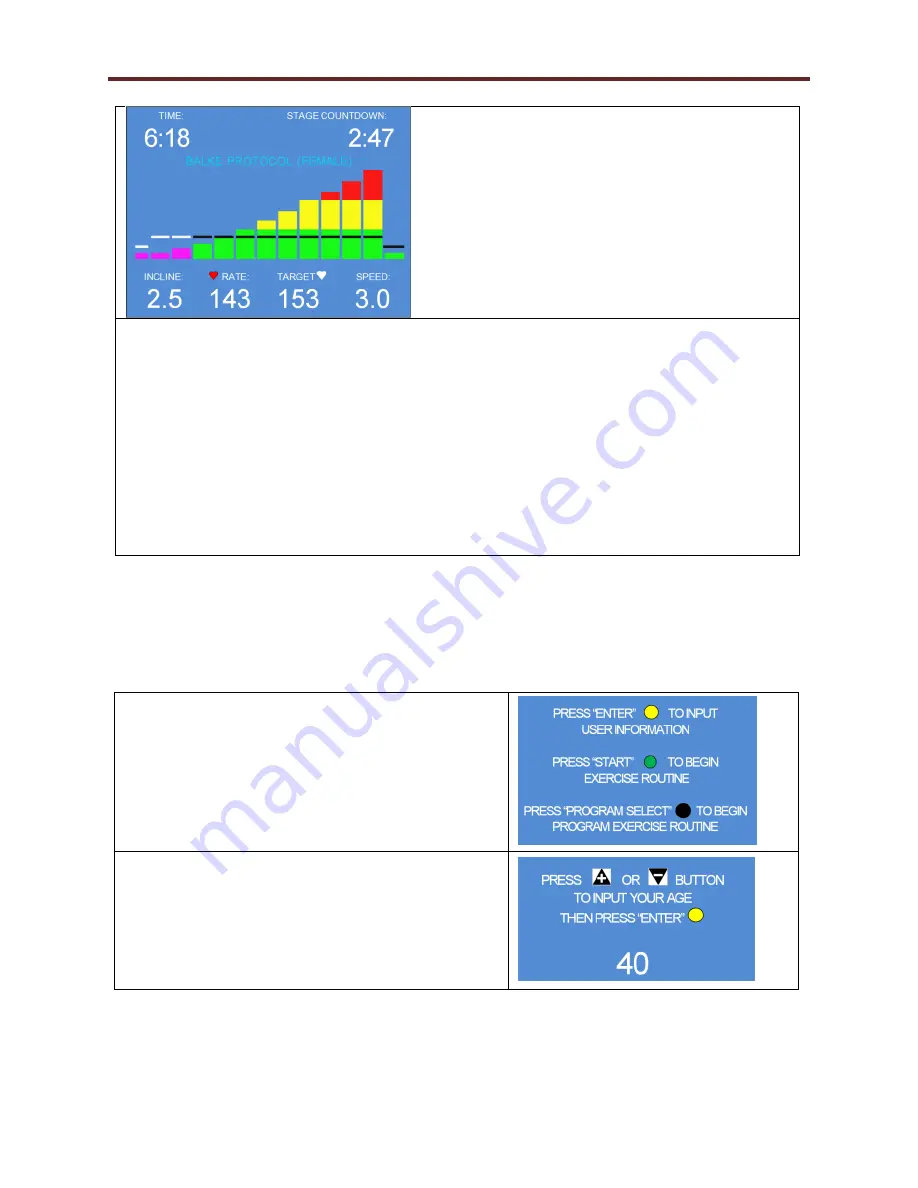
WORKOUT GRAPHICS 


1.


The  entire  workout  is  represented  in  the  form  of  a  colored  bar  graph  which  depicts  increasing 
workout intensity as well as workout progression and current treadmill settings. These values can be 
displayed in either Metric or English measurements. 

2.


Segments  that  have  been  completed  will  turn  to  MAGENTA.  In  the  example  above,  the  first  two 
segments of the workout have been completed leaving (7) segments yet to complete. 

3.


The GREEN portion of the bar represents an incline between 0 and 10% 

4.


The YELLOW portion of the bar represents an incline between 10% and 18%. 

5.


The RED portion of the bar represents an incline from 18% to 25%. 

6.


The  BLACK  horizontal  bars  represent the running  belt speed. They  will turn  to WHITE  when  the 
segment is completed.


MANUAL OPERATION: 

The  default  start-up  screen  allows  the  user  to  bypass  the  user  data  by  simply  pressing  the  START 
button. To enter user data, complete steps 1-16. The user interface screen easily leads the user through 
the appropriate steps to achieve a desired operation. 


1.


Press the ENTER button to input user information. 

2.


Optionally, press the START button to start the 
treadmill in a non-defined run mode-OR- 

3.


Press the PROGRAM SELECT button to view and 
select a Built-In routine. Go to step 15. 


If you opted to input your user information, follow 
the next 12 steps 

4.


Press the + or 

 button until the desired age appears 

on the screen. 

5.


Press the ENTER button to continue. 


Summary of Contents for TRACK MASTER TMX428

Page 1: ...TMX428 Owner s Manual 317 160 284 Rev 6 February 2021 MEDICAL TREADMILL OWNER S MANUAL TMX428 TMX428CP...

Page 2: ......

Page 3: ...MODIFICATION IS PROHIBITED The TRACKMASTER treadmill is manufactured to exacting standards both in physical form and in component selection The components used in our products have been selected with...

Page 4: ...ning medical devices from the following bodies Date of first CE mark August 2013 Revision History The document part number and revision history appear at the bottom of each page The revision identifie...

Page 5: ...r s Declaration Immunity All ME Equipment and ME Systems 13 Table 4 Guidance and Manufacturer s Declaration Immunity ME Equipment and ME Systems that is NOT Life supporting 14 Table 6 Recommended Sepa...

Page 6: ...al Setup Running Belt Tension Adjustment 34 Final Setup Drive Belt Tension Adjustment 34 Chapter 6 Operating Instructions 37 Electrical Safety Tests 37 Operating Controls 37 Controlling the Treadmill...

Page 7: ...ount Assembly 57 Circuit Board Assembly 58 Elevation Assembly 58 Pull Tether Assembly 59 Emergency Stop Assemblies 59 Motor Pan Assembly 60 Motor Pan Assembly Wiring 62 Frame Assembly 65 Deck Assembly...

Page 8: ...Contents TRACKMASTER 6 TMX428 Owner s Manual 317 160 284 Rev 6 February 2021...

Page 9: ...are expected to have working knowledge of medical procedures practices and terminology as required for completing these examinations Intended Use The medical treadmills are intended as stressing devi...

Page 10: ...signed and manufactured to the appropriate medical regulations and controls The purchaser is solely responsible for the training instruction supervision and safety of all users of the TRACKMASTER trea...

Page 11: ...rious injury For example WARNING Never open the hood of the TRACKMASTER treadmill while it is plugged into a power outlet Line voltage can cause severe injury or death Safety Hazards WARNING Before pe...

Page 12: ...re not considered enclosed protective footwear Walk in the center of the running belt Contact with the side rail and the moving belt could cause injury Place the treadmill on a hard level and unobstru...

Page 13: ...iately Never use the treadmill outdoors Immediately discontinue use and unplug the treadmill if you smell the distinctive odor of hot electrical components WARNING Serious injury or death could result...

Page 14: ...ory standards for FDA Class 1 motor operated physical medicine machines They have been tested by Intertek Testing Services N A Inc and are listed by Engineering Testing Laboratories ETL However the ul...

Page 15: ...The customer or user of the TMX428 Series should ensure that it is used in such an environment Immunity Test IEC 60601 Test Level Compliance Level Electromagnetic Environment Guidance ESD IEC 61000 4...

Page 16: ...stance in meters Field strengths from fixed transmitters as determined by an electromagnetic site survey should be less than the compliance levels V1 and E1 Interference may occur in the vicinity of e...

Page 17: ...ng belt unplug the treadmill power supply and seek factory authorized repair before attempting to restart the treadmill Never allow children or pets near the machine without qualified adult supervisio...

Page 18: ...ever drape garments hook up leads or other equipment over the side rails or drop objects on the belt while the TMX428 and TMX428CP is running Do not allow moisture or oils to accumulate on equipment c...

Page 19: ...c shock hazards To reduce the risk of electric shock hazards do not open this enclosure Refer servicing to qualified personnel Reading of the Owner s Manual is mandatory Elevation incline decline adju...

Page 20: ...ating the potential presence of hazardous substances in the waste stream Customers should contact their local authorities or TRACKMASTER Distributor for guidance in complying with the directive Keep D...

Page 21: ...duction 317 160 284 Rev 6 TMX428 Owner s Manual 19 February 2021 Product and Package Information This section identifies the labels and their locations on the product and packaging TMX428 TMX428CP Shi...

Page 22: ...on RH or LH end cap on handrail Identifies E Stop 3 Front of the device on the hood Identifies the Caution Electrical shock hazard 4 On the motor Identifies the Caution Electrical shock hazard 5 On th...

Page 23: ...duct Model 12 Front of device Identifies Listing Standards 13 Front of device Contains the European Union disposal requirements 14 Front of the device on motor pan on Shipping label Identifies Unique...

Page 24: ...ll 6 Amps Specifies amperage of treadmill 7 Serial Number Manufacturers assigned serial number 8 Manufacturer Date Manufacturers date code 9 Type B Equipment Device is suitable for the external applic...

Page 25: ...sed on the assumption that you are standing on the treadmill TMX 428 facing the control console TMX 428CP All parts listed below are considered Patient Applied Parts except where noted Item Descriptio...

Page 26: ...0 60 Hz 15 amp power supply optional US Configuration Speed Range 0 1 to 15 0 MPH 0 2 to 24 0 KPH self calibrating and adjustable in 0 1 MPH 0 2 KPH increments Incline Range 0 to 25 5 incremental move...

Page 27: ...ain if the outlet meets local electrical codes Polarized outlets such as NEMA 5 20 and CEE7 7 must be verified for proper polarity configuration before plugging in the device Incorrect polarization of...

Page 28: ...electric current Ungrounded connections must not be used No other equipment may be used on the electrical circuit with the device Do not use extension cords Using a shared or unreliable circuit can a...

Page 29: ...to the Trackmaster electronic control system Failure to follow these instructions will void your warranty NEVER USE AN AC HI POT TESTER ON THIS TREADMILL Using an AC Hi Pot tester will permanently da...

Page 30: ...Power Requirements Ch 4 TRACKMASTER 28 TMX428 Owner s Manual 317 160 284 Rev 6 February 2021...

Page 31: ...t the 3 nylon straps holding the cardboard cover to the wood pallet 2 Remove the cardboard box by lifting straight up from one end to clear the treadmill 3 Carefully cut the zip tie to open the protec...

Page 32: ...de treadmill balance Note When moving to final destination you may experience a narrow passage or doorway The treadmill can be tipped on the side with handrails in the folded position This will allow...

Page 33: ...mbly into the operating position and insert 2 3 8 16 bolts and 3 8 lock washer each side and tighten securely 2 Install 2 plastic caps each side for a finished look Figure 5 1 Item Description 1 Opera...

Page 34: ...5 Connect electrical 6 pin connection to J8 and quick disconnect to BC4 and BC5 to the back of the LCD Screen console from the connectors within the handrail cross brace 6 Attach the console to the co...

Page 35: ...admill will pivot on its wheels and push forward When you have maneuvered the treadmill into its location gently lower the end of the bed assembly to the floor WARNING The device weight is 425lbs This...

Page 36: ...m significantly reduces the need to adjust the belt on your treadmill However when you operate your treadmill for the first time you may need to adjust the tracking of the belt to conform to your floo...

Page 37: ...connector and turn treadmill power ON Continue holding until treadmill begins to elevate 4 Once this is initiated each push of the button should elevate the treadmill by 5 5 When the treadmill reaches...

Page 38: ...y The standard Female RS232 port and a new USB B port offer connectivity diversification You will need to install the appropriate USB driver software in order to communicate with the TRACKMASTER tread...

Page 39: ...t handrail Optional on opposite side Controlling the Treadmill Turn the power switch ON Use the controlling equipment to start the treadmill adjust the treadmill speed and grade proceed through exerci...

Page 40: ...ull tether clip needs to be seated for the treadmill to operate as designed Pull Tether Switch Check NOTE Verify proper operation of the pull tether switch assembly every month With the belt moving at...

Page 41: ...thru communication All control buttons on the console are disabled in this mode with the exception of the two stop buttons located at the lower left and lower right of the control The display will re...

Page 42: ...0 with a maximum of 25 The degree of incline can be increased or decreased in 5 increments Distance The distance traveled in miles during the duration of the workout session beginning with the initia...

Page 43: ...segments of a workout when creating or modifying a workout routine Speed Minus Slower The triangular speed minus button decreases the speed of the running belt by 0 1 MPH or KPH each time it is presse...

Page 44: ...een 10 and 18 5 The RED portion of the bar represents an incline from 18 to 25 6 The BLACK horizontal bars represent the running belt speed They will turn to WHITE when the segment is completed MANUAL...

Page 45: ...ireless chest strap or pulse rate watch monitoring device NOTE If the user exceeds the stated heart rate target the screen will flash a warning that the target heart rate has been exceeded The treadmi...

Page 46: ...to define a custom workout by utilizing the buttons When the desired program is highlighted press the Yellow Enter button to select If the user selects Fitness Workouts go to Step 17 If the user sele...

Page 47: ...7 1 min 9 7 6 0 6 Stage 8 1 min 9 7 6 0 8 Stage 9 1 min 10 5 6 5 8 Stage 10 1 min 10 5 6 5 10 Stage 11 1 min 11 3 7 0 10 Stage 12 1 min 11 3 7 0 12 Stage 13 1 min 12 0 7 5 12 Stage 14 1 min 12 0 7 5 1...

Page 48: ...3 3 14 Stage 15 1 min 5 3 3 3 15 Stage 16 1 min 5 3 3 3 16 Stage 17 1 min 5 3 3 3 17 Stage 18 1 min 5 3 3 3 18 Stage 19 1 min 5 3 3 3 19 Stage 20 1 min 5 3 3 3 20 Stage 21 1 min 5 3 3 3 21 Stage 22 1...

Page 49: ...on to input user information or press the Green Start button to begin workout NOTE Any of the Fitness Interval Training programs can be altered in intensity merely by pressing for belt speed or inclin...

Page 50: ...5 0 Stage 11 0 5 min 6 4 4 0 0 Stage 12 1 5 min 4 0 2 5 0 Stage 13 0 5 min 6 4 4 0 0 Stage 14 1 0 min 4 0 2 5 0 Cool Down 3 0 min 3 2 2 0 0 HIGH INTENSITY SPEED INTERVAL WORKOUT Time Speed KPH MPH In...

Page 51: ...5 7 Stage 11 0 5 min 6 4 4 0 12 Stage 12 1 5 min 4 0 2 5 10 Stage 13 0 5 min 6 4 4 0 12 Stage 14 1 0 min 4 0 2 5 3 Cool Down 3 0 min 3 2 2 0 0 HI INTENSITY PEAK INTERVAL WORKOUT Time Speed KPM MPH Inc...

Page 52: ...at the right shows the 5 Custom Workouts the user can choose from The control has room for 10 Select the desired Custom Workout by pressing the button then press the Green Start button to begin or pre...

Page 53: ...by an authorized and qualified service provider Contact customer support with any questions at 316 283 3344 Use only TRACKMASTER replacement parts Using other parts may void your warranty and may cau...

Page 54: ...l Allen wrench NOTE Because this adjustment is not covered under your warranty it is important that you review these instructions thoroughly before proceeding The patented MasterTrack Belt Tracking Sy...

Page 55: ...t The running belt may stretch and loosen with regular use This looseness is noticeable when the belt tends to hesitate or stick Adjust the tension on the belt by following the procedure and referring...

Page 56: ...and wrench loosen the TENSION ADJUSTMENT back nut 3 Press down on drive belt between motor and front roller with approximately 5lbs of force to achieve to 3 8 4 If adjustment is need using a wrench tu...

Page 57: ...F position and unplug the treadmill from its outlet 3 Using a lint free cloth remove the old lubricant and accumulated dust from the elevation screw 4 Use a small brush to reapply a thin coat of greas...

Page 58: ...Preventive Maintenance Ch 7 TRACKMASTER 56 TMX428 Owner s Manual 317 160 284 Rev 6 February 2021...

Page 59: ...317 160 197 1 3 Sprocket Drive 530 5MGT 15 317 160 201 1 4 Flywheel DC W Magnet 50 Dia 317 160 200 1 5 HHCS 7 16 14 x 5 Lg 001 2332 1 6 NLN 7 16 14 001 2333 1 7 HHCS 13 3 Lg All Thread 001 2348 1 8 H...

Page 60: ...ersal Power Supply 317 160 199 1 3 HN 8 32 Nylon 001 1763 5 4 Mount Inverter Isolation 317 160 040 5 5 HHWHTS 8 32 x 375 001 1744 5 6 Trim Black 3 Lg 001 102 044 1 Elevation Assembly Item Description...

Page 61: ...LPDE BLK Modified Not Sold Individually 317 160 230 1 1 3 Pull Tether Assembly Sold as assembled kit 317 720 001 1 Emergency Stop Assemblies Item Description Part Number Qty 1 Emergency Stop IDEC Not...

Page 62: ...e Ch 8 TRACKMASTER 60 TMX428 Owner s Manual 317 160 284 Rev 6 February 2021 Motor Pan Assembly DC MOTOR MOUNT ASSEMBLY CIRCUIT BOARD MOUNT ASSEMBLY TAP 10 32 HOLE AND SAND POWDER COAT MATERIAL FOR PRO...

Page 63: ...3 8 16 001 1430 1 12 Fan Assembly DC W Connector 317 160 202 1 13 RHMS 6 32 x 50 Lg 001 1851 4 14 K Lock Nut 6 32 001 1858 4 15 Resistor Omite 85 150MJ40R0DE 317 160 233 1 16 HNS 8 32 Flange 001 1636...

Page 64: ...CTOR 220V CONFIGURATION RESITOR OMITE DRIVE DC SERVO PC2303 012 N BLANK BLACK 240 BROWN HOT BLANK CONNET COLOR CONFIGURATION 25 GAP ITEM 12 SHEETS 1 OF 2 RELAY NOT SHOWN DC FAN WIRE BLACK 120V CONFIGU...

Page 65: ...MON BLUE INCLINE HOT BROWN AC HOT BLK WHT BLK RED BRN BRN BRN BLU HARNESS CONNECTOR BLACK HARNESS CONNECTOR BROWN CONNECTOR COLOR CONFIGURATION POWER SWITCH ASSEMBLY HARNESS JUMPER BROWN HARNESS JUMPE...

Page 66: ...7 160 076 2 8 Harness Motor Controller 417 160 031 1 9 Harness Ground 317 160 070 2 10 Harness Main DC Treadmill 317 160 247 1 11 Harness Jumper 317 160 071 2 12 LW 10 EXT Tooth 001 1751 1 13 Surge Su...

Page 67: ...TRACKMASTER Ch 8 Parts List with Part Numbers 317 160 284 Rev 6 TMX428 Owner s Manual 65 February 2021 Frame Assembly APPLY MOLY BASED GREASE 2X...

Page 68: ...20 Grade 5 001 1386 26 12 Landing Gear Assembly 317 702 001 1 13 Bumper 1 8 Dia Black 317 160 106 2 14 Shoulder Bolt HSHSS 5 8 Dia x 1 Lg 001 1730 2 15 Elevation Delrin Spacer 317 160 060 4 16 Flat Wa...

Page 69: ...CAMBER UP SEE NOTE 3 SEE NOTE 1 NOTES 1 ADJUSTMENT SCREWS MUST BE MATCH TIGHTENED PROPER TENSION IS ACHIEVED WHEN BELT CAN T SLIP ON PULLEYS WHEN IN OPERATION 2 ADJUST DRIVE BELT TENSION PULLING ALL F...

Page 70: ...lator 1 75 Dia with Stud 317 345 003 6 8 Flange Lock Nut HNS 5 16 18 001 1398 6 9 Deck Running Board 317 160 025 1 10 Screw HSFCHCS 5 16 18 x 1 5 Lg PLTD 001 1739 6 11 Roller Front 317 160 156 1 12 Se...

Page 71: ...IL 1 OUTSIDE CONTACT CONNECT CABLE TO PULL TETHER CONNECT CONTACT I I ROUTE THRU LEFT HANDRAIL CONNECT CABLE TO ESB ROUTE WIRES THRU CENTER LEFT HAND RAIL CONTROLLER OPTION CONNECT CONSOLE COMMUNICATI...

Page 72: ...230 VAC C 19 AS NZS 3112 Power Cord 200 240 VAC C 19 CEE 7 7 EURO Power Cord 250 VAC C 19 Type N Brazil Power Cord 230 VAC C 19 UK BS1363 Power Cord 240 VAC C 19 BS546 3 pin Option Power Cord 250 VAC...

Page 73: ...TRACKMASTER Ch 8 Parts List with Part Numbers 317 160 284 Rev 6 TMX428 Owner s Manual 71 February 2021 TMX428CP Controller Assembly CONNECT TO J10 ON LCD SCREEN...

Page 74: ...ack Plate Fitness Panel 317 731 001 1 6 Fastener 20 UNC Riv Nut 001 1686 4 7 Rubber Control Dampener 317 160 277 2 8 Handrail Controller TMX428CP 317 719 001 1 9 Flat Washer Dia 001 1439 4 10 Lock Was...

Page 75: ...large transformer 8 If connections at the power switch breaker are good turn main power switch to OFF and unplug the treadmill from the wall receptacle Check the continuity of each conductor of the po...

Page 76: ...Center Occasionally the treadmill running belt will become off center See Running Belt Tracking Adjustment Internal Circuit Breaker Location and Resetting 1 All circuit breakers are located at the fr...

Page 77: ...ner s Manual 75 February 2021 Maintenance Log Serial _______________________________Date Purchased_______________ Purchased From ________________________Phone_______________________ DATE HOURS SERVICE...

Page 78: ...76 TMX428 Owner s Manual 317 160 284 Rev 6 February 2021...

Page 79: ...eaning Do not use abrasive brushes or abrasive cleaners This could damage the paint and plastic surfaces Do not use sharp tools e g knife metal scraper or aggressive cleaning solvents for cleaning Alc...

Page 80: ...switch to OFF and disconnect the treadmill from its power outlet Step 2 Prepare 20 mL 0 68 oz of 70 or greater isopropyl alcohol disinfectant solution according to the manufacturer s directions Step 3...

Page 81: ...er 4 Hood 5 Running Belt 6 Controller if applicable The instructions provided have been validated by the manufacturer of the medical device as being capable of preparing a medical device for reuse It...

Page 82: ...80 TMX428 Owner s Manual 317 160 284 Rev 6 February 2021...

Page 83: ...2020 Full Vision Inc Assembled in Newton KS U S A 3017 Full Vision Drive Newton KS 67114 www full vision com www trackmastertreadmills com...

Reviews: