background image

1. Place the top rack 

5

 onto the collecting container 

1

.

2. Flip the pusher 

2

 open.

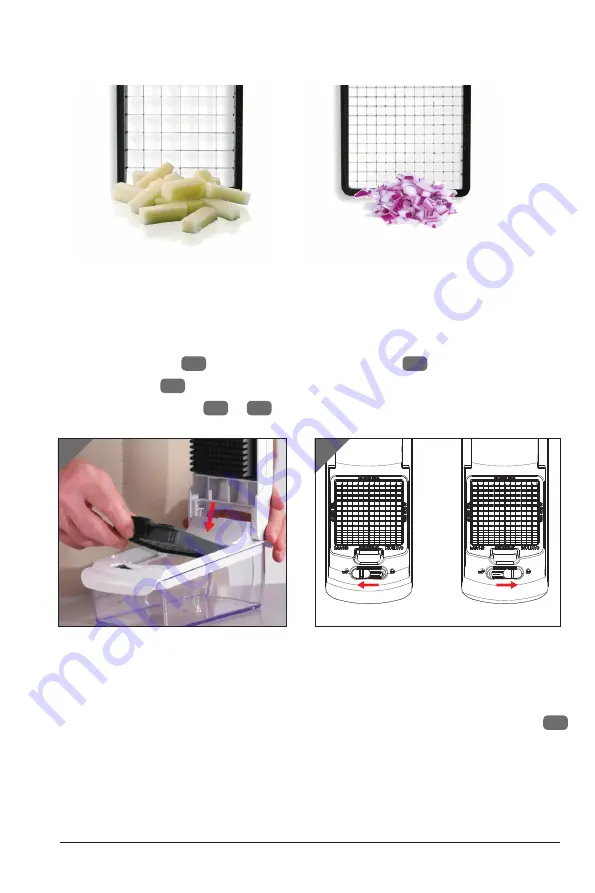
3. Select a cutting blade 

6

 or 

7

 and insert it into the lower slot       

(see Fig. B).  

C

Ensure correct installation with the text “THIS SIDE UP” facing upward on the 

cutting blade.

4.Lock the cutting blade(see Fig.C) 

6.Close the pusher. The chopper is now assembled and ready for use.

It is recommended to always close the pusher when the chopper is not 

in use.

5

TWO CHOPPING BLADES INCLUDED

Fine chopping blade

for onions, zucchinis, chillis,

shallots, garlic, mushrooms.

soft cheese, bell peppers and more.

Medium chopping blade

 for carrots,potatoes, zucchinis, onions,

shallots, peppers,chillis. 

5.To replace the cutting blade, unlock the cutting blade then remove the

  installed cutting blade before placing the desired one onto the chopper base

4

B

Summary of Contents for CHOPPER PLUS

Page 1: ...blade holder Spiralizer spiked grip Spiralizer cleaning brush 14 Blade lock button 15 Dicer cleaning brush The top rack consists of the pusher and chopper base CHOPPER PLUS 11 10 5 6 7 14 8 9 12 15 13 Live Life to the Full Full Instruction Video Here fullstar org videos ...

Page 2: ...in personal injury or damage to the CHOPPER PLUS Store the user manual for further use Make sure to include this user manual when passing the CHOPPER PLUS on to third parties Safety Proper use The CHOPPER PLUS is exclusively designed for cutting fruit and vegetable It is only intended for private use and not suitable for commercial purposes Only use the CHOPPER PLUS as described in this user manua...

Page 3: ... The blades are very sharp Keep fingers clear of the blades at all times Keep children away from the food chopper Do not leave the CHOPPER PLUS unattended during use Before using the CHOPPER PLUS check that all parts are operating properly and perform the intended functions Do not use the CHOPPER PLUS if damage is found Ensure that the CHOPPER PLUS is stable during use The collecting container sho...

Page 4: ...e a microwave or oven First use Checking the CHOPPER PLUS and package contents 1 Take the CHOPPER PLUS out of the packaging and check whether the CHOPPER PLUS or any of the individual parts are broken or damaged If this is the case do not use the CHOPPER PLUS Be very careful when opening the packaging to prevent damage to the CHOPPER PLUS 2 Check to make sure that all components and accessories ha...

Page 5: ...s clear of the blades at all times Before using the chopper Peel fruit or vegetable with thick skin e g onion Remove stems and trim ends Cut large fruit or vegetable into smaller pieces must be smaller than the cutting blade the height of the food is not greater than 4cm before cutting 4 Carrots zucchinis cucumbers 0 53x0 53 in 0 27x0 27 in Zucchini mushrooms soft cheese peppers and more ...

Page 6: ...r The chopper is now assembled and ready for use It is recommended to always close the pusher when the chopper is not in use 5 TWO CHOPPING BLADES INCLUDED Fine chopping blade for onions zucchinis chillis shallots garlic mushrooms soft cheese bell peppers and more Medium chopping blade for carrots potatoes zucchinis onions shallots peppers chillis 5 To replace the cutting blade unlock the cutting ...

Page 7: ...er and press it downward onto the fruit or vegetable see Fig D1 D1 4 Remove the top rack 5 to empty the cut fruit or vegetable from the collecting container 1 Cut an onion or large vegetable into a quarter or much smaller pieces when using the fine chopping blade Press the pusher down swiftly and firmly with both hands like a hammer Fruits or vegetables to be cut are pressed downward through the c...

Page 8: ...p Keep fingers clear of the blades at all times 7 TWO SPIRALIZING BLADES INCLUDED Spiralizing Julienne blade for cucumbers zucchinis carrots Ribbon blade for cucumbers zucchinis carrots Spiralizer spiked grip skewer short pieces of food or end pieces 4 Clean all blades under running water immediately after use in order to prolong the life of blade and keep them sharp for longer time ...

Page 9: ...e stems and trim ends 7 Place food into the insert 8 1 Flip the pusher 2 11 9 10 4 11 12 open F H G I or ATTENTION Skewer short pieces of food or end pieces on the Spiralizer spiked grip 8 Twist the food with slight pressure to slice it See Fig I 9 Clean all blades under running water immediately after use in order to prolong the life of blade and keep them sharp for longer time 3 Switch to lock S...

Page 10: ...E 3 13 15 Use spiralizer cleaning brush to remove any stuck food see Fig J1 Do not use Spiralizer cleaning brush to clean chopping blades otherwise the brush bristles will be torn off easily Clean the chopping blades with provided Dicer cleaning brush and always keep fingers clear of blades at all times see Fig J2 Storage All parts must be completely dry before storing J2 Cleaning Extremely sharp ...

Page 11: ...r stain the plastic and blade parts This is normal and safe it s common issue with plastic products of this nature The best thing to do is to prevent it from happening in the first place as follows Spray some vegetable oil on the plastic parts where the plastic may come into contact with the vegetable This will make it much harder for carrots beets to stain the plastic parts If stains happen pleas...

Reviews: