background image

CONTENTS

Warnings

   .   .   .   .   .   .   .   .   .   .   .   .   .   .   .   .   .   .   .   .   .   .   .   .   .   .   .   .   .   .   .   .   .   .   .   .   .   .   .   .   .   .   .   .   .    Page 1

Load Rating

 .   .   .   .   .   .   .   .   .   .   .   .   .   .   .   .   .   .   .   .   .   .   .   .   .   .   .   .   .   .   .   .   .   .   .   .   .   .   .   .   .   .   .   .    Page 3

Dimensions   . 

  .   .   .   .   .   .   .   .   .   .   .   .   .   .   .   .   .   .   .   .   .   .   .   .   .   .   .   .   .   .   .   .   .   .   .   .   .   .   .   .   .   .   .   Page 4

Assembly Tips

  .   .   .   .   .   .   .   .   .   .   .   .   .   .   .   .   .   .   .   .   .   .   .   .   .   .   .   .   .   .   .   .   .   .   .   .   .   .   .   .   .   .   .    Page 5                    

Inventory

   .   .   .   .   .   .   .   .   .   .   .   .   .   .   .   .   .   .   .   .   .   .   .   .   .   .   .   .   .   .   .   .   .   .   .   .   .   .   .   .   .   .   .   .   .    Page 7

Assembly Instructions

   .   .   .   .   .   .   .   .   .   .   .   .   .   .   .   .   .   .   .   .   .   .   .   .   .   .   .   .   .   .   .   .   .   .   .   .   .   .   .    Page 9


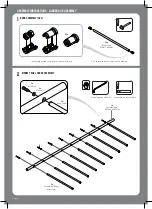
Ladder Bar Assembly

     .   .   .   .   .   .   .   .   .   .   .   .   .   .   .   .   .   .   .   .   .   .   .   .   .   .   .   .   .   .   .   .   .   .   .    Page 9


Leg Assembly

    .   .   .   .   .   .   .   .   .   .   .   .   .   .   .   .   .   .   .   .   .   .   .   .   .   .   .   .   .   .   .   .   .   .   .   .   .   .   .    Page 12


Twirly Whirly Bar Assembly 

.   .   .   .   .   .   .   .   .   .   .   .   .   .   .   .   .   .   .   .   .   .   .   .   .   .   .   .   .   .   .   .   .   .   Page 16


Main Monkey Bar Assembly 

   .   .   .   .   .   .   .   .   .   .   .   .   .   .   .   .   .   .   .   .   .   .   .   .   .   .   .   .   .   .   .   .    Page 18


Swing Bar Assembly

 .   .   .   .   .   .   .   .   .   .   .   .   .   .   .   .   .   .   .   .   .   .   .   .   .   .   .   .   .   .   .   .   .   .   .   .   .   Page 20


Load Twirly Whirly Bars   .  

 .   .   .   .   .   .   .   .   .   .   .   .   .   .   .   .   .   .   .   .   .   .   .   .   .   .   .   .   .   .    .   .   .   .   Page 24

Maintenance

   .   .   .   .   .   .   .   .   .   .   .   .   .   .   .   .   .   .   .   .   .   .   .   .   .   .   .   .   .   .   .   .   .   .   .   .   .   .   .   .   .   .   .   Page 26       

Page 1

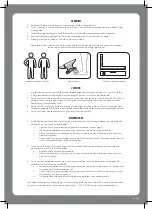
SAFETY NOTICE

1.  Any person handling or using the Funky Monkey Bars® products must follow the instructions as described  
 

in this document. The person in charge of assembling and using the equipment must ensure that the  


recommendations for use given in this document are seen by all users.

2.  Only use the Funky Monkey Bars® after they have been fully assembled and after checking that the  
 

fittings are tightened properly (

refer to page 5 - Correct Tightening Method

).

3.  DO NOT install your Funky Monkey Bars® over concrete, asphalt, packed earth, wood decking or any  
 

other hard surface. A fall onto a hard surface can result in serious injury or death.

4.  Inspect all grub screws, bolts and nuts at the beginning of each play session to ensure your Funky Monkey  
 Bars® are tight and secure.
5.  Ensure all tubes are fully inserted into fittings until you hear the magic “CLUNK” sound.
6.  Ensure your Funky Monkey Bars® are properly secure at ALL times. Pegs are in place and inserted fully into  
 

the ground.

7.  DO NOT exceed the maximum load/weight limit as recommended by Funky Monkey Bars®.
8.  Children should be supervised by an adult at all times.
9.  Installing a gym/crash mat under the fall zone area of your Funky Monkey Bars® would be recommended  
 

for children learning this new skill. This will reduce the chance of injury and build the child’s confidence  


while they build strength and master the skill.

10.  Ensure you have thoroughly read your assembly and installation instructions and viewed our on-line   
 

installation videos at 

https://www.funkymonkeybars.com/blogs/installation-maintenance-videos

11.  DO NOT climb, sit or stand on top of the monkey bar (horizontal ladder) section.
12.  DO NOT jump from the top of any section of the monkey bar.
13.  DO NOT use your Funky Monkey Bars® when wet as the steel will be slippery.
14.  DO NOT attach items to your frame that are not designed specifically to be used with Funky Monkey  
 Bars®, especially lower quality products that have not been approved by Funky Monkey Bars®.
15.  Ensure the height of your Funky Monkey Bars® (horizontal ladder) are set at a level that is age appropriate.
16.  DO NOT install your Funky Monkey Bars® over or near objects that could interfere with users in an unsafe  
 

way. Maintain a clear area around your Funky Monkey Bars®.

17.  DO NOT use your Funky Monkey Bars® while under the influence of drugs and alcohol.
18.  Wear clothing free of drawstrings, hooks, loops or anything that could get caught while using your Funky  
 

Monkey Bars® and result in entanglement and/or strangulation.

WARNING

PLEASE CAREFULLY READ ALL INFORMATION CONTAINED IN THIS ASSEMBLY MANUAL BEFORE 

YOU INSTALL AND USE YOUR FUNKY MONKEY BARS®.

WARNINGS

Summary of Contents for THE MARMOSET

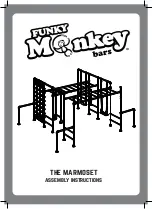
Page 1: ...THE MARMOSET ASSEMBLY INSTRUCTIONS...

Page 2: ...ey Bars 8 Children should be supervised by an adult at all times 9 Installing a gym crash mat under the fall zone area of your Funky Monkey Bars would be recommended for children learning this new ski...

Page 3: ...cesses be performed on your Funky Monkey Bars Tighten all connections and hardware Check all protective coverings on bolts pipes edges and corners Replace if they are loose cracked or missing 3 Once a...

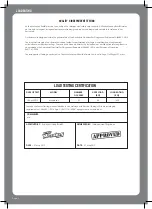
Page 4: ...testing The tests have been performed by independent certified structural engineers in accordance with Australian Standard for Playground Equipment AS4685 1 2014 and European Standards EN1176 1 2008 T...

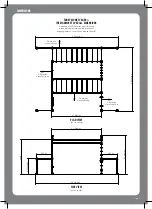
Page 5: ...e elevated hanging points of your Funky Monkey Bars not to scale 2 0 Metres clear fall zone 2 0 Metres clear fall zone not to scale Page 4 DIMENSIONS PLAN VIEW SIDE VIEW FUNKY MONKEY BARS THE MARMOSET...

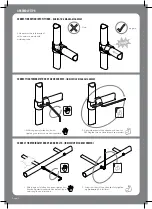
Page 6: ...of allen key hand tighten grub screw as much as possible 2 Using other end of the allen key do one full 360 degree turn as a minimum use muscles ASSEMBLY TIPS o 360 CORRECT TIGHTENING METHOD OF RUNG B...

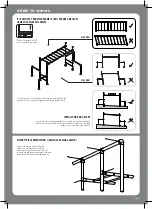
Page 7: ...level square straight PLAN VIEW SIDE VIEW IT IS CRITICAL YOUR MAIN FRAME IS 100 SQUARE AND LEVEL indicative diagram shown If your frame is not straight or level remove pegs loosen grub screws re adjus...

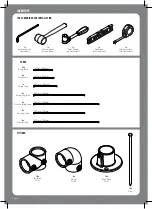
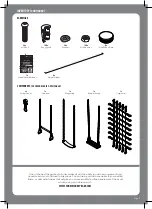
Page 8: ...LLATION FITTINGS 1x Spirit Level Not included Page 7 INVENTORY 50Dia x 900mm 50Dia x 2950mm 50Dia x 2950mm 50Dia x 2300mm 25Dia x 850mm 50Dia x 2300mm 8x Adj Leg Tube TUBES 4x Ladder Tube 2x Double Sw...

Page 9: ...of the best things about a Funky Monkey Bar is the ability to add new equipment and accessories as your child and family grows You can swap or add accessories to your existing frame or add extra fram...

Page 10: ...x Assembled Rungs from step 1 9x Rung tube Hand tighten all bolts MONKEY BAR LADDER ASSEMBLY 2 Page 9 ASSEMBLY INSTRUCTIONS LADDER BAR ASSEMBLY 1 Assemble plastic rung inserts as shown above 2 Push in...

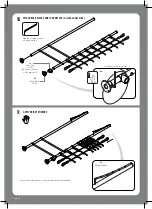
Page 11: ...3 4 turns FIRMLY TIGHTEN ALL RUNG BOLTS 1x Ladder Tube 50Dia x 2950mm 18x 3 4 Hand tighten all bolts Page 10 ATTACH SECOND LADDER TUBE 9x M10 Bolts 9x Washers See page 5 for correct tightening method...

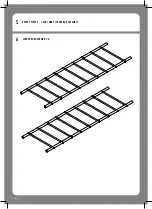
Page 12: ...Page 11 5 REPEAT STEPS 2 4 FOR 1 MORE LADDER BAR ASSEMBLY LADDER BAR ASSEMBLY x2 6...

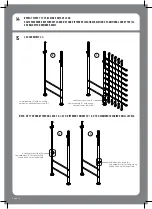
Page 13: ...bolts 9 Page 12 ASSEMBLY INSTRUCTIONS LEG ASSEMBLY INSERT RUNGS ATTACH SECOND LEG AND CARGO NET 2x M10 Bolts 2x Washers 1 Slide cargo net onto second leg tube 2 Ensure one or two hoops are between th...

Page 14: ...2x Height Sticker 10 11 Tighten all grub screws on base plates 2x Base Plate D 125 Page 13 ATTACH BASE PLATES AND 1x SHORT TEE A cargo net side APPLY HEIGHT STICKERS 1x Short Tee D 101 Short tee A on...

Page 15: ...go hoops if required 2x 2x Short Tee D 101 Page 14 SET LADDER BAR HEIGHT 13 FIRMLY TIGHTEN ALL GRUB SCREWS AND RUNG BOLTS 8x 360 o Hand tighten grub screw A Temporary location Fully tighten all others...

Page 16: ...t tee A LEG ASSEMBLY x 4 SEE BELOW FOR DESIRED RESULT Additional short tee A Leg assembly 1 with cargo net and lower short tee Additional short tee A Leg assembly 3 for twirly whirly connection on lef...

Page 17: ...TICAL TWIRLY TUBE 360 o Page 16 ASSEMBLY INSTRUCTIONS TWIRLY WHIRLY BAR ASSEMBLY ATTACH HORIZONTAL TWIRLY TUBE Fully insert twirly tube then firmly tighten all grub screws 1x Twirly Tube 50Dia x 900mm...

Page 18: ...Page 17 ASSEMBLY INSTRUCTIONS MAIN MONKEY BAR ASSEMBLY 180 180 1 2 1 Attach first set of legs 1 tighten all grub screws 2 Attach second set of legs 2 tighten all grub screws 1 2 For the following step...

Page 19: ...22 180 Hammer in pegs x4 23 4x Pegs Page 18 FLIP ASSEMBLY OVER SECURE TO GROUND CRITICAL ENSURE YOUR FRAME IS 100 SQUARE AND LEVEL AS PER PAGE 6 BEFORE MOVING ONTO THE REST OF THE ASSEMBLY...

Page 20: ...105cm apart Do not peg down second assembly at this stage 1040mm Ensure short tees for twirly whirly attachment are on the far side to the first assembled monkey bar frame 24 25 REPEAT STEPS 20 22 FOR...

Page 21: ...and fully tighten elbow grub screws Leave short tees and swing hooks loose for assembly adjustment 26 SWING BAR ASSEMBLY x2 Page 20 ASSEMBLY INSTRUCTIONS SWING BAR ASSEMBLY 4x Swing Hooks 2x Swing Hoo...

Page 22: ...There are 2x short tees on the cargo net side Cargo Net Side Fully tighten all elbow grub screws 360 o Page 21 Attach the short tees and the elbows on the swing bars to the main monkey bar ladder leg...

Page 23: ...en the swing leg and the other monkey ladder Approx 1040 apart 2 Loosen grub screws on A B C 3 Thread in bottom cargo tube between cargo net hoops fully engage into short tees 360 o 1x Cargo Tube Dia...

Page 24: ...rly bars from step 19 360 o Page 23 1 Check level and square 2 Hammer in all remaining pegs x6 31 6x Pegs SECURE TO GROUND Adjust height of short tees to align with horizontal twirly whirly bar Tighte...

Page 25: ...TWIRLY WHIRLY BARS 1 Ensure twirly whirly is level and square swing leg is pegged down 2 Loosen the grub screw fixing the short tee to the swing leg 6 Tighten grub screw fixing the short tee to the sw...

Page 26: ...swing hook bolts with rachet Marmoset supplied accessory rubber swing shown 34 Marmoset supplied accessory trapeze shown Marmoset supplied accessory sling swing shown 1 Ensure frame is square and leve...

Page 27: ...t the beginning of each heavy play session especially a party and twice a month during play season ensure 1 Tighten all hardware grub screws nuts and bolts 2 Pegs are in place and fully secure 3 Lubri...

Page 28: ...funkymonkeybars com www funkymonkeybars com 9 Cutting Way Yangebup WA 6164 we are social monkeys AUSTRALIAN MADE AND OWNED ABN IP Australia All Funky Monkey Bars designs are registered and protected u...

Reviews: