RVC-7W
- 8 -
circumstances. Consult the electrical code for
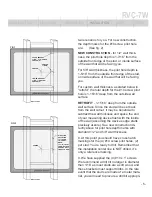
your area. Make sure all three wires are se-
cure. (See fi g. 4)
19. Now, connect the Plasma or projector’s de-
tachable A.C. cord to the GFI outlet (this is to
make dressing through the front panel easier).
(See fi g. 4, previous page)
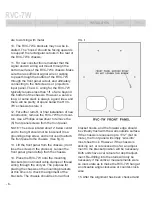
20. Connect the ground strap from the front
panel to the green 10-32 screw located on top
of the input ground screw. Make sure this is
secure, as it is for both safety and R.F. shield-
ing. Also, take care to maintain the ground con-
nection to the transformer. If the transformer’s
ground connection is compromised, the noise
attenuation will suffer. Now, re-attach the front
panel to the chassis.
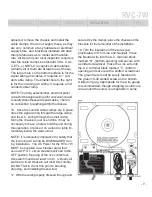
21. Go to the electrical panel and switch the
power to the RVC-7W on. The blue A.C. out-
put indicator should be lit. it is located next to
the GFI outlet, and will be visible when you
look into the larger rectangular cut-out in the
front panel.
22. If you are using the RVC-7W for a projec-
tor, you’re fi nished! However, if you are mount-
ing a Plasma screen wall bracket over the
RVC-7W, there is one fi nal consideration. Be-
cause the front panel of the RVC-7W protrudes
from the wall surface .076” (approximately
1/16”), and some plasma wall mount brackets
will have center sections that press fl ush to
the RVC-7W’s front panel, we have included
(4) white painted washers to offset the space
of the front panel, when securing the plasma
bracket’s mounting arms through the wall, and
into the studs. This will off-set any wobble or
mechanical stress that might otherwise occur.
Use these only if necessary.
GROUND FAULT
INTERRUPTER (GFCI)
As the RVC-7W incorporates Isolated Sym-
metrically Balanced AC Power, it is necessary
to guard against catastrophic failure in Refer-
ence components. Under normal conditions,
Symmetrical Balanced Power is safe for use
in any home or professional installation. With
the addition of Furman’s Isolated Symmetrical
Technology, any form of electrical shock (under
normal use) is virtually impossible. Never the
less, to safeguard against even the most re-
mote electrical abnormalities, we have includ-
ed a GFCI (ground fault interrupter). This GFCI
will immediately disconnect the output voltage
when it detects an excess of fi ve milliamps cur-
rent fl ow from either line potential to ground.
This ensures that even if your lcd, plasma, or
projector experiences a catastrophic failure,
there will be no possibility of electric shock
resulting from the normal recommended use of
the RVC-7W.
Because the GFCI relies on the detection of
current leakage from AC line to ground, it is
occasionally possible to false trip the GFCI if
additional fi lters with unacceptable levels of
current leakage to ground are used. These
designs can actually create as much noise as
they attempt to reduce, we recommended they
not be used.
If you experience a false tripping of the GFCI,
just press the reset tab in the center of the
GFCI. If the RVC-7W’s GFCI protection circuit
is activated, the blue AC output indicator will
not light, and there will be no power delivered
INTRODUCTION
FEATURES
DESCRIPTION
INSTALLATION
SAFETY
SPECS


