background image

English


CCD-0005503 Rev: 05-06-22

- 4 -


Children should be taught that the appliance is not a toy. 
They should not be allowed to play with the controls or 
any other parts of the appliance. Do not allow anyone 
to stand or sit on top of the appliance. Not only can this 
damage the appliance, but personal injuries could result.


Do not store items of interest to children in cabinets above 
or near the appliance. Children climbing on the appliance 
to reach items could be seriously injured.


All control knobs must be turned off when not in use. 
Fire and/or burning hazard may occur if a burner is 
accidentally left on.


If any burner should extinguish (after initially lighting or 
due to accidental blow-out), turn all burner knobs off and 
wait five (5) minutes before again attempting to light the 
burner.


DO NOT store flammable materials on, in, or near the 
appliance. Any fumes can create an explosion and/or fire 
hazard.


Do not wear loose fitting clothing or long-hanging sleeved 
clothing while using the appliance. If they contact the 
open flame of the burner, they could ignite and cause 
severe burns.


Use only dry potholders to remove hot utensils. Using 
damp potholders on hot surfaces could result in burns to 
hands. Do not use a towel or bulky cloth for a pot holder. 
The cloth could contact open flame and catch fire.


Never heat an unopened container. Pressure build-up 
within the container can cause it to explode.


Do not use water on grease fires. Never pick-up a flaming 
pan. Smother a flaming pan with a lid or flat pan. Flaming 
grease outside the pan can be extinguished with baking 
soda or a multipurpose dry chemical fire extinguisher.


This appliance is intended to be built-in to a cabinet 
structure only and is not intended for attachment to the 
building structure.


The appliance must be isolated from the gas supply piping 
system by closing its individual manual shutoff valve during 
any pressure testing of the gas supply piping system at test 
pressures equal to or less than 1/2 psi (3.5 kPa).

Cooktop Safety Warnings


Do not place pans onto glass surface. Raise cover into full 
open position before operating burners. Let cooktop cool 
before closing glass cover. 


If the cooktop is near a window, proper precautions 
should be taken to prevent curtains from blowing over 
burners creating a fire hazard.


Keep the area around the cooktop clean and clear of 
any combustible materials, gasoline or other flammable 
vapors and liquids. Not doing so can cause an explosion 
and/or fire.


Do not leave children alone or unsupervised in area where 
cooktop is being used. The top burners, burner grates 
and other areas near the burners become hot enough to 
cause severe burns.


Keep the cooktop clean. The build-up of grease and food 
boil-over and/or spillage can create a fire hazard.


Turn pan handles inward or toward back of cooktop and 
out of the way of people walking past cooktop and/or out 
of the reach of children. Do not turn handles to where they 
are over the burners.


Never leave top burner(s) unattended.


For such reasons as down drafts that could be created 
by opening and closing of cabinet doors or doors 
within the RV or by positive or negative air pressures 
affecting burners due to improper installation. (See 
Installation section) The burner could extinguish 
resulting in gas escaping into the RV. Remember, gas 
flow to each burner is controlled manually, you must 
turn gas flow “ON” and “OFF”.


A boil over could occur and the spill could ignite.


Flame size


Never extend the flame beyond the outer edge of the 
utensil. A higher flame simply wastes heat and energy.


Correct flame size is determined by utensil size and 
material, what you are cooking and whether or not you 
are cooking with liquid.


To prevent damage to the cooktop, top burners, or top 
grate, never operate a top burner without a pan in place. 
The top burners, especially the high input burner, should 
not be operated on high for an extended period of time. 
The high setting should be used only to start the food 
cooking or to bring liquids to a boil, then reduce the flame 
to a lower setting to continue cooking. Use the low flame 
setting to keep food warm. Remember, a gas range heats 
quicker than an electric range, therefore, experiment with 
various settings until you feel comfortable cooking with 
gas.


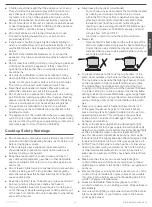
Never use cookware which extends beyond one inch 
of the grate (maximum pan size 10" diameter). Never 
place cooking utensil on grate to where it rests over two 
operating top burners. This will cause excessive heat 
buildup, which could result in damage to the grate, top 
burner(s) and cooktop.


Verify sufficient gas supply before attempting to light 
any top burner. Air in the gas supply line will significantly 
delay burner ignition, and a burner may light unexpectedly 
as the air in the line clears out and is replaced by LP 
gas, this unexpected ignition may burn you. Air may be 
introduced into the supply line when the vehicle gas bottle 
is replaced, during servicing of other gas appliances, etc.


DO NOT touch top burners, burner grates, or other areas 
near top burners during and after use. Do not let clothing 
or other flammable materials to contact top burners or 
areas near top burners until they have had sufficient time 
to cool.


Make sure the utensils you use are large enough to 
contain food and avoid boil overs and spillovers. Heavy 
splattering or spillovers left on the cooktop can ignite and 
burn you.


Be sure that glass cooking utensils are safe for use on the 
cooktop. Only certain kinds of glass utensils are suitable 
for surface or top burner use without breaking due to the 
sudden changes in temperature.


Grease is flammable. Never allow grease to collect 
around top burners or on cooktop surface. Wipe spillovers 
immediately.


Use care when lighting a top burner by hand. If the burner 
lights unexpectedly, or your hand is close to the burner, 
you may be burned.

Summary of Contents for 2021132313

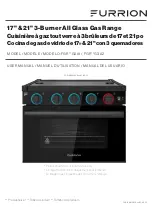
Page 1: ...MOD LE MODELO FGR G3A1 FGR G3A2 USER MANUAL MANUEL D UTILISATION MANUAL DEL USUARIO Picture shown here is for reference only L image montr e ici est uniquement pour r f rence La imagen que se muestra...

Page 2: ...ry or death Do not store or use gasoline or other flammable vapors and liquids in the vicinity of this or any appliance WHAT TO DO IF YOU SMELL GAS Do not try to light any appliances Do not touch any...

Page 3: ...t Instructions 7 Oven Installation 7 Gas Connection 8 Electrical Connection 9 Wiring Diagram 9 Glass Cover Replacement 9 Leak Check 9 Operation 10 Lighting the Cooktop 10 Turning Off Cooktop 11 Lighti...

Page 4: ...ller service agency manufacturer or the gas supplier Avoid using your appliance or any other appliance if you smell gas Do not assume that the smell of gas in your RV is normal Any time you detect the...

Page 5: ...ooktop and out of the way of people walking past cooktop and or out of the reach of children Do not turn handles to where they are over the burners Never leave top burner s unattended For such reasons...

Page 6: ...he Flame Spreader Rack shelf above oven burner The air circulation inside the oven will be interrupted and cooking times will vary from normal food may be burned or undercooked DO NOT use oven as a st...

Page 7: ...iances may draw the top burner flame down into or toward the cooktop resulting in cooktop damage burn hazard explosion possibility and or carbon monoxide build up POSITIVE DRAFT may blow out the top b...

Page 8: ...rhead cabinet to cooking surface WARNING The minimum vertical distance to combustible material above the range cooking top is 30 762mm provided the overhead construction does not extend 15 381 mm from...

Page 9: ...oving parts after installed Be sure all openings in the cabinets around the gas line are sealed at time of installation Fig 5 Pressure Check 1 Turn LP gas off to the appliance 2 Remove the Screw with...

Page 10: ...ce it into the top of the range cooktop Fig 9 Fig 9 2 Press the backside of the top glass cover and you will hear a click noise The top glass cover is now locked into place Fig 10 and Fig 11 Fig 10 Fi...

Page 11: ...ontrol knob to adjust the flame to desired level 5 Repeat steps 2 and 5 to light the other burner s as required If the burner does not ignite In the event of failure to light the burner within 5 secon...

Page 12: ...ell gas STOP Refer to the installation section and follow the instructions as listed for the appliance Fig 18 Fig 18 2 Push and turn the oven control knob counterclockwise to the position Fig 19 Fig 1...

Page 13: ...he air in the oven but the walls and the door which ensures that the oven will quickly return to that temperature when the door has been opened and then closed again Based on the cooking temperature t...

Page 14: ...ner Never use a wire brush or metallic item for cleaning burner ports or orifices Brush may shed bristles that may lodge in the orifice or burner ports and cause a fire or explosion Clean all surfaces...

Page 15: ...e carefully to avoid breaking Grasp only the sides of the oven door Do not grasp the handle as it may swing in your hand and cause damage or injury Failure to grasp the oven door firmly and properly c...

Page 16: ...ight bulb replacement please call Furrion service for assistance Replacing the Control Knob LED 1 Disconnect the oven from the power supply by means of the switch used to connect the appliance to the...

Page 17: ...er dry burner thoroughly Burner ports or slots are clogged With the burner off clean ports with a small gauge wire or needle to clean ports or slots Moisture is present after cleaning Lightly fan the...

Page 18: ...soulamort Ne pas stocker ou utiliser d essence ou d autres vapeurs et liquides inflammables proximit de cet appareil ou de tout autre appareil QUE FAIRE SI VOUS SENTEZ UNE ODEUR DE GAZ N essayez pas d...

Page 19: ...des armoires 23 Installation du four 23 Raccordement au gaz 24 Connexion lectrique 25 Sch ma de c blage 25 Remplacement du couvercle en verre 25 Contr le d tanch it 25 Fonctionnement 26 Allumage de l...

Page 20: ...le fabricant ou le fournisseur de gaz vitez d utiliser votre appareil ou tout autre appareil si vous sentez une odeur de gaz Ne supposez pas que l odeur de gaz dans votre VR est normale Chaque fois q...

Page 21: ...rri rede latabledecuisson horsdelaport edespersonnespassantdevant latabledecuissonet ouhorsdelaport edesenfants Netournezpas lespoign espourqu ellessetrouventau dessusdesbr leurs Nelaissezjamaisle s b...

Page 22: ...eurdufour Lacirculationde l air l int rieurdufourserainterrompueetlestempsdecuisson serontdiff rentsdelanormale lesalimentsrisquentd trebr l sou insuffisammentcuits N utilisezPASlefourcommelieudestock...

Page 23: ...n cr ant un courant d air n gatif ou positif Un TIRAGE N GATIF caus par des appareils en mouvement peut attirer la flamme du br leur sup rieur vers le bas ou vers la table de cuisson ce qui peut endom...

Page 24: ...auxcombustibles au dessusdelaplaquedecuissondelacuisini reestde762mm 30po conditionquelaconstructionsup rieurened passepas de381mm 15po lemurarri re Ladistancerecommand eentrele plancheretlebasdel ouv...

Page 25: ...uvertures dans les armoires autour de la conduite de gaz sont scell es au moment de l installation Fig 5 V rification de la pression 1 Coupez l alimentation en gaz de l appareil 2 Retirez la vis avec...

Page 26: ...cez le dans le haut de la table de cuisson de la cuisini re Fig 9 Fig 9 2 Appuyez sur l arri re du couvercle de la vitre sup rieure et vous entendrez un clic Le couvercle de la vitre sup rieure est ma...

Page 27: ...iguilles d une montre jusqu la position Fig 13 Fig 13 3 Tournez le bouton d allumage dans le sens des aiguilles d une montre plusieurs reprises jusqu ce que le br leur soit allum Fig 14 Fig 14 4 Tourn...

Page 28: ...au moins 5 minutes et rallumez le br leur teindre la table de cuisson AVERTISSEMENT Fermez toujours le robinet du r servoir d essence lorsque vous faites le plein ou que vous voyagez Pour teindre les...

Page 29: ...four AVERTISSEMENT Fermez toujours le robinet du r servoir d essence lorsque vous faites le plein ou que vous voyagez Pour teindre le four tournez le bouton de commande du four dans le sens des aiguil...

Page 30: ...s de cuisson Bien cuit l int rieur mais collant l ext rieur Utilisez moins de liquide baissez la temp rature et augmentez le temps de cuisson La p te colle au moule Graissez bien le moule et saupoudre...

Page 31: ...PAS les surfaces en porcelaine chaudes Laissez ces surfaces refroidir avant de les nettoyer Vous pourriez vous br ler ou la porcelaine pourrait se fissurer Des piq res et une d coloration se produiron...

Page 32: ...l interrupteur utilis pour connecter l appareil au r seau lectrique ou d branchez l appareil si la fiche est accessible 2 Retirez le couvercle en verre du support de la lampe Fig 27 Fig 27 3 Retirez l...

Page 33: ...ans le nouvel ensemble de DEL 6 Fixez nouveau l ensemble de DEL la console l aide des deux vis retir es l tape 3 Assurez vous que les fils ne sont pas pinc s pendant ce processus 7 Fixez nouveau le bo...

Page 34: ...iguille pour nettoyer les orifices ou les fentes De l humidit est pr sente apr s le nettoyage Ventilez l g rement la flamme et laissez le br leur fonctionner jusqu ce que la flamme soit pleine S chez...

Page 35: ...ene ni utilice gasolina u otros vapores y l quidos inflamables cerca de este o cualquier otro dispositivo QU HACER SI HUELE A GAS No intente encender ning n dispositivo No toque ning n interruptor el...

Page 36: ...te 40 Instalaci n del horno 40 Conexi n de gas 41 Conexi n el ctrica 42 Diagrama de cableado 42 Sustituci n de la cubierta de vidrio 42 Verificaci n de estanqueidad 42 Funcionamiento 43 Encendido de l...

Page 37: ...ralavidaydebecorregirsedeinmediato Apaguecualquier llamaabierta inclusocigarrillos yevac eatodaslaspersonasdel veh culo Cierreelsuministrodegaseneltanquedegaslicuado Sielusuariodeestedispositivonoloma...

Page 38: ...escomolascorrientesdeairequepodr an crearsealabrirycerrarlaspuertasdelosgabinetesolas puertasdentrodelveh culorecreativooporpresionesdeaire positivasonegativasqueafectenalosquemadoresdebidoa unainstal...

Page 39: ...entrodelhornoseinterrumpir ylostiemposdecocci nvariar n delonormal losalimentospuedenquemarseococinarsepoco NOutiliceelhornocomozonadealmacenamiento Siseapagaraelpilotodelhornodespu sdeencenderloporpr...

Page 40: ...ativaopositiva LaCORRIENTEDEAIRENEGATIVAcausadaporelmovimiento delairedelosdispositivospuedehacerquelallamadelquemador superiordesciendahacialaplacadecocci n loquepuede provocarda osenesta peligrodequ...

Page 41: ...rficie decocci n ADVERTENCIA Ladistanciaverticalm nimaalmaterialcombustibleporencimade lapartesuperiordelacocinaesde30 762mm siemprequela construcci nsuperiornoseextienda15 381mm desdelapared posterio...

Page 42: ...g rese de que todas las aberturas de los gabinetes alrededor de la l nea de gas est n selladas en el momento de la instalaci n Fig 5 Verificaci n de la presi n 1 Cierre el gas licuado hacia el disposi...

Page 43: ...junto de la cubierta de vidrio superior x 2 con las ranuras de la parte posterior de la consola y col quelas en la parte superior de la placa de cocci n de la cocina Fig 9 Fig 9 2 Presione la parte tr...

Page 44: ...correspondiente en sentido contrario a las agujas del reloj hasta la posici n Fig 13 Fig 13 3 Gire la perilla de encendido en el sentido de las agujas del reloj varias veces hasta que el quemador se e...

Page 45: ...de control a la posici n APAGADO Espere al menos 5 minutos y vuelva a encender el quemador Apagado de la placa de cocci n ADVERTENCIA Cierresiemprelav lvuladeltanquedegasalllenarloocuandoviaje Para a...

Page 46: ...s de intentar volver a encender el quemador del horno Apagado del horno ADVERTENCIA Cierre siempre la v lvula del tanque de gas al llenarlo o cuando viaje Para apagar el horno gire la perilla de contr...

Page 47: ...ura y aumente el tiempo de cocci n Se ha cocinado bien por dentro pero est pegajosa por fuera Use menos l quido baje la temperatura y aumente el tiempo de cocci n La masa se pega al molde Engrase bien...

Page 48: ...manezcan en las superficies de porcelana o pintadas Los cidos pueden eliminar el acabado brillante Limpie los derrames de huevos cuando la placa de cocci n est fr a NO lave las superficies de porcelan...

Page 49: ...e energ a mediante el interruptor para conectar el dispositivo a la red el ctrica o desenchufe el dispositivo si el enchufe es accesible 2 Retire la cubierta de vidrio del portal mparas Fig 27 Fig 27...

Page 50: ...conectar el conjunto LED en la consola con los 2 tornillos que retir en el paso 3 Aseg rese de que los cables no se pincen durante este proceso 7 Vuelva a conectar la perilla de control alineando el v...

Page 51: ...aguja para limpiar los puertos o las ranuras Hay humedad despu s de la limpieza Abanique ligeramente la llama y deje que el quemador funcione hasta que la llama est completa Seque bien los quemadores...

Page 52: ...entation has been provided Any unauthorized use shall void any applicable warranty The information contained in this manual is subject to change without notice and at the sole discretion of Lippert Re...

Reviews: