background image

6

English

slope is to allow moisture drainage towards the sidewall 
vent. 


The cooling system is a forced air closed loop design, 
with inlet and exhaust on the bottom front of the unit. The 
enclosure does not need to be ventilated for any purpose. 
There is also no need for additional insulation on sides 
and top of the enclosure. The enclosure can be treated as 
a normal cabinet enclosure of the living space.


Face surfaces of the cabinet enclosure made from solid 
MDF should contain a softwood backing as a skeleton for 
mounting support, and to reduce splitting.  

NOTE: 

A softwood core with MDF laminate, or a soft/

hardwood face will be sufficient without a skeleton 
backing. 

Electrical Preparation

WARNING


Proper grounding is required for your safety, to prevent 
electrical shock or fire. The refrigerator is provided with 
the proper grounding for internal electric faults from the 
factory. This grounding must not be removed or altered.


Ensure that the converter or DC power supply is 
grounded properly per manufacturers instruction. Per 
RVIA the power supply is required to be isolated and 
grounded with the Coach Chassis.

CAUTION

This refrigerator will accept voltage levels up to 17V DC 
only. Anything other than this, including any AC power will 
cause product damage and void the warranty. 


The refrigerator requires a power source that can 
adequately provide 10.5 - 17V DC to function properly.  
Furrion Recommends Power Center (FCVSWC42A or 
FCVSWC54A) and Lithium Battery (FB12I10C) to match 
with.


The refrigerator should be dedicated to a single branch 
circuit, and must be fused for 15A minimum. 

NOTE:

 An internal 15A fuse is provided with the product. 

This is only intended to protect the internal wiring of the 
unit. It will not protect the power source and wiring to the 
product and is not to be used as a substitute. The internal 
fuse will however allow for a larger rated branch circuit. 

NOTE:

 Sharing power with other devices on the same 

branch circuit may cause transient surges and voltage 
drops. These interferences may damage or limit 
functionally of all devices on the branch circuit. 

NOTE:

 When replacing an absorption refrigerator, the 

power supplied is usually shared with other powered 
features in the coach, such as overhead lights. A separate 
dedicated branch circuit will be preferred to eliminate 
flickering during compressor operation.


The maximum input of the appliance is rated for 11A. All 
wiring must follow 

RVIA

 and 

NEC

 standards based on the 

input rating. 


Apply the following wiring guidelines to achieve maximum 
performance out of the battery reserve.

Dedicated from the Distribution Box/Panel

Table A

Wire Length to Refrigerator

Wire Gauge

Maximum 5ft

14AWG

Maximum 10ft

12AWG

Maximum 15ft

10AWG

Exceeds 15ft and/or main wire feed 

exceeds 25ft of 6AWG

See "Direct Connection from 

Battery"

*Optional - A pigtail harness of matching gauge can be added to the 
refrigerator, however the length must be included in the total.
** Main wire feed required to be 6AWG minimum @ 25ft maximum.

Refrigerator

Converter

Wire Length - Reference Tabel A

Mini 
Breaker

Battery 
Dis-connect

Battery

Distribution 
Box/Panel

Main Wire 
Feed (**)

Refrigerator

Converter

Mini Breaker

Battery 
Dis-connect

Battery

Distribution 
Box/Panel

Pigtail

Pigtail Connection 
Point (*)

Pigtail Connection 
Point (*Optional)

Chasis 
Grounding  
(**Optional)

Pigtail

Wire Length - Reference Tabel B

Direct Connection from Battery

Table B

Wire Length to Refrigerator

Wire Gauge

Maximum 20ft

10AWG

Maximum 35ft

8AWG (*)

Maximum 55ft

6AWG (*)

* The refrigerator will accept maximum 10AWG wire. To connect a larger 
gauge wire, utilize a 10AWG pigtail, maximum 5ft.
**Optional - The ground/negative terminal can be connected to the chassis 
with the same gauge wire, instead of returning to the battery.

Refrigerator

Converter

Wire Length - Reference Tabel A

Mini 
Breaker

Battery 
Dis-connect

Battery

Distribution 
Box/Panel

Main Wire 
Feed (**)

Refrigerator

Converter

Mini Breaker

Battery 
Dis-connect

Battery

Distribution 
Box/Panel

Pigtail

Pigtail Connection 
Point (*)

Pigtail Connection 
Point (*Optional)

Chasis 
Grounding  
(**Optional)

Pigtail

Wire Length - Reference Tabel B


If additional grounding is desired for external faults to the 
refrigerator chassis, an external grounding wire can be 
prepared and attached directly to the terminal block. The 
terminal block is rated for Maximum 300V at 25A.


Enter service wire into the cabinet space. It is acceptable 
to enter through the cabinet floor, sidewall or ceiling. 
Ensure that the wire is within the 1/4" space provided to the 
back of the unit and cabinet.  

NOTE

: For replacement of an existing refrigerator, the 

Summary of Contents for Arctic FCR8DCDTA Series

Page 1: ...a imagen del producto es solo una referencia TM 8 10 Cu Ft 12V Built In Refrigerator R frig rateur int gr de 12 V de 8 et 10 pieds cubes Refrigerador integrado de 12 V de 8 y 10 pies c bicos Instructi...

Page 2: ...xtreme Temperature Usage 11 Adjusting the Shelf Optional 11 Storage Lock 12 Transportation 12 Energy Saving Tips 12 Extended Storage 12 Cleaning and Maintenance 13 Cleaning Refrigerator Interior 13 Cl...

Page 3: ...ns including children with reduced physical sensory or mental capabilities or lack of experience and knowledge unless they have been given supervision or instruction concerning use of the appliance by...

Page 4: ...0 Item Part Name 1 Trim Kit 2 Freezer Wire Shelf 3 Charcoal Filter 4 Temperature Control 5 Refrigerator Wire Shelf 6 Refrigerator Glass Shelf 7 Drawer Item Part Name 8 Air Vent 9 Gallon Door Bin 10 Ga...

Page 5: ...rigerator to the enclosure Slide the refrigerator out from the enclosure and remove it from the RV Select Location Your new refrigerator must stand on a flat surface which should support a weight of 3...

Page 6: ...r powered features in the coach such as overhead lights A separate dedicated branch circuit will be preferred to eliminate flickering during compressor operation The maximum input of the appliance is...

Page 7: ...e drainage is captured in a drain pan integrated with the unit No external drainage needs to be prepared at this point Installing the Refrigerator Electrical Connection 1 Remove the strain relief and...

Page 8: ...gerator chassis frame will cause an abrasion or pinch on the wire Relocate the wire if necessary it should be within the 1 4 space between the back of the unit and cabinet Refer to Electrical Preparat...

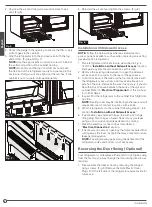
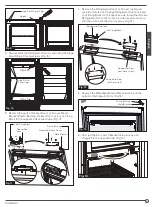
Page 9: ...Bracket Fig 11 4 Remove the Refrigerator Door Lock Cover right and save it for future use Change Refrigerator Door Lock and Lock Fixing Blocks to the opposite side Install the left side Refrigerator...

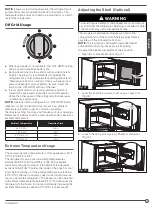
Page 10: ...the risk of foodborne illness bacteria The temperature control knob is located in the fresh food compartment of the refrigerator It is designed to set the temperature from cold to coldest or turn the...

Page 11: ...5 110 F 43 C 25 Extreme Temperature Usage The normal operating temperature for this appliance is 50 F 10 C to 109 4 F 43 C The refrigerator can be used in ambient temperatures between 109 4 F 43 C and...

Page 12: ...ill help reduce any moisture ice accumulation and accidental battery discharging Avoid traveling with food in the cavity Wait until you have arrived to your destination and remove any remaining food b...

Page 13: ...is a good way to maintain battery voltage if a local power source is not available Contact Furrion for further questions or options on Solar Replacing the Interior LED WARNING Electric Shock Hazard R...

Page 14: ...Gloss Black C FCR08DCDTA A03 C FCR10DCDTA A03 Black Stainless Steel C FCR08DCDTA A04 C FCR10DCDTA A04 Refrigerator Door Panel When replacing the refrigerator door panel the following dimensions should...

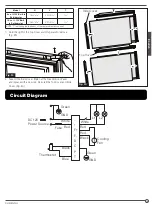
Page 15: ...ment door panel 1 Hold the right of the Top Cover and lift upward to remove Fig 29 Fig 29 2 Take off the Side Cover Slide out the Freezer Door Panel and replace with a new one Reinstall the Top Cover...

Page 16: ...Food Compartment 35 6 46 4 F 2 8 C Freezer Compartment 21 2 0 4 F 6 18 C 10 Cu Ft 12V Built In Refrigerator Capacity cu ft 10 cu ft Product Dimensions H D W 603 16 x 253 4 x 241 4 1350 x 654 x 616 mm...

Page 17: ...tions on setting the temperature The door is open or is frequently opened The door gasket is torn or not sealing properly A large amount of warm or hot food was stored recently Wait for the refrigerat...

Page 18: ...Table des mati res 18 Explication des symboles 19 Consignes de s curit importantes 19 Mises en garde g n rales et consignes de s curit 19 Mise au rebut appropri du r frig rateur 20 Pi ces et fonctionn...

Page 19: ...act ristiques lectriques du r frig rateur Ne pas vaporiser de liquides proximit des prises des branchements ou des composants lectriques du r frig rateur La plupart des liquides sont des conducteurs s...

Page 20: ...ujours dangereux m me s ils ne resteront que quelques jours Si vous vous d barrassez de votre r frig rateur usag veuillez suivre les instructions ci dessous afin de pr venir tous accidents Avant de je...

Page 21: ...pour cong lateur 3 Filtre charbon 4 R gulation de la temp rature 5 tag re en fil m tallique pour r frig rateur 6 tag re en verre pour r frig rateur Article Nom de la pi ce 7 Tiroir 8 Orifice d a ratio...

Page 22: ...frig rateur puis couvrez les extr mit s des fils Coupez l alimentation du r frig rateur en gaz propane liqu fi D branchez la conduite de gaz propane liqu fi du r frig rateur Bouchez la conduite et v r...

Page 23: ...c blage interne de l appareil Il ne prot ge pas la source d alimentation et le c blage du produit et ne doit pas tre utilis comme substitut Le fusible interne permet cependant un circuit de d rivation...

Page 24: ...l l arri re de l appareil pr voyez la longueur de fil appropri e l ext rieur du bo tier afin de pouvoir effectuer le raccord avant son installation REMARQUE Furrion recommande de faire descendre le fi...

Page 25: ...les cales de fa on appropri e Fig 6 Fig 7 5 R installez l orifice d a ration puis serrez les vis Fig 8 Fig 8 Installation avec acc s la paroi lat rale REMARQUE Suivez les tapes ci dessous lorsqu un v...

Page 26: ...une utilisation ult rieure Charni re A Fig 9 Bouchons perfor s en plastique 2 D montez la porte du r frig rateur en retirant les vis de fixation des charni res B et C Fig 10 Charni re B Charni re C Fi...

Page 27: ...nt De l gers ajustements peuvent tre effectu s en desserrant et en ajustant les charni res si n cessaire REMARQUE Les instructions ci dessus servent modifier le sens d ouverture de la porte de gauche...

Page 28: ...r le r frig rateur Utilisation autonome Lorsque le r seau lectrique n est pas disponible le r glage OFF GRID AUTONOME peut tre utilis pour maximiser la dur e de vie de la batterie En voyage lorsqu un...

Page 29: ...Fig 19 Fig 19 4 R p tez les tapes 2 et 3 pour desserrer la vis de fixation de l tag re de l autre c t Tirez pour retirer l tag re de sa position initiale Fig 20 Fig 20 5 Glissez l tag re dans une posi...

Page 30: ...puis d sactivez le cadran 2 Laissez d geler la glace accumul e puis essuyez la l aide d une serviette 3 D branchez l alimentation soit via l interrupteur principal et en teignant le convertisseur soit...

Page 31: ...euve Fixez l agrafe puis serrez les vis Ensuite r installez le couvercle Fig 25 Fig 25 Remplacement du filtre charbon Il est recommand de remplacer le filtre charbon tous les trois mois d utilisation...

Page 32: ...g rateur puis remplacez le par un nouveau Fig 28 Fig 28 Remplacement du panneau de porte du cong lateur Lors du remplacement du panneau de porte du cong lateur les dimensions suivantes doivent tre res...

Page 33: ...emplacez le par un nouveau R installez le couvercle sup rieur et le couvercle lat ral Fig 30 Couvercle lat ral Couverclesup rieur Fig 30 Sch ma de c blage GND Green GND Blue Black Thermostat Green F F...

Page 34: ...F 2 8 C Compartiment cong lateur 21 2 0 4 F 6 18 C R frig rateur int gr de 12 V de 10 pieds cubes Capacit pieds cubes 10 pieds cubes Dimensions du produit H x P x L 603 16 po x 253 4 po x 241 4 po 1 3...

Page 35: ...lation de la temp rature la page 27 pour le r glage de la temp rature du compartiment La porte est ouverte ou est fr quemment ouverte Le joint de la porte est d chir ou ne ferme pas correctement Une g...

Page 36: ...5 Uso de temperatura extrema 46 Ajuste del estante opcional 46 Cerrojo de almacenamiento 46 Transporte 47 Consejos para ahorrar energ a 47 Almacenamiento extendido 47 Mantenimiento de la bater a 47 Li...

Page 37: ...rsonas incluidos ni os con capacidades f sicas sensoriales o mentales reducidas o bien que no posean la experiencia y conocimientos a menos que hayan recibido instrucciones sobre el uso de electrodom...

Page 38: ...lica del congelador 3 Filtro de carb n 4 Control de temperatura 5 Bandeja met lica del refrigerador 6 Bandeja de vidrio del refrigerador 7 Gaveta Objeto Nombre de la parte 8 Rejilla de ventilaci n 9 C...

Page 39: ...erre la alimentaci n de gas licuado al refrigerador Desconecte la tuber a de gas licuado del refrigerador Coloque la tapa de la tuber a y verifique que no haya p rdidas de gas licuado Retire los torni...

Page 40: ...interno de 15 A Esto tiene como nico fin proteger el cableado interno de la unidad No proteger la fuente de alimentaci n ni el cableado hacia el producto y no se deber a usar como sustituto Sin embarg...

Page 41: ...o planifique que la longitud del cable sea adecuada para llegar hasta la parte trasera del gabinete de forma de poder realizar la conexi n del cable antes de la instalaci n del equipo NOTA Furrion rec...

Page 42: ...para alinearlo Fig 6 Fig 7 5 Reinstale la rejilla de ventilaci n y apriete los tornillos Fig 8 Fig 8 Instalaci n con acceso a pared lateral NOTA Siga estos pasos cuando tenga acceso a una rejilla de...

Page 43: ...a 1 Quite los tornillos de fijaci n de la bisagra A para desarmar la puerta del congelador Fig 9 Retire los tapones de la tapa pl stica de la brecha del lado izquierdo del refrigerador y d jelos a un...

Page 44: ...isagra B al lado izquierdo de la barra del medio Fig 15 Bisagra A Bisagra B Fig 15 8 Reinstale la puerta del congelador y luego fije la bisagra C en la parte superior izquierda Fig 16 Bisagra C Bisagr...

Page 45: ...del termostato Temperatura del refrigerador Temperatura del congelador Max 41 F 5 C 11 2 F 24 C Entre Max y Mid 39 2 F 4 C 1 4 F 17 C Mid 43 7 F 6 5 C 5 F 15 C Entre Mid y Min 45 5 F 7 5 C 6 8 F 14 C...

Page 46: ...r Los estantes tienen como fin disuadir a los ni os de jugar en el rea del compartimiento Los estantes del refrigerador y el congelador vienen fijados a sus compartimientos de f brica Si desea ajustar...

Page 47: ...lmacenamiento extendido Durante cualquier periodo en el cual la unidad no estar en uso se considerar almacenamiento extendido Siga estos pasos para preparar la unidad adecuadamente para almacenarla 1...

Page 48: ...tiguo por uno nuevo Fije el retenedor y apriete los tornillos Reinstale la tapa Fig 25 Fig 25 Cambio del filtro de carb n Se recomienda cambiar el filtro de carb n cada tres meses de uso activo Contac...

Page 49: ...ig 27 2 Deslice hacia afuera el panel de la puerta del refrigerador y sustit yalo por uno nuevo Fig 28 Fig 28 Cambio del panel de puerta del congelador Al cambiar el panel de puerta del congelador el...

Page 50: ...al Deslice hacia afuera el panel de la puerta del congelador y sustit yalo por uno nuevo Vuelva a instalar la tapa superior y la tapa lateral Fig 30 Tapalateral Tapasuperior Fig 30 Diagrama de circuit...

Page 51: ...4 F 2 8 C Compartimiento del congelador 21 2 0 4 F 6 18 C Refrigerador integrado de 12 V de 8 y 10 pies c bicos Capacidad en pies c bicos 10 pies c bicos Tama o del producto Alto Profundidad Ancho 60...

Page 52: ...temperatura en la p gina 43 por instrucciones sobre el ajuste de la temperatura La puerta est abierta o se abre con frecuencia La empaquetadura de la puerta est rota o no sella correctamente Se introd...

Page 53: ...o de Furrion son marcas registradas usadas bajo licencia de Furrion Ltd y se encuentran registradas tanto en los Estados Unidos como en otros pa ses CN ZL201830164193 3 CN ZL201830164332 2 CN ZL201830...

Reviews: