background image

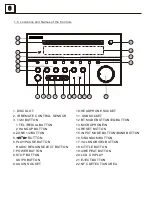
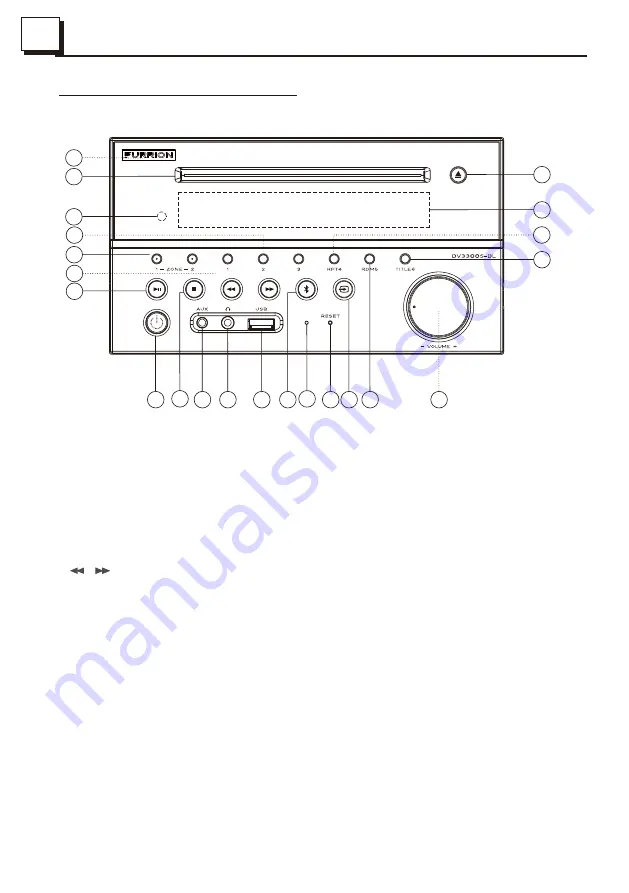
1.6  Locations and Names of the Controls

1. DISC SLOT

2. IR REMOTE CONTROL  SENSOR

3. 1/2/3 BUTTON

    1 TEL /REDIAL BUTTON

    2 HANG UP BUTTON

4.ZONE 1/2 BUTTON

5.      

6.PLAY/PAUSE BUTTON 

    RADIO REGION SELECT BUTTON

7.POWER BUTTON

8.STOP  BUTTON

    AS/PS BUTTON

9.AUX IN SOCKET

10.HEADPHONE SOCKET

11. USB SOCKET

12.BT MODE BUTTON/EQ BUTTON

13.MICROPHONE IN

14.RESET BUTTON

15.INPUT MODE BUTTON/BAND BUTTON

16.5/RANDOM BUTTON

17.VOL KNOB/SEL BUTTON

18.6/TITLE BUTTON

19.4/REPEAT BUTTON

20.LCD  DISPLAY

21.EJECT BUTTON

22.NFC DETECTION AREA

7

8

9

10

11

14 15 16

17

18

21

2

4

3

5

19

12 13

1

22

20

6

/      BUTTON

6

Summary of Contents for DV3300S-BL

Page 1: ...DV3300S BL...

Page 2: ...and maintenance of the appliance Please keep this instruction manual in a safe place for future reference This will ensure safe use and reduce the risk of injury Be sure to pass on this manual to new...

Page 3: ...might have been swallowed or placed inside any part of the body seek immediate medical attention outside of the unit Read through this instruction manual before installation and use persons CAUTION 1...

Page 4: ...k 20 5 Advanced Disc USB Operation 20 5 1 Playback with Speed 20 5 2 Playback with Slow Speed 20 5 3 Playback with Still Frame 21 5 4 Playback Repeatedly 21 5 4 1 One All Repeat 21 5 4 2 A B Repeat 21...

Page 5: ...Vehicles Ensure when installing the stereo all wire ends which are not being used are terminated with a insulated end to avoid wires shorting or earthing which can lead to the risk of fire or electric...

Page 6: ...e up correct correct wrong wrong wipe it off before using on the disc surface with a new battery with polarity side upward 1 Improper use of a battery may cause overheating or an explosion that could...

Page 7: ...PREVIOUS BUTTON CLEAR BUTTON 9 AV IN MODE BUTTON UP BUTTON NEXT BUTTON RIGHT BUTTON DOWN BUTTON AM FM RADIO MODE BUTTON RANDOM BUTTON REPEAT BUTTON LEFT BUTTON PROGRAM BUTTON AUX ARC MODE BUTTON...

Page 8: ...BUTTON 7 POWER BUTTON 8 STOP BUTTON AS PS BUTTON 9 AUX IN SOCKET 10 HEADPHONE SOCKET 11 USB SOCKET 12 BT MODE BUTTON EQ BUTTON 13 MICROPHONE IN 14 RESET BUTTON 15 INPUT MODE BUTTON BAND BUTTON 16 5 RA...

Page 9: ...SB storage contains more than 2 folders contains playback file FOLDER icon is lit 11 PLAYBACK icon During disc or USB playback state PLAYBACK icon is lit 12 PAUSE icon During disc or USB pause playbac...

Page 10: ...ton to select between CINEMA ROCK CLASSIC FLAT Press and hold CLOCK button on the remote control to enter CLOCK Setup rotate VOL KNOB to adjust hour Press it briefly to minute setting and rotate it to...

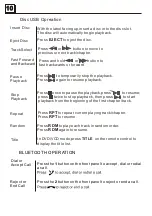
Page 11: ...ld APS button on the remote control or press and hold button on the front panel to automatically store the six strongest stations in the current band Up to18 FM stations and 12 AM stations can be stor...

Page 12: ...t the disc Press to temporarily stop the playback Press again to resume playback Press RPT to repeat current playing track chapter Press RPT to resume Press RDM to play each track in random order Pres...

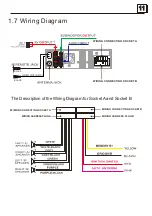
Page 13: ...agram for Socket A and Socket B 1 7 Wiring Diagram WIRING HARNESS PLUG A WIRING HARNESS PLUG B WIRING CONNECTING SOCKET A WIRING CONNECTING SOCKET B BLACK HDMI OUT ARC WIRING CONNECTING SOCKET A WIRIN...

Page 14: ...IRING CONNECTING SOCKET A VIEW PURPLE PURPLE PIN NO COLOR FUNCTION 1 YELLOW 12V DC MEMORY B 2 PINK AUTO ANTENNA 3 RED 12V DC IGNITION SWITCH 4 BLACK POWER GROUND 12DC WIRING CONNECTING SOCKET B VIEW 1...

Page 15: ...OM STEREO CONNECTOR WIRES FROM RV BOAT OR TRUCK ZONE 1 SPEAKER WIRES ZONE 1 SPEAKER WIRES ZONE 2 SPEAKER WIRES 1 1 2 2 ZONE 2 SPEAKER WIRES ZONE 1 SPEAKER WIRES ZONE 1 SPEAKER WIRES ZONE 2 SPEAKER WIR...

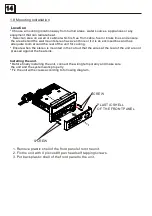
Page 16: ...the unit for cooling Ensure when the stereo is mounted in the cut out that the wires at the rear of the unit are not pressed against the heat sink Installing the unit Before finally installing the un...

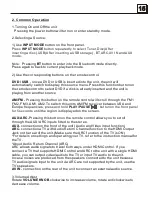
Page 17: ...button on the front panel for 5 seconds until the region is displayed on the screen AUX ARC Pressing this button on the remote control allows you to scroll through the AUX ARC inputs fitted to the st...

Page 18: ...es CINEMA ROCK CLASSIC FLAT The sound effect will be changed 7 To turn on off LOUD mode Press and hold LOUD button on the remote control to turn on off LOUD mode 8 To adjust the sound equalizer curves...

Page 19: ...ion is finished it will resume broadcasting on the M1 It can store 3x6 stations for FM and 2x6 stations for AM in all 2 When briefly pressing APS button on the remote control or press button on the fr...

Page 20: ...to VIDEO1 2 Insert a disc into the DISC SLOT with labelled side facing up NOTE 1 For some discs that are seriously scratched or poor manufacturing or recording quality it may not play 2 If the player...

Page 21: ...e 0 number buttons to directly select and play the 1st to 9th track chapter If you want to play the track chapter with serial number bigger than 9 use the 10 1 9 and 0 button For example 1 to play the...

Page 22: ...is disabled 4 7 Terminate the Playback 1 Press EJECT button to eject disc 2 Press and hold POWER button on the front panel or briefly press POWER button on the remote control to turn off the Stereo 5...

Page 23: ...ect REP ONE REP ALL or OFF When it is in the state of PBC ON during VCD disc playing the RPT button is not available 3 In the mode of MP3 WMA disc playback Press RPT button to select REP ONE REP DIR R...

Page 24: ...then use the number buttons to input the serial number of the track finally press OK or PLAY PAUSE button to play the selected track 5 6 Playback in Random When playing DVD VCD PBC OFF MP3 WMA CD dis...

Page 25: ...Stereo no language function 3 When playing CD WMA MP3 discs AUDIO on the remote control button is invalid 5 11 Look over the Playback Status 1 When playing DVD discs press OSD button on the remote co...

Page 26: ...the item you want to change input the desired sequence number During VCD playback if it is in PBC ON mode at the same time of entering the state of program playback it turns off PBC mode 5 13 Playback...

Page 27: ...on for all formats of discs In MP3 WMA mode during playback the information of the file name folder name songs title artist and album will be scrolling on the LCD display As long as the current playin...

Page 28: ...rol The defaulted state is locked The defaulted password is 0000 You can set a new password that you like Select the PASSWORD item and then press the button to enter it then input the original passwor...

Page 29: ...ge AUDIO OUT For the selection of Digital output method SPD IF OFF SPD IF RAW SPD IF PCM HDMI AUDIO AUTO Selected to output the audio automatically by RAW or PCM type PCM Selected to output the audio...

Page 30: ...signal when outputting audio signal with 2 channels it will output the common 2 channels of stereo signal VSS If you choose the item when playing a disc recorded with 5 1 channels the main channel sp...

Page 31: ...Parental Control Depending on the DVD feature of seamless switching described above the scenes that are not tting for children will be cleared or replaced by the other tting scene automatically rated...

Page 32: ...every region a code namely region code The region codes and the countries or areas represented by the region codes are as follows Region 1 America Canada East Pacific Inlands Region 2 Japan West Euro...

Page 33: ...y need to select the paired BT device and press the CONNECTION button When connection is ok the LCD of the car audio system will show LINK OK 2 Use the mobile phone to do connection or disconnection I...

Page 34: ...EDIAL button on the remote control it will dial the last phone number 5 2 To reject Incoming call ringing short press HANG UP button on the remote control or 2 button on the front panel to REJECT the...

Page 35: ...oid smartphone or App Store iPhone Do a search for ES Control and proceed to download Install per the app instructions 2 Turn on the BT function of your smartphone and pair with DV3300 3 Under BT conn...

Page 36: ...Preferences RADIO 34...

Page 37: ...BT DVD CD USB 35...

Page 38: ...ARC AUX 36...

Page 39: ...s scratched or stained Check whether the AV connector and the output terminal is stained Check whether there is condensation inside the Lens If so leave the player off for an hour or so then try again...

Page 40: ...38 4x15W RMS 6 NTSC PAL AUTO optional 87 5MHz 108 0MHz AUS 522KHz 1710KHz AUS Video Output Level Composite 1 0 0 2Vp p...

Page 41: ......
Reviews: