background image

9

Electrical Connection

English

 WARNING

The 12V power supply wiring should incorporate a general main switch that enables 

all pole disconnection of the 12V appliances from the 12V power supply source.

 WARNING

This refrigerator should be properly grounded for your safety.

This refrigerator requires 10.5-17VDC,>=15A power source for normal operating. 

Direct connection with AC power source is forbidden. If doing so, it will void any 

product warranty.

This refrigerator is designed for DC power input only, if you do not have ,recommend 

Power Center (FCVSWC42A and FCVSWC54A), Lithium battery (FB12I10C) to match 

with it. 

The cord should be secured behind the refrigerator and not left exposed or dangling 

to prevent accidental injury. If needed, please use strain relief to hold it. You should 

follow the instruction of strain relief to install it.

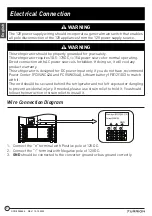
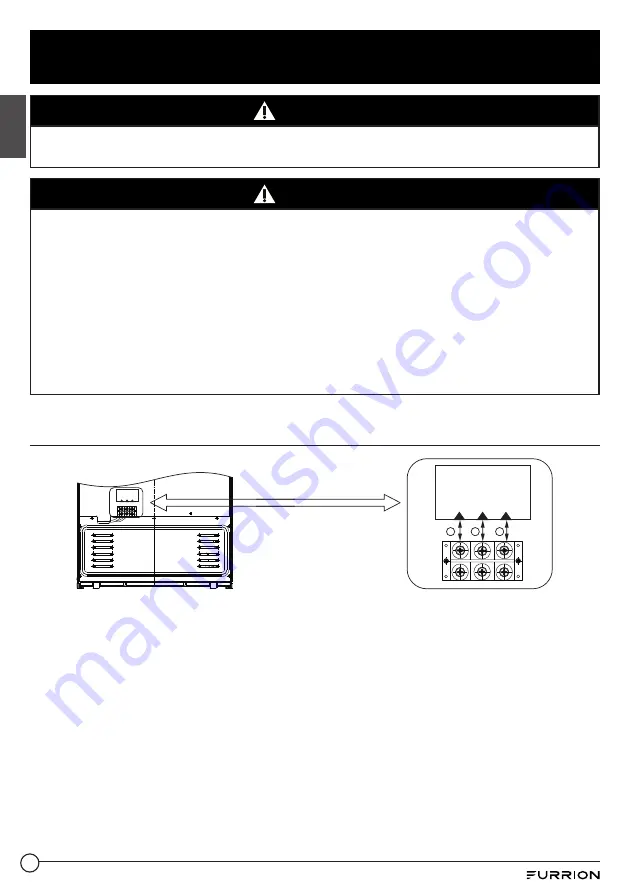
Wire Connection Diagram

+

- GND

+ -

GND

Power Input: DC12V(10.5-17V)
Current: 20A MAX

Power Input: DC12V(10.5-17V)
Current: 20A MAX

1

2

3

1. Connect the "

+

" terminal with Positive pole of 12V DC.

2. Connect the "

-

" terminal with Negative pole of 12V DC.

3.

GND

 should be connected to the converter ground or bus ground correctly.

CCD-0005596     REV: 10.12.2022

Summary of Contents for FCR10DCBTA-BL

Page 1: ...Refrigerator 10 pi cu R frig rateur CC 10 pies c bicos Refrigerador CC Instruction Manual Manuel d instructions Manual de instrucciones Model Mod le Modelo FCR10DCBTA BL FCR10DCBTA SS CCD 0005596 REV...

Page 2: ...e use installation and maintenance of the appliance Please keep this instruction manual in a safe place for future reference Pass it onto possible new owners of the appliance The manufacturer does not...

Page 3: ...allation Precautions 6 What s in the box 6 Installing Your Refrigerator 6 Electrical Connection 9 Wire Connection Diagram 9 Operation 10 Temperature Control 10 Replacing the Interior Light 10 Freezer...

Page 4: ...r installation for the refrigerator must be performed by a qualified technician or service company Failing to do so may result in an electrical shock Proper Disposal of the Refrigerator DANGER Risk of...

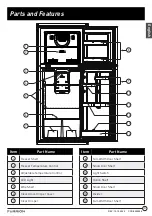
Page 5: ...erature Control 4 LED Light 5 Wire Shelf 6 Clear Glass Crisper Cover 7 Clear Crisper Item Part Name 8 Full Width Door Shelf 9 Small Door Shelf 10 Light Switch 11 Gallon Shelf 12 Small Door Shelf 13 Di...

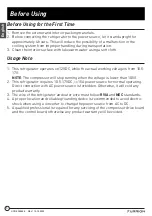
Page 6: ...s from 10 5 17V NOTE The compressor will stop running when the voltage is lower than 10 5V 2 This refrigerator requires 10 5 17VDC 15A power source for normal operating Direct connection with AC power...

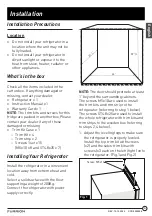
Page 7: ...d ST4 8x25 x 7 Installing Your Refrigerator Install the refrigerator in a convenient location away from extreme heat and cold Select a solid surface with the floor supporting a weight of 200Kg Connect...

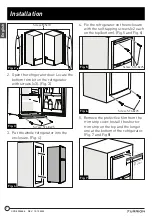
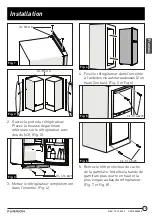
Page 8: ...4 Fix the refrigerator on the enclosure with the self tapping screws x2 each on the top bottom Fig 5 and Fig 6 Fig 5 Fig 6 5 Remove the protective film from the trim strip cover Install the shorter tr...

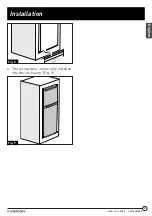
Page 9: ...8 Installation English Longer 650mm Fig 8 6 The refrigerator is now fully installed into the enclosure Fig 9 Fig 9 REV 10 12 2022 CCD 0005596...

Page 10: ...C power input only if you do not have recommend Power Center FCVSWC42A and FCVSWC54A Lithium battery FB12I10C to match with it The cord should be secured behind the refrigerator and not left exposed o...

Page 11: ...e refrigerator will rework after 3 to 5 minutes automatically Replacing the Interior Light Switch off the fridge Failure to do so may result in electrical shock or personal injury Replace the old bulb...

Page 12: ...ch off the refrigerator Clean the interior and leave doors open to avoid possible odor or mold formation Keep the refrigerator not easily accessible by children Moving Your Refrigerator Switch off the...

Page 13: ...D 26 13 16 x 60 7 8 x 27 3 16 681 x 1545 x 690 mm Recessed Dimensions W H D 23 3 4 x 59 1 2 x 24 604 x 1512 x 610 mm Net Weight 114 6 Lbs 52 Kg Voltage DC 12V Rated Current 11A Temperature Range Fres...

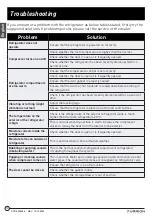
Page 14: ...vibration is normal Adjust the leveling legs Ensure that the refrigerator is placed on a flat and solid surface The temperature on the exterior of the refrigerator is high Check if the temperature of...

Page 15: ...UCT TO ANY DATA SOFTWARE OR INFORMATION AND NORMAL WEAR AND TEAR THIS WARRANTY ONLY PROTECTS THE ORIGINAL END USER YOU AND IS NOT TRANSFERABLE ANY ATTEMPT TO TRANSFER THIS WARRANTY SHALL MAKE IT IMMED...

Page 16: ...NCIDENTAL OR CONSEQUENTIAL DAMAGES OR EXCLUSIONS OR LIMITATIONS ON THE DURATION OF IMPLIED WARRANTIES OR CONDITIONS SO THE ABOVE LIMITATIONS OR EXCLUSIONS MAY NOT APPLY TO YOU THIS WARRANTY GIVES YOU...

Page 17: ...rit de l appareil Veuillez conserver le pr sent guide d utilisation en lieu s r pour vous y r f rer ult rieurement afin d assurer votre s curit et de r duire les risques de blessure Veuillez aussi rem...

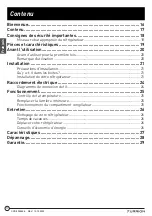
Page 18: ...nstallation 21 Qu y a t il dans les boites 21 Installation de votre r frig rateur 21 Raccordement lectrique 24 Diagramme de connexion de fil 24 Fonctionnement 25 Contr le de la temp rature 25 Remplace...

Page 19: ...teur doit tre effectu e par un technicien qualifi ou une soci t d entretien Tout manquement cet gard pourrait se solder par une d charge lectrique Mise au rebut appropri e du r frig rateur DANGER Risq...

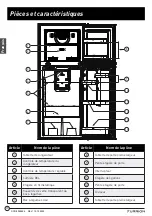
Page 20: ...DEL 5 tag re en fil m tallique 6 Couvercle de verre transparent du bac l gumes 7 Bac l gumes clair Article Nom de la pi ce 8 Tablette de porte pleine largeur 9 Petite tag re de porte 10 Interrupteur...

Page 21: ...fonctionner lorsque la tension est inf rieure 10 5V 2 Ce r frig rateur n cessite une source d alimentation de 10 5 17 V CC 15 A pour un fonctionnement normal La connexion directe avec une source d al...

Page 22: ...de vis 1 x 15 M5x10 x 8 et ST4 8x25 x 7 Installation de votre r frig rateur Installez le r frig rateur dans un endroit pratique l abri de la chaleur et du froid extr mes S lectionnez une surface soli...

Page 23: ...ent dans l enceinte Fig 4 Fig 4 4 Fixez le r frig rateur dans l enceinte l aide des vis autotaraudeuses 2 en haut 2 en bas Fig 5 et Fig 6 Fig 5 Fig 6 5 Retirez le film protecteur du cache de la garnit...

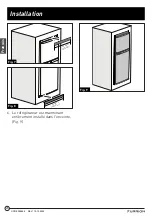
Page 24: ...23 Installation Fran ais Shorter 594mm Longer 650mm Fig 7 Shorter 594mm Longer 650mm Fig 8 6 Le r frig rateur est maintenant enti rement install dans l enceinte Fig 9 Fig 9 CCD 0005596 REV 10 12 2022...

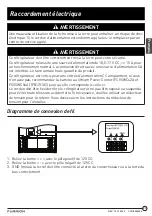
Page 25: ...limentation CC uniquement si vous n en avez pas recommandez la batterie au lithium Power Center FCVSWC42A et FCVSWC54A FB12I10C pour qu elle corresponde celle ci Le cordon doit tre fix derri re le r f...

Page 26: ...frig rateur sera automatiquement remis en fonction apr s 3 5 minutes Remplacer la lumi re int rieure teignez le r frig rateur Ne pas le faire peut entra ner un choc lectrique ou des blessures corpore...

Page 27: ...Nettoyez l int rieur et laissez les portes ouvertes pour viter la formation d odeurs ou de moisissures D couragez l utilisation du r frig rateur par les enfants D placer votre r frig rateur D branche...

Page 28: ...H P 26 13 16 x 60 7 8 x 27 3 16 681 x 1545 x 690 mm Dimensions encastr es L H P 23 3 4 x 59 1 2 x 24 604 x 1512 x 610 mm Poids net 114 6 Lbs 52 Kg Tension DC 12V Courant nominal 11A cart de temp ratur...

Page 29: ...glez les pieds de nivellement Assurez vous que le r frig rateur est plac sur une surface plane et solide La temp rature l ext rieur du r frig rateur est lev e V rifiez si la temp rature des parois ex...

Page 30: ...IELS OU RENSEIGNEMENTS AINSI QUE L USURE NORMALE LA PR SENTE GARANTIE PROT GE UNIQUEMENT L UTILISATEUR FINAL INITIAL VOUS ET NE PEUT TRE C D E QUICONQUE TOUTE TENTATIVE DE CESSION DE LA PR SENTE GARAN...

Page 31: ...JUDICES ACCESSOIRES OU CONS CUTIFS NI LES EXCLUSIONS OU LIMITATIONS DE LA DUR E DES GARANTIES OU CONDITIONS IMPLICITES POUR CE MOTIF LES LIMITES ET EXCLUSIONS PR C DEMMENT NONC ES POURRAIENT NE PAS S...

Page 32: ...o Conserve este manual de instrucciones en un lugar seguro para futuras referencias Esto le garantizar un uso seguro y reducir el riesgo de lesiones Aseg rese de proporcionar este manual a los nuevos...

Page 33: ...i n 36 Qu hay en la cajas 36 Instalaci n de su refrigerador 36 Conexi n el ctrica 39 Diagrama de conexi n del cable 39 Operaci n 40 Control de temperatura 40 Para reemplazar la luz interior 40 Funcion...

Page 34: ...stalaci n relevante para el refrigerador debe realizarse por un t cnico calificado o una compa a de servicio De lo contrario puede provocar una descarga el ctrica Eliminaci n adecuada del refrigerador...

Page 35: ...la 6 Cubierta transparente de vidrio para el caj n para verduras 7 Caj n para verduras transparente Art culo Nombre de la pieza 8 Estante de puerta de ancho completo 9 Estante de puerta peque a 10 Int...

Page 36: ...r cuando el voltaje sea inferior a 10 5 V 2 Este refrigerador requiere una fuente de alimentaci n de 10 5 17 V CC 15A para un funcionamiento normal La conexi n directa con la fuente de alimentaci n de...

Page 37: ...x25 x 7 Instalaci n de su refrigerador Instale el refrigerador en un lugar conveniente lejos del calor y el fr o extremos Seleccione una superficie s lida con el piso soportando un peso de 200 Kg Cone...

Page 38: ...gerador en el gabinete con los tornillos autorroscantes x2 cada uno en la parte superior inferior Fig 5 y Fig 6 Fig 5 Fig 6 5 Retire la pel cula protectora de la cubierta de la tira de guarnecido Inst...

Page 39: ...38 Instalaci n Espa ol Longer 650mm Fig 8 6 El refrigerador ahora est completamente instalado en el recinto Fig 9 Fig 9 REV 10 12 2022 CCD 0005596...

Page 40: ...o solo para la entrada de alimentaci n de CC si no lo tiene se recomienda un centro de alimentaci n FCVSWC42A y FCVSWC54A bater a de litio FB12I10C para que coincida con este El cable debe estar asegu...

Page 41: ...de 3 a 5 minutos autom ticamente Para reemplazar la luz interior Apague el refrigerador De lo contrario podr a producirse una descarga el ctrica o lesiones personales Reemplace la bombilla vieja con u...

Page 42: ...riente Limpie el interior y deje las puertas abiertas para evitar posibles olores o la formaci n de moho Mantenga el refrigerador fuera del alcance de los ni os Para mover su refrigerador Desconecte e...

Page 43: ...tura Profundidad 26 13 16 x 60 7 8 x 27 3 16 681 x 1545 x 690 mm Dimensiones empotradas Ancho Altura Profundidad 23 3 4 x 59 1 2 x 24 604 x 1512 x 610 mm Peso neto 114 6 Lbs 52 Kg Voltaje DC 12V Corri...

Page 44: ...tear la vibraci n leve es normal Ajuste las patas de nivelaci n Aseg rese de que el refrigerador est sobre una superficie plana y s lida La temperatura en el exterior del refrigerador es alta Verifiqu...

Page 45: ...UALQUIER TIPO DE DATOS SOFTWARE O INFORMACI N Y EL DESGATE NORMAL ESTA GARANT A SOLO PROTEGE AL USUARIO FINAL ORIGINAL USTED Y NO ES TRANSFERIBLE CUALQUIER INTENTO DE TRANSFERENCIA RESULTAR EN LA ANUL...

Page 46: ...DA OS INCIDENTALES O DERIVADOS O EXCLUSIONES O LIMITACIONES SOBRE LA DURACI N DE LAS GARANT AS IMPL CITAS O CONDICIONES EN CUYO CASO LAS LIMITACIONES O EXCLUSIONES ANTERIORES PODR AN NO APLICARSE A U...

Page 47: ...46 REV 10 12 2022 CCD 0005596...

Page 48: ...entation has been provided Any unauthorized use shall void any applicable warranty The information contained in this manual is subject to change without notice and at the sole discretion of Lippert Re...

Reviews: