background image

6

CONDENSATION

Moisture will form in the operating section 
of the unit if the unit is brought from cool 
surroundings into a warm room or if the 
temperature of the room rises suddenly. When 
this happens the unit’s performance will be 
impaired. To prevent this, let the unit stand 
in its new surroundings for about an hour 
before switching on, or make sure the room 
temperature rises gradually.
Condensation may also form during the 
summer if the unit is exposed to the breeze 
from an air conditioner. In such cases, change 
the location of the unit.

HOW TO HANDLE THE LCD PANEL


Do not press hard or jolt the LCD panel. It 
may cause the LCD panel glass to break 
and injury may occur.


If the LCD panel is broken, make 
absolutely sure you do not touch the 
liquid in the panel. This may cause skin 
inflammation.


If the liquid gets in your mouth, 
immediately gargle and consult with your 
doctor. Also, if the liquid gets in your eyes 
or touches your skin, consult your doctor 
after rinsing for at least 15 minutes in clean 
water.

Possible Adverse Effects on LCD Panel: 

If a fixed (non-moving) pattern remains on the 
LCD panel for long periods of time, the image 
can become permanently engrained and 
cause subtle but permanent ghost images. 
This type of damage is NOT COVERED BY 
YOUR WARRANTY. Never leave your LCD 
panel on for long periods of time while it is 
displaying the following formats or images:


Fixed images, such as stock tickers, video 
game patterns, TV station logos and 
websites.


Special formats that do not use the entire 
screen. For example, viewing letterbox 
style (16:9) media on a normal (4:3) display 
(black bars at top and bottom of screen); or 
viewing normal style (4:3) media on a wide 
screen (16:9) display (black bars on left and 
right sides of screen).

The following symptoms are not signs of 
malfunction but technical limitation. Therefore 
we disclaim any responsibility for these 
symptoms.


LCD panels are manufactured using 
an extremely high level of precision 
technology, however sometimes parts 
of the screen may be missing picture 
elements or have luminous spots. This is 
not a sign of a malfunction.


Do not install the LCD panel near 
electronic equipment that produces 
electromagnetic waves. Some equipment 
placed too near this unit may cause 
interference.


Effect on infrared devices – there may be 
interference while using infrared devices 
such as infrared cordless headphones.

Power source

: This LED TV is designed to 

operate on 100~240 volt 50/60 Hz, AC current. 
Insert the power cord into a 100~240 volt 
50/60 Hz outlet.
To prevent electric shock, do not use the LED 
TV’s (polarized) plug with an extension cord, 
receptacle, or other outlet unless the blades 
and ground terminal can be fully inserted to 
prevent blade exposure.

Warning

: To reduce the risk of fire or electric 

shock, do not expose this apparatus to rain or 
moisture.

Caution:

 Never remove the back cover of the 

LED TV as this can expose you to very high 
voltages and other hazards. If the TV does not 
operate properly, unplug the LED TV and call 
your authorized dealer or service center.
Adjust only those controls that are covered 
in the instructions, as improper changes or 
modifications not expressly approved by 
Furrion could void the user’s warranty.

Declaration of Conformity
WARNING:

 This equipment has been tested 

and found to comply with the limits for a 
Class B digital device, pursuant to Part 15 of 
the FCC Rules. These limits are designed 
to provide reasonable protection against 
harmful interference in a residential installation. 

Summary of Contents for FDFD24D3D

Page 1: ...24 FHD 12V SMART TV WITH DVD COMBO MODEL FDFD24D3D LIPPERT ITEM NO 2021132193 USER MANUAL Product picture for reference only...

Page 2: ...ntains information for safe use installation and maintenance of the product Please keep this user manual in a safe place for future reference This will ensure safe use and reduce the risk of injury Be...

Page 3: ...on 13 What s in the Box 13 Install 13 Connect Power 13 Preparation of Remote Control 14 Getting Started 14 OSD 15 MENU Settings 16 Channel Menu 20 Quick Menu 21 Home 21 Apps 21 TV 22 Media Operation 2...

Page 4: ...ly or has been dropped 15 Apparatus should not be exposed to dripping or splashing and objects filled with liquids such as vases should not be placed on the apparatus 16 An outside antenna system shou...

Page 5: ...ION 810 21 ELECTRIC SERVICE EQUIPMENT 20 When replacement parts are required be sure the service technician uses replacement parts specified by the manufacturer or those that have the same characteris...

Page 6: ...rmal style 4 3 media on a wide screen 16 9 display black bars on left and right sides of screen The following symptoms are not signs of malfunction but technical limitation Therefore we disclaim any r...

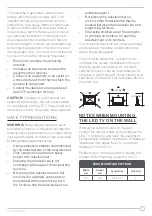
Page 7: ...elevision set Only using furniture that can safely support the television set Ensuring the television set is not overhanging the edge of the supporting furniture Not placing the television set on tall...

Page 8: ...m the improper installation YES NO WARNING Do not use this TV with wall mounts that allow the TV to tilt vertically Vertical tilting wall mounts may cause structural damage to the TV Use ONLY fixed or...

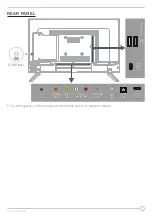
Page 9: ...9 REAR PANEL DVD Player RJ45 IN HDMI1 IN DC IN HDMI2 ARC IN USB2 USB1 MINI LINE OUT The configuration of the connection ports may vary from model to model...

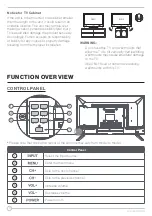
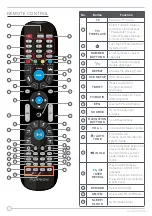
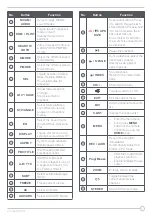
Page 10: ...manual for more information 2 Turn the TV Entertainment System on off 3 NUMBER BUTTONS Enter numbers or select channels 4 Toggle between single double digit input 5 REPEAT Change the playing mode 6 D...

Page 11: ...ext On Off 32 SUBT Select subtitle language DVD 33 FREEZE Freeze current picture 34 AV Select AV Mode 35 AUX ARC Select AUX ARC Mode No Button Function 36 APS SIZE Scan radio stations Press it to sear...

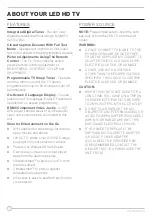
Page 12: ...t using a Digital TV Set Top Box Closed Caption Decoder With Full Text Mode Displays text captions or full screen text on the screen for hearing impaired viewers Picture Adjustments Using The Remote C...

Page 13: ...igarette Adapter 1 Remote Control 1 Quick Start Guide 1 Warranty Manual 1 Warning Card x 1 Important Safety Insturctions x 1 12V Power Adapter 1 Wall Mount Screws M4 8 x 4 Screw Adapters x 4 Now you c...

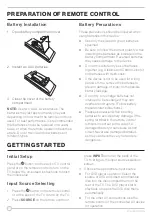
Page 14: ...injury from possible battery leakage Do not try to recharge batteries not intended to be recharged they can overheat and rupture Follow battery manufacturer s directions Please use caution when inser...

Page 15: ...ur desired mode 4 Press OK button to confirm your selection 5 Press MENU button to return to the previous menu or press EXIT at any time to exit the setting Press DISPLAY button on the remote control...

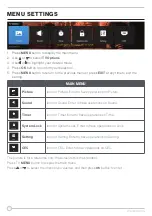
Page 16: ...ter to have operations on Picture Sound Icon for Sound Enter to have operations on Sound Timer Icon for Timer Enter to have operations on Time System Lock Icon for System Lock Enter to have operations...

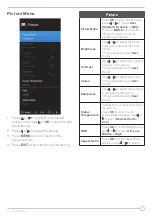
Page 17: ...the visual perception output of the entire picture Only adjustable under User mode Contrast Use or to adjust the highlight intensity of the picture Only adjustable under User mode Colour Use or to ad...

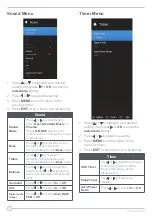
Page 18: ...e high pitched sounds Only adjustable under User mode Balance Press or to enter the setting page and use or to adjust the audio output between left and right track Surround Press or to select On or Of...

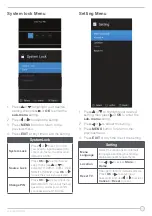
Page 19: ...r to lock the source you selected Change PIN Press OK or to enter input the default 0000 then input the new password you desired confirm your password at third time Setting Menu 1 Press or to highligh...

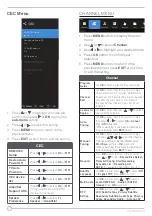
Page 20: ...play Channel edit function includes Delete Skip Swap Favorite Favorite Skip mark will appear only after the users have some setting on the channel Favorite and Skip can t be set together Country Or Re...

Page 21: ...he search results may vary depending on the channel region network settings and whether you have agreed to the terms and conditions Item Description 1 HOME The popular programs for quick access 2 VIDE...

Page 22: ...drive then press SOURCE button to set the Source to Media 1 2 All APPs Like APPs Click the MENU key to edit my apps 1 Use or to select MY APPS then press to select Media Player and OK to enter the Me...

Page 23: ...u MUSIC Press or to select Music in the main menu and then press OK or to enter Press EXIT button to return back to the previous menu You can see the information of the current playing sonny at the le...

Page 24: ...Applications in the main menu and then press OK to enter Press EXIT button to return back to the previous menu SETTING Press or to select Setting in the Source Menu and then press OK or to enter NETWO...

Page 25: ...ress or to select desired picture ratio OSD LANGUAGE Press or to select the desired language SCREEN SAVER Press or to set the screen saver ON or OFF RESUME Press or to set ON or OFF REPEAT Press to se...

Page 26: ...Function 1 AUTO TUNE Eject DVD CD 2 HOLD Select the previous track chapter during playback 3 Start pause or restart the playback 4 STEP REVEAL Play the previous file directly 5 APS SIZE Play the next...

Page 27: ...sc 12 cm Disc Only DVD DVD R DVD R DVD RW DVD RW VCD SVCD CD CDR CDRW Multimedia Format MP3 WMA JPEG MPEG 1 MPEG 2 MPEG 4 DIVX3 xx DIVX5 xx DVD VCD SVCD PLAYBACK When playing a DVD VCD SVCD CD Press t...

Page 28: ...angle Check the Antenna connection is tight to the TV Check there is power supplied to the Antenna distribution box Confirm your incoming cable is connected to the correct cable antenna wall connectio...

Page 29: ...with Stand W x H x D Max Resolution 2111 16 x 1215 16 x 21 2 551 x 329 x 63mm 2111 16 x 15 x 63 4 551 x 381 x 171mm 1920 x 1080 FHD INPUT OUTPUT CONNECTIONS DC COAXIAL Out VIDEO IN AUDIO IN MINI LINE...

Page 30: ...N 46514 USA Toll free 1 800 789 3341 Email support furrion com 2007 2022 Furrion Ltd Furrion and the Furrion logo are trademarks licensed for use by Furrion Ltd and registered in the U S and other cou...

Reviews: