8
Installation
English
WARNING
This unit employs components that tend to
produce arcs or sparks. To prevent fire or
explosion, do not install in compartments
containing batteries or flammable
materials (LP gas).
CAUTION
●
To prevent fire, do not cover or obstruct
ventilation openings. Do not mount
in zero-clearance compartment.
Overheating may result.
●
For continued protection against risk of
fire or electric shock, replace only with
same type and rating of fuse.
What’s in the Box
Make sure you have all the following items
included in the packaging. If any items are
damaged or missing, contact your dealer.
−
Power Center x 1
−
Instruction Manual x 1
−
Warranty Card x 1
Mounting the Power Center
Consult a licensed electrician or an RV
technician for installation assistance.
1. Select a mounting location near the
shore power and battery (batteries). A
minimum compartment size of 3 cubic
feet is recommended. Failure to provide
adequate ventilation will prevent the
power center from supplying full output
power.
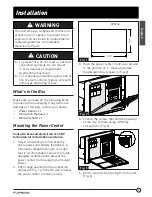
2. Cut a rough opening (to the dimension
outlined in Fig. 1) on the RV wall to allow
the power center to slide in easily.
Fig. 1
RV Wall
10
9
/
16
in
268.0 mm
7 in
178.0 mm
3. Push the power center front cover around
to the position of ‘F” mark and rotate
downwards to fully open it. (Fig. 2)
Fig. 2
4. Loosen the screws that hold the housing
at the four corners using a Phillips
screwdriver. (Fig. 3)
Fig. 3
5. Pull to remove the housing from the unit.
(Fig. 4)

