


2. MOUNTING
2-2
2. Do one of the following:
●
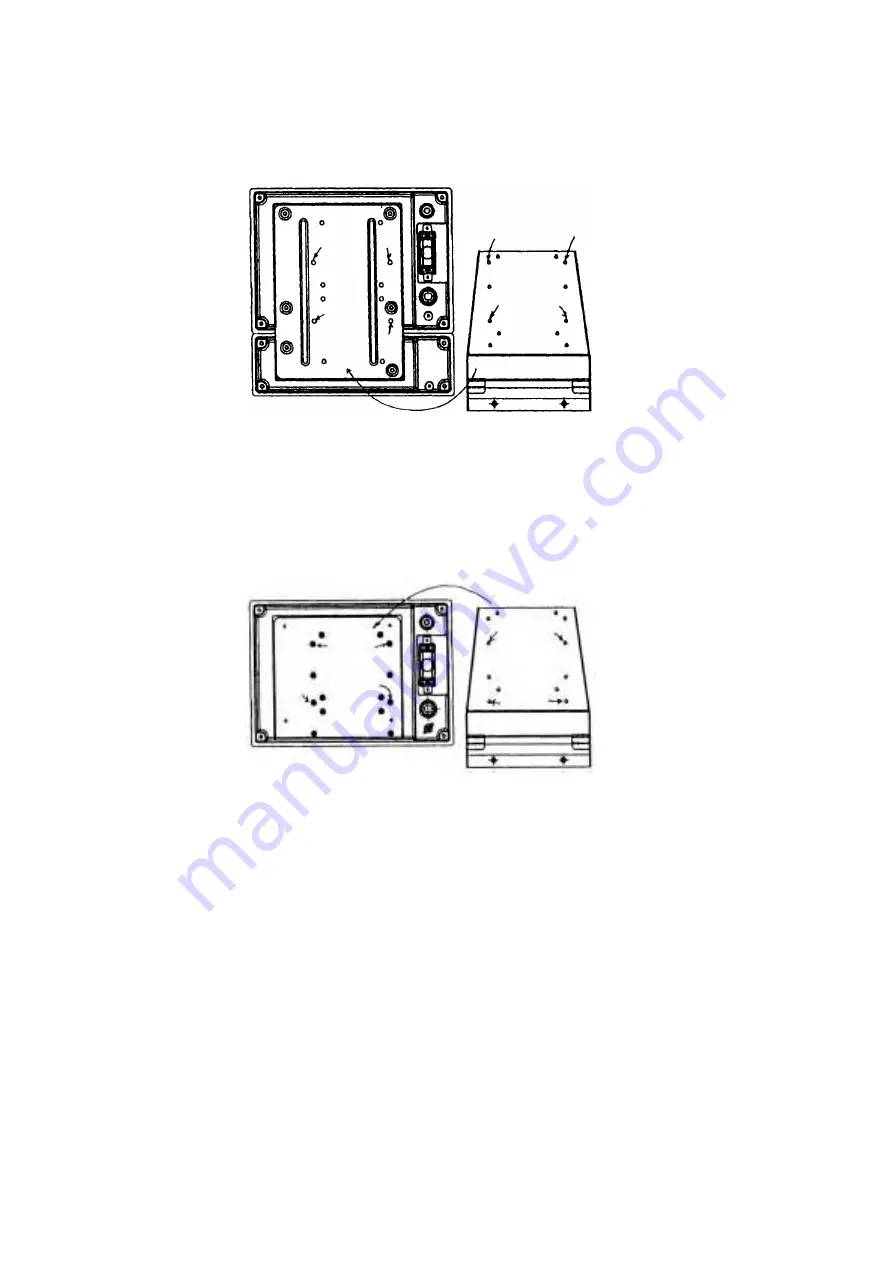
Mounting the monitor unit together with the control unit
a) Fasten the hanger at the rear of the monitor unit with four binding screws (M4x10).
1
1
2
2
3
3
4
4
Bracket (rear view)
Hanger (landscape-type)
●
Mounting the monitor unit separately from the control unit
a) Dismount the coupling plate from the rear of the monitor unit to separate the monitor unit
from control unit.
b) Attach the hanger at the rear of the monitor unit with four binding screws (M4x10).
1
2
3
4
1
2
3
4
Bracket (rear view)
Monitor unit, rear view
3. Grease threads of upset screws (M6x16, 2 pcs.) used to fasten the hanger to the
mounting base.
4. Attach the waterproofing cap (MJ-A10C, supplied as the installation materials) to the
CONT port at the back of the monitor unit.
Summary of Contents for CI-88
Page 4: ...ii SYSTEM CONFIGURATIONS System configuration ...
Page 24: ...2 MOUNTING 2 14 This page is intentionally left blank ...
Page 34: ...3 WIRING 3 10 This page is intentionally left blank ...
Page 53: ...4 ADJUSTMENT 4 19 ...
Page 55: ...4 ADJUSTMENT 4 21 ...
Page 56: ...4 ADJUSTMENT 4 22 This page is intentionally left blank ...
Page 63: ...Takahashi T Y Hatai D 1 ...
Page 64: ...Y Hatai D 2 ...
Page 65: ...Y Hatai D 3 ...
Page 66: ...22 Mar 2011 Y NISHIYAMA D 4 ...
Page 67: ...Takahashi T Y Hatai D 5 ...
Page 68: ...D 6 19 Mar 2015 H MAKI ...
Page 69: ...Takahashi T Y Hatai D 7 ...
Page 70: ...D 8 ...
Page 71: ...Dec 19 03 D 9 ...
Page 72: ...D 10 ...
Page 73: ...Dec 19 03 D 11 ...
Page 74: ...D 12 ...
Page 75: ...Feb 22 05 D 13 ...
Page 76: ...Feb 22 05 D 14 ...
Page 77: ...Feb 22 05 D 15 ...
Page 78: ...Feb 22 05 D 16 ...
Page 79: ...Nov 15 05 D 17 ...
Page 80: ...29 May 2014 H MAKI D 18 ...
Page 81: ...D 19 ...
Page 82: ...D 20 Nov 27 03 ...


