1. MOUNTING
1-3
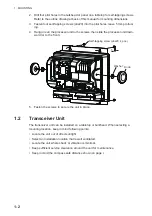
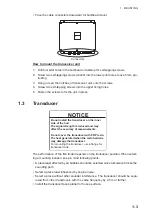
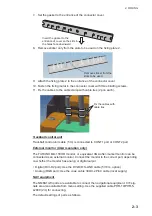
• Face the cable connectors downward for bulkhead mount.
How to mount the transceiver unit
1. Drill four pilot holes in the bulkhead or tabletop for self-tapping screws.
2. Screw two self-tapping screws (
I
5x20) into the lower pilot holes, leave 5 mm pro-
truding.
3. Hang (or set) the notches of transceiver unit onto the screws.
4. Screw two self-tapping screws into the upper fixing holes.
5. Fasten the screws to fix the unit in place.
1.3
Transducer
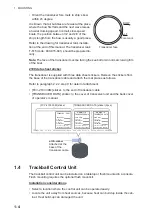
The performance of the fish finder depends on the transducer position. When select-
ing a mounting location, keep in mind following points.
• A place least affected by air bubbles should be selected since turbulence blocks the
sounding path.
• Select a place least influenced by engine noise.
• Select a place without other sounder interference. The transducer should be sepa-
rated from other transducers with the same frequency by 2.5 m or farther.
• Install the transducer face parallel to the sea surface.
Connectors
Connectors
NOTICE
Do not install the transducer on the inner
side of the hull.
The signal strength is reduced and may
affect the accuracy of measurements.
Do not cover the transducer with FRP resin.
The heat generated when the resin hardens
may damage the transducer.
For mounting the transducer, use a flange for
transducer tank.
Summary of Contents for FCV-2100
Page 6: ...EQUIPMENT LISTS iv This page is intentionally left blank...
Page 14: ...1 MOUNTING 1 8 This page is intentionally left blank...
Page 46: ...3 INITIAL SETTINGS 3 18 This page is intentionally left blank...
Page 52: ...16 Nov 2015 H MAKI 16 Nov 2015 H MAKI...
Page 53: ...17 Nov 2015 H MAKI 17 Nov 2015 H MAKI...
Page 54: ...26 Feb 2016 H MAKI 26 Feb 2016 H MAKI...
Page 55: ...17 Nov 2011 Y NISHIYAMA 17 Nov 2011 Y NISHIYAMA...
Page 56: ...17 Nov 2011 Y NISHIYAMA 17 Nov 2011 Y NISHIYAMA...
Page 57: ...17 Nov 2011 Y NISHIYAMA 17 Nov 2011 Y NISHIYAMA...
Page 58: ...8 Mar 2016 H MAKI...

