4-6
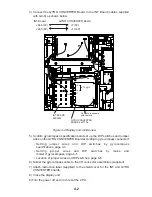
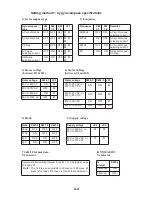
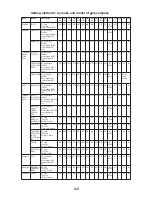
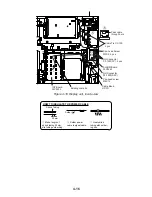
Location of DIP switches, jumper wires on the GYRO CONVERTER
Board
64P1106
JP5, JP4
(Supply voltage)
JP2
(Rotor voltage)
JP3
(Stator voltage)
JP1
(Gyro type)
Fuse
(2A)
J5
(Rotor signal input,
external power input)
J4
(Stator signal input)
SW1
DIP switch
J6
(IEC-61162-1 output port)
J7
(Data output port #1)
J8
(Data output port #2)
J9
(Data output port #3)
JP6, JP7
(AD formal
data Tx interval)
SW2
DIP switch
J10
(Data output
port #4)
J11
(Data output
port #5)
J12
(Data output
port #6)
Figure 4-4 GYRO CONVERTER Board
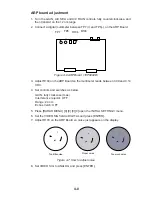
Setting the heading readout on the radar display
Confirm that the gyrocompass is giving a reliable readout. Then, set the heading
readout on the radar display with the gyrocompass readout as follows:
1. Press [RADAR MENU] to display the FUNCTIONS 1 menu.
2. Press the [0] key twice to display the FUNCTIONS 3 menu.
3. Press the [9] key to select the GYRO SETTING option.
4. Rotate the EBL control to align the radar’s HDG readout with the gyrocompass.
5. Press [ENTER] to conclude the setting.
Summary of Contents for FR-2165DS
Page 1: ...MARINE RADAR MODEL FR 2165DS...
Page 61: ......
Page 62: ......
Page 63: ......
Page 64: ......
Page 65: ......
Page 66: ......
Page 67: ......
Page 68: ......
Page 69: ......
Page 70: ......
Page 71: ......
Page 72: ......
Page 73: ......
Page 74: ......
Page 75: ......
Page 76: ......
Page 77: ......
Page 78: ......
Page 79: ......
Page 80: ......
Page 81: ......
Page 82: ......
Page 83: ......
Page 84: ......
Page 85: ......
Page 86: ......
Page 87: ......
Page 88: ......
Page 89: ......
Page 90: ......
Page 91: ......
Page 92: ......

