


10. MAINTENANCE, TROUBLESHOOTING
10-12
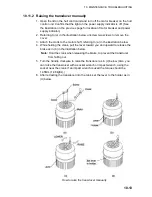
10.11 Raising the Transducer from the Hull Unit
If the transducer cannot be raised with the switches on the control unit, because
it is tangled in the net or its shaft is bent,
try to raise it from the hull unit,
automatically or manually, whichever works.
10.11.1 Raising the transducer automatically
1. Turn off the control unit, power unit and hull unit from the breaker on the
ship’s mains. (If the transducer cannot be retracted power to the control unit
cannot be shut off.)
2. Check if the net or other object is caught in the transducer.
3. Look through the lid on the hull control unit to check if the motor breaker is
OFF. If it is midway between ON and OFF, open the lid and turn it off and on
again.
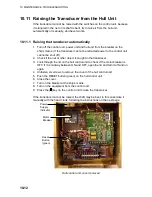
4. Unfasten six screws to remove the cover of the hull control unit.
5. Push the RESET button (green) on the hull control unit.
6. Close the cover.
7. Turn on the breaker at the ship’s mains.
8. Turn on the equipment from the control unit.
9. Press the [ ] key on the control unit to raise the transducer.
If the transducer cannot be raised, the shaft may be bent. In this case raise it
manually with the hand crank, following the instructions on the next page.
Motor
Breaker
Reset
Button
(green)
Power
Supply
Indicator
Hull control unit, cover removed
Summary of Contents for FSV-30
Page 1: ...COLOR SCANNING SONAR FSV 30 ...
Page 14: ...This page is intentionally left blank ...
Page 30: ...1 OPERATIONAL OVERVIEW 1 16 This page is intentionally left blank ...
Page 80: ...2 HORIZONTAL MODE 2 50 The page is intentionally left blank ...
Page 100: ...3 VERTICAL MODE 3 20 The page is intentionally left blank ...
Page 122: ...5 6 This page is intentionally left blank ...
Page 136: ...7 10 This page is intentionally left blank ...
Page 152: ...8 OTHERS MENU 8 16 This page is intentionally left blank ...
Page 170: ...10 MAINTENANCE TROUBLESHOOTING 10 14 This page is intentionally left blank ...
Page 174: ...SP 4 This page is intentionally left blank ...
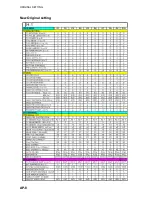
Page 182: ...ORIGINAL SETTING AP 8 New Original setting ...
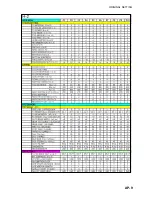
Page 183: ...ORIGINAL SETTING AP 9 ...
Page 184: ...ORIGINAL SETTING AP 10 ...
Page 185: ...ORIGINAL SETTING AP 11 Color setting ...
Page 186: ...ORIGINAL SETTING AP 12 Color Response Curve setting ...


