


2. WIRING
2-11
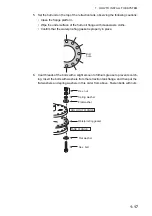
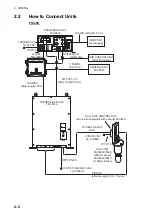
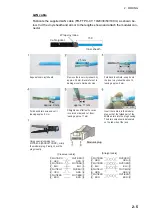
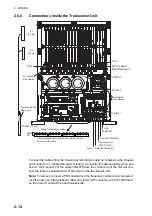
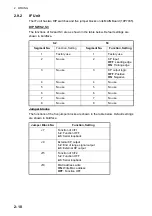
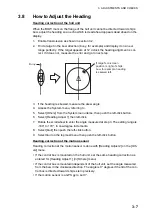
3. Connect the remote controller cable to J2 on the control unit and use the support
plate to fix the cable.
4. Attach the cover.
5. At a distance of 1 cm from the Control Unit, attach the supplied EMI core (RFC-6)
to the remote controller cable.
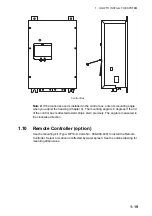
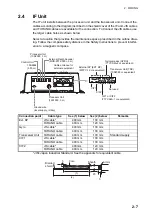
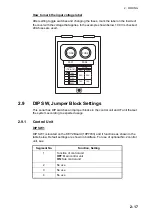
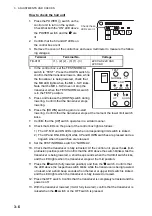
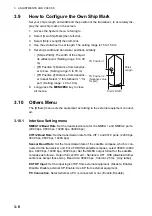
How to connect No.2 control unit (option)
Two control units can be connected. On the No.2 control unit, remove the rear cover
and set the DIP Switch as shown below.
Panhead screw
M4x12, 3 pcs.
Support plate
J2
Fix at copper tape.
Rear side of the control unit (cover removed)
S1
#1: ON
#2: OFF
#3: OFF
#4: OFF
4 3 2 1
Summary of Contents for FSV-85
Page 28: ...1 HOW TO INSTALL THE SYSTEM 1 20 This page is intentionally left blank ...
Page 56: ...3 ADJUSTMENTS AND CHECKS 3 10 This page is intentionally left blank ...
Page 67: ...12 Nov 2010 Y NISHIYAMA D 1 ...
Page 68: ...4 Feb 2011 Y NISHIYAMA D 2 ...
Page 69: ...5 Nov 2010 Y NISHIYAMA D 3 ...
Page 70: ...4 Apr 2014 H MAKI D 4 ...
Page 71: ...6 Jul 2012 Y NISHIYAMA D 5 ...
Page 72: ...Nov 22 06 T Matsuguchi D 6 ...
Page 73: ...22 Apr 2013 Y NISHIYAMA D 7 ...
Page 74: ...22 Apr 2013 Y NISHIYAMA D 8 ...
Page 75: ...26 Nov 2010 Y NISHIYAMA D 9 ...
Page 76: ...27 Dec 2010 Y NISHIYAMA D 10 ...
Page 77: ...Nov 22 06T Matsuguchi D 11 ...
Page 78: ...D 12 ...
Page 79: ...29 Mar 2011 Y NISHIYAMA D 13 ...
Page 80: ...13 Sep 2011 Y NISHIYAMA D 14 ...
Page 81: ...13 Sep 2011 Y NISHIYAMA D 15 ...
Page 82: ...Mar 14 07 R Esumi D 16 ...