Site preparation
2-9
3. Allow sufficient space so the nut is free of the welded seam and there is room for tools
(min. 50 mm).
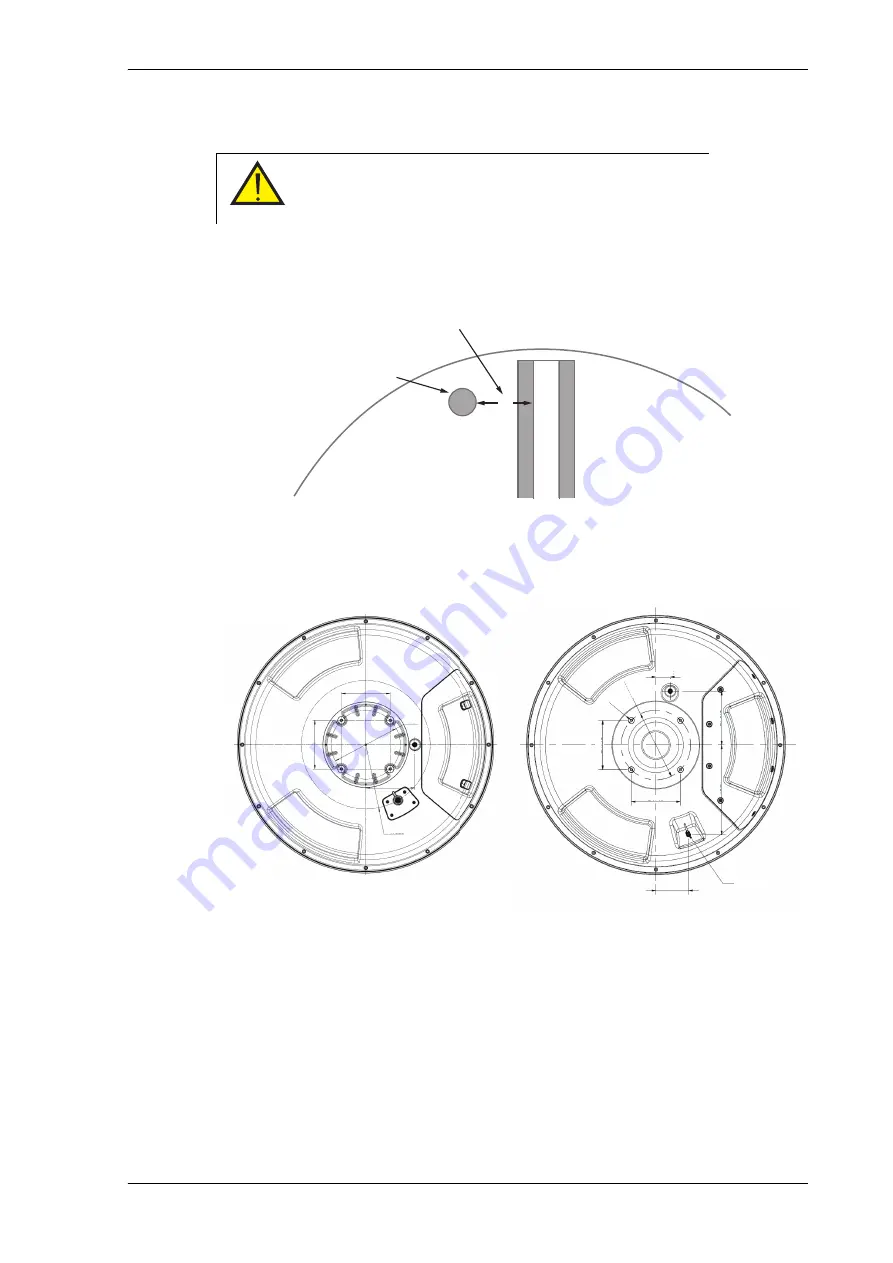
4. Use the dimensions in the following figure to prepare the mast flange for mounting of
the ADU.
CAUTION!
Avoid sharp edges where the flange is in
direct contact with the radome. Round all edges as much as
possible to avoid damaging the surface of the radome.
Figure 2-8: ADU mast flange, distance to the welded seam
Figure 2-9: ADU, bottom view
50
W
elded seam
W
elded seam
Gusset plate
Allow sufficient space so the
nut is free of the welded seam
and there is room for tools
(min. 50 mm).
Clearance hole
for M12 bolts
New antenna
Current antenna
R326
248
ø350
247.5
247.5
N-Connector
164.5
247.5
247.5
452
270.5
72.5
M12
ø350
Summary of Contents for FV-110GX
Page 1: ...GX TERMINAL FV 110GX OPERATOR S MANUAL www furuno com Model ...
Page 16: ...xiv This page is intentionally left blank ...
Page 46: ...Installation of the ADU 2 22 N connector interface on the ADU ...
Page 54: ...To connect the ADU ACU and GMU 2 30 This page is intentionally left blank ...
Page 110: ...Installation check list Functional test in harbor 6 4 This page is intentionally left blank ...
Page 164: ...Supported commands C 10 This page is intentionally left blank ...
Page 165: ...D 1 Appendix D Approvals D This appendix lists the approvals for FV 110GX OEM declaration ...
Page 166: ...OEM declaration D 2 D 1 OEM declaration ...
Page 173: ...OD 1 30 Jul 2018 H MAKI ...
Page 174: ...OD 2 30 Jul 2018 H MAKI ...
Page 175: ...OD 3 2 Oct 2018 H MAKI ...
Page 176: ...OD 4 2 Oct 2018 H MAKI ...
Page 178: ......
Page 186: ......


