background image

4.  ROUTES

4-4

4. Use the cursorpad to place the cursor on the location for the next waypoint then 

press the 

NU/CU ENT

 key. Repeat this step to enter all waypoints.

5. At the last waypoint, press the 

ROUTE

 key to complete the route.

4.1.3

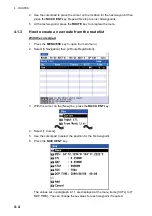
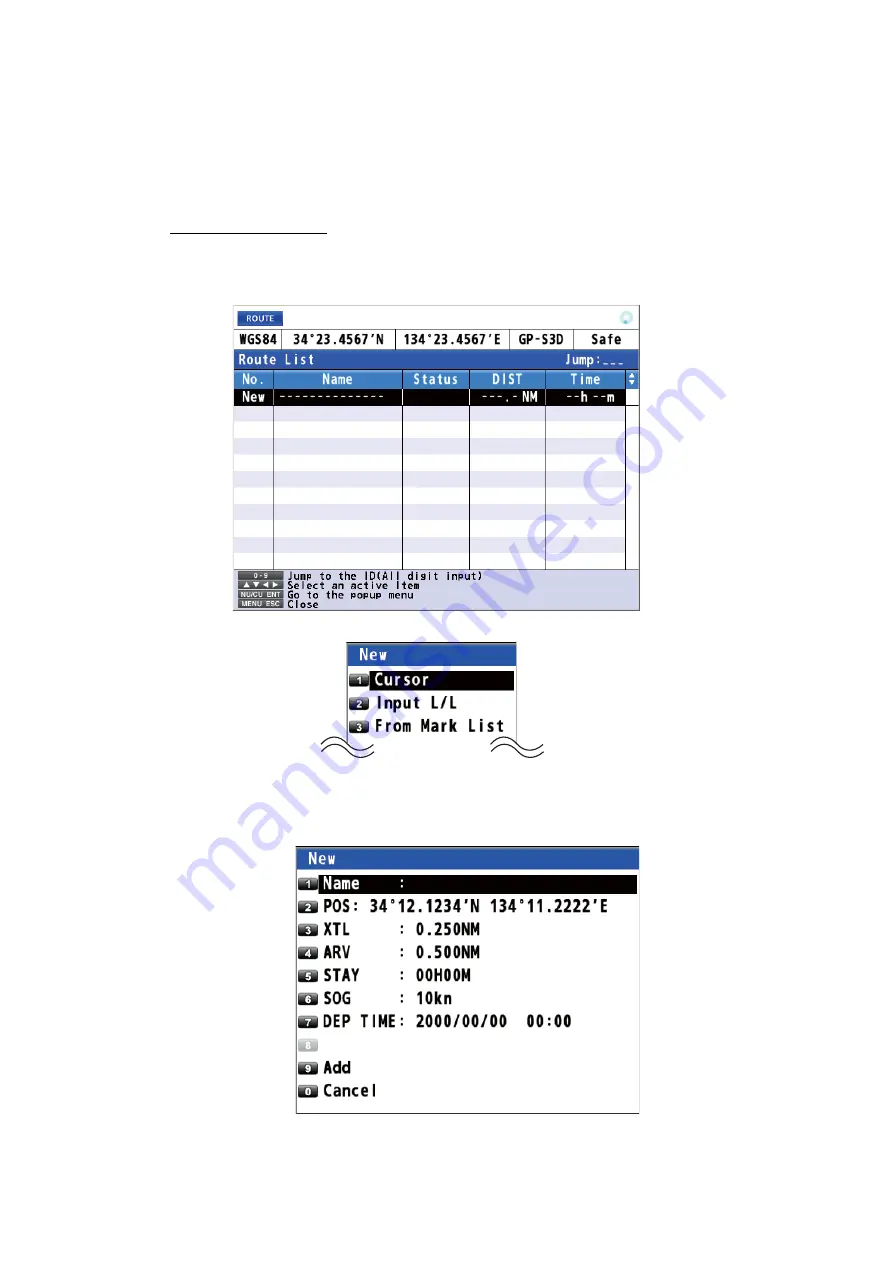
How to create a new route from the route list

With the cursorpad

1. Press the 

MENU/ESC

 key to open the main menu.

2. Select [3 Navigation] then [2 Route Registration].

3. With the cursor on the [New] line, press the 

NU/CU ENT

 key.

4. Select [1 Cursor].
5. Use the cursorpad to select the position for the first waypoint.
6. Press the 

NU/CU ENT

 key.

The values set in paragraph 4.1.1 are displayed at the menu items [3 XTL] to [7 
DEP TIME]. You can change these values for each waypoint if required.

Summary of Contents for GP-170

Page 1: ...GPS NAVIGATOR GP 170 OPERATOR S MANUAL www furuno com Model ...

Page 2: ...his manual is elemental chlorine free FURUNO Authorized Distributor Dealer 9 52 Ashihara cho Nishinomiya 662 8580 JAPAN A JUN 2014 Printed in Japan All rights reserved Pub No OME 44820 A YOTA GP 170 0 0 0 1 7 7 7 3 6 1 0 ...

Page 3: ...roduct according to local regulations for the disposal of industrial waste For disposal in the USA see the homepage of the Electronics Industries Alliance http www eiae org for the correct method of disposal How to discard a used battery Some FURUNO products have a battery ies To see if your product has a battery ies see the chapter on Maintenance Follow the instructions below if a battery ies is ...

Page 4: ...e to the equipment Do not connect disconnect the signal cable while turning the power on The unit may be damaged About the TFT LCD The TFT LCD is constructed using the latest LCD techniques and displays 99 99 of its pixels The remaining 0 01 of the pixels may drop out or blink however this is not an indication of malfunction Name Caution Label Type 20 035 1003 0 Code No 100 386 200 10 Caution Labe...

Page 5: ...ange its color 2 4 2 1 11 How to set the COG vector 2 4 2 1 12 How to display the time mark 2 5 2 1 13 How to display the names for marks and waypoints 2 5 2 1 14 How to show or hide the weather data 2 5 2 2 Bearing Reference 2 6 2 2 1 How to select bearing reference 2 6 2 2 2 How to set the magnetic variation 2 6 2 3 About Tracks 2 7 2 3 1 How to start or stop plotting and recording of the track ...

Page 6: ...stination 5 3 5 2 How to Cancel a Destination 5 3 5 2 1 How to cancel a destination with the GO TO key 5 3 5 2 2 How to cancel a destination from the main menu 5 3 5 2 3 How to cancel a destination from the context menu 5 4 5 3 How to Calculate the Distance Bearing and TTG Time To Go Between Two Points 5 4 5 4 How to Display the ETA and TTG 5 5 5 5 How to Calculate the Trip Distance 5 6 5 6 How to...

Page 7: ... 4 9 13 9 6 2 How to set the Ethernet 9 14 9 6 3 How to select the input data 9 15 9 6 4 Line monitor log 9 16 9 7 How to Set Dual Configuration 9 18 9 8 How to Set ECDIS Sync Configuration 9 18 9 9 How to Change the User Password 9 19 9 10 How to Set the Demo Mode 9 20 10 MAINTENANCE TROUBLESHOOTING 10 1 10 1 Maintenance 10 1 10 2 Fuse Replacement 10 2 10 3 Troubleshooting 10 2 10 4 Equipment Inf...

Page 8: ...lution color LCD Comprehensive navigation data displays A DGPS beacon receiver internal or external can be connected to the GP 170 to add DGPS capability Storage for 1 000 waypoints 100 routes 99 for creating one for external input 1 000 tracks and 2 000 marks External USB flash memory capability Notices Arrival Anchor XTE Cross track Error Ship speed Trip Alerts Warning Caution Man overboard feat...

Page 9: ...SC NU CU ENT LIST DISPLAY ROUTE GO TO MOB MARK 1 2 3 4 EVENT5 PLOT ON OFF 6 7 8 9 ZOOM IN CENTER ZOOM OUT ACK DELETE CURSOR ON OFF 0 BRILL 110 220 VAC USB Flash Memory Switching Hub HUB 100 Radar Echo Sounder Autopilot Printer PP 505FP Beacon Receiver Interface Unit IF 2503 w internal beacon receiver w o internal beacon receiver Rectifier PR 240 100 to 115 200 to 230 VAC Rectifier PR 62 ...

Page 10: ...ENU ESC NU CU ENT LIST DISPLAY ROUTE GO TO MOB MARK 1 2 3 4 EVENT5 PLOT ON OFF 6 7 8 9 ZOOM IN CENTER ZOOM OUT ACK DELETE CURSOR ON OFF 0 BRILL 12 24 VDC USB Flash Memory w internal beacon receiver w o internal beacon receiver Antenna Unit GPA 021S Antenna Unit GPA 020S Antenna Unit GPA 017S Radar Echo Sounder Autopilot Printer PP 505FP Beacon Receiver Interface Unit IF 2503 Radar Echo Sounder Aut...

Page 11: ...y or cursor on the plotter display Switches display on the integrity display 4 LIST Opens the list Switches the list any display mark list route list station list requires the internal beacon receiver any display Long press to switch the list in reverse order 5 Right click Opens the context menu on the plotter display MENU ESC NU CU ENT LIST DISPLAY ROUTE GO TO MOB MARK 1 2 3 4 EVENT5 PLOT ON OFF ...

Page 12: ...rsor on Puts an event mark at own ship s position on the plotter display with cursor off 11 PLOT ON OFF 6 Resumes stops track plotting on the plotter display 12 ZOOM IN 7 Zooms in the plotter display 13 CENTER 8 Centers the cursor position on the plotter display with cursor on Centers own ship s position on the plotter display with cursor off 14 ZOOM OUT 9 Zooms out the plotter display 15 CURSOR O...

Page 13: ...ver Only the beacon receiver equipped GP 170 has DGPS capa bility To get DGPS capability install the optional internal beacon receiver name bea con receiver set type OP20 42 code no 000 023 637 or connect an external beacon receiver Status indications Indication System 2D positioning 3D positioning GP 2D GP 3D GPS GP S2D GP S3D GPS SBAS Self test results Start up screen Last used screen example pl...

Page 14: ...GP D2D GP D3D GPS Differential GP D2D Yellow GP D3D Yellow GPS Differential WER 10 GP D2D Yellow GP D3D Yellow GPS Differential Unmonitored GA 2D GA 3D GALILEO GA S2D GA S3D GALILEO SBAS GA D2D GA D3D GALILEO Differential GA D2D Yellow GA D3D Yellow GALILEO Differential WER 10 GA D2D Yellow GA D3D Yellow GALILEO Differential Unmonitored GL 2D GL 3D GLONASS GL S2D GL S3D GLONASS SBAS GL D2D GL D3D ...

Page 15: ...RSE and DA TA Press the DISPLAY key to select the display mode in the following sequence To reverse the order long press the DISPLAY key You can turn off the highway course or data display if its use is not required 1 Press the MENU ESC key to open the main menu 2 Select 1 Display then 9 Display Select 3 Select 3 Highway 4 Course or 5 Data 4 Select 1 On or 2 Off The display modes which are set to ...

Page 16: ... is functioning normally RAIM reliability Datum Status indication HDOP 2D PDOP 3D Time and date of Position FIX Distance for RAIM reliability This icon appears when the number of satellites used for positioning is more than four and the high preci sion speed computing is available Shows the ship s position adjusted with the setting position offset based on the selected datum refer to paragraph 9 3...

Page 17: ...hway Display Course Display Attitude gauge Weather data Speed over ground Course information Course over ground Waypoint Velocity to destination Range Cross track distance indication Trip distance Estimated time and date of arrival ...

Page 18: ...m then press the NU CU ENT key You can also select a menu item by pressing the numeric keys This manual states this operating procedure as Select No menu name The menu items that have a X indicate additional menus Note When invalid data is input is displayed These marks indicate additional menus Basic operation or alert information Second layer Third layer ...

Page 19: ... in a list 1 Press the MENU ESC key to open the main menu 2 Select 8 System Setting then 2 Plotter 3 Select 7 List Number 4 Select 1 Keeping or 2 Not Saved Keeping Saves position in lists Not Saved No 0001 is always displayed at the top of the list 5 Press the MENU ESC key to close the main menu Any display Mark List Route List Station List Short press the LIST key Long press the LIST key Requires...

Page 20: ...nd longitude Range Bearing Displays the bearing and distance from own ship to a mark or a waypoint 5 Press the MENU ESC key to close the main menu 1 7 Context Menu Overview You can display a context menu for track mark route waypoint or MOB For example do the following to open the context menu for a mark 1 Press the CURSOR ON OFF key to turn the cursor on 2 Use the cursorpad to select a mark then ...

Page 21: ...r out the display You can change the range scale on the plotter display Press the ZOOM IN key to zoom in the display and the ZOOM OUT key to zoom out the display The horizontal range is available among 0 125 0 25 0 5 1 2 4 8 16 32 64 128 256 512 and 1024 NM 2 1 3 How to change the display orientation The display orientation for the plotter display can be selected to north up or course up Press the...

Page 22: ...or Size 3 Select 1 Large or 2 Small 4 Press the MENU ESC key to close the main menu 2 1 5 How to move the cursor You can move the cursor with the cursorpad 1 Press the CURSOR ON OFF key to turn the cursor on 2 Press or hold down the cursorpad The cursor moves in the direction of the arrow or diagonal The display shifts when the cursor reaches an edge of the display in the direction opposite of the...

Page 23: ...ange its color see Plotter Display on page 1 6 1 Press the MENU ESC key to open the main menu 2 Select 1 Display then 2 Grid 3 Select the grid color To turn the grid off select 8 Off When selecting 7 White Black the grid color depends on the background color 4 Press the MENU ESC key to close the main menu 2 1 9 How to show or hide the XTL line and change its color The XTL lines see the illustratio...

Page 24: ...ip s icon This vector shows speed and course of own ship The top of a vector shows estimated position of own ship after the selected vector time elapses Note The COG vector is not displayed when there is no position data How to show or hide the COG vector and change its color 1 Press the MENU ESC key to open the main menu 2 Select 1 Display then 3 Lines Color 3 Select 3 Course Vector 4 Select the ...

Page 25: ... off the names 4 Press the MENU ESC key to close the main menu 2 1 14 How to show or hide the weather data You can display the direction and the speed of the wind analyzed from type 16 mes sage when the weather data is received from a beacon station see page 7 2 Note This menu requires an internal or external beacon receiver 1 Press the MENU ESC key to open the main menu 2 Select 1 Display then 0 ...

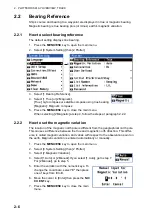
Page 26: ...ow the steps at paragraph 2 2 2 2 2 2 How to set the magnetic variation The location of the magnetic north pole is different from the geographical north pole This causes a difference between the true and magnetic north direction This differ ence is called magnetic variation and varies with respect to the observation point on the earth Magnetic variation is entered automatically or manually 1 Press...

Page 27: ...position of your ship is stored into the memory of this equip ment at an interval of time or distance A shorter interval provides better reconstruction of the track but the storage time of the track is reduced When the track memory be comes full the oldest track is erased to make room for the latest 1 Press the MENU ESC key to open the main menu 2 Select 2 Track Mark then 1 Track REC 3 Select 1 Ti...

Page 28: ...ntext menu 3 Select 1 Change Color 4 Select the color to change 5 Press the MENU ESC key to close the context menu 2 3 4 How to erase the track How to erase all tracks from the main menu 1 Press the MENU ESC key to open the main menu 2 Select 2 Track Mark then 9 Erase Track 3 Select 1 Erase Track The confirmation message appears 4 Select 1 Yes 5 Press the MENU ESC key to close the main menu How to...

Page 29: ...rk shape from 16 types 1 Press the MENU ESC key to open the main menu 2 Select 2 Track Mark then 3 Mark Shape 3 Use the cursorpad to select the shape then press the NU CU ENT key 4 Press the MENU ESC key to close the main menu Mark color You can select a mark color from seven colors 1 Press the MENU ESC key to open the main menu 2 Select 2 Track Mark then 4 Mark Color 3 Select the color 4 Press th...

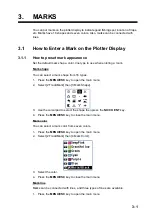
Page 30: ...ine Color 3 Select the color 4 Press the MENU ESC key to close the main menu 3 1 2 How to enter a mark at the cursor position 1 Press the CURSOR ON OFF key to turn the cursor on 2 Use the cursorpad to place the cursor on the location for a mark 3 Press the MARK EVENT key to put the mark This mark is named with the young est unused mark number for example POINT0001 and saved to the mark list 3 1 3 ...

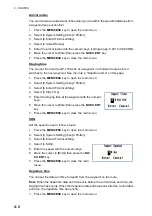
Page 31: ...bol or color if necessary 8 Select 9 Register The confirmation message appears 9 Select 1 Yes or 2 No Yes Marks are registered with connection lines No Marks are registered without connection lines 10 Press the MENU ESC key to close the main menu By entering L L 1 Press the MENU ESC key to open the main menu 2 Select 3 Navigation then 1 Mark Registration 3 With the cursor on the New line press the...

Page 32: ...m 0 to 9 6 Move the cursor to Enter then press the NU CU ENT key 7 Change the name see page 4 6 position symbol or color if necessary 8 Select 9 Register The confirmation message appears 9 Select 1 Yes or 2 No Yes Marks are registered with connection lines No Marks are registered without connection lines 10 Press the MENU ESC key to close the main menu ...

Page 33: ...the main menu Event mark color You can select an event mark color from seven colors 1 Press the MENU ESC key to open the main menu 2 Select 2 Track Mark then 8 Event Color 3 Select the color 4 Press the MENU ESC key to close the main menu 3 2 2 How to enter an event mark at own ship s position 1 Press the CURSOR ON OFF key to turn the cursor off 2 Press the MARK EVENT key on the plotter display Th...

Page 34: ...rd position You can use it as an aid to rescue Press the MOB key to put a MOB mark When the key is pressed own ship s position is registered as a MOB mark The following message appears Select 1 Yes The position for the MOB mark becomes the destination A line is drawn between own ship and the MOB mark This line shows the shortest course to go to the MOB position The bearing and range from own ship ...

Page 35: ... edit then set them 4 Press the MENU ESC key to close the context menu From the mark list 1 Press the MENU ESC key to open the main menu 2 Select 3 Navigation then 1 Mark Registration 3 Use the cursorpad S or T to select the event mark to edit then press the NU CU ENT key The Edit window same as above appears Note You can select the event mark to edit by entering its mark no with the nu meric keys...

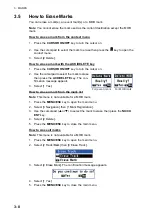
Page 36: ...ase then press the ACK DELETE key The con firmation message appears 3 Select 1 Yes How to erase a mark from the mark list Note This menu is not available for a MOB mark 1 Press the MENU ESC key to open the main menu 2 Select 3 Navigation then 1 Mark Registration 3 Use the cursorpad S or T to select the mark to erase then press the NU CU ENT key 4 Select 2 Delete 5 Press the MENU ESC key to close t...

Page 37: ...f 1 000 waypoints 4 1 1 How to preset the settings for routes XTL Cross track limit range The XTL range is the maximum distance your boat is allowed to go off course before the XTE notice see section 6 3 is given 1 Press the MENU ESC key to open the main menu 2 Select 8 System Setting then 2 Plotter 3 Select 6 Initial XTL Arrival Stay 4 Select 1 XTL 5 Enter the XTL distance with the numeric keys s...

Page 38: ...ting then 2 Plotter 3 Select 6 Initial XTL Arrival Stay 4 Select 3 Stay Time 5 Enter the staying time at the waypoint with the numeric keys 6 Move the cursor to Enter then press the NU CU ENT key 7 Press the MENU ESC key to close the main menu SOG Set the speed to use to follow a route 1 Press the MENU ESC key to open the main menu 2 Select 8 System Setting then 2 Plotter 3 Select 6 Initial XTL Ar...

Page 39: ... Circle This course line is the shortest course between two points on the surface of the earth like stretching a piece of string between two points on earth Frequent bearing changes are required to navigate by this method For long range navigation divide the Great Circle route into several routes and nav igate each route by Rhumb Line 5 Press the MENU ESC key to close the main menu Route color You...

Page 40: ... route from the route list With the cursorpad 1 Press the MENU ESC key to open the main menu 2 Select 3 Navigation then 2 Route Registration 3 With the cursor on the New line press the NU CU ENT key 4 Select 1 Cursor 5 Use the cursorpad to select the position for the first waypoint 6 Press the NU CU ENT key The values set in paragraph 4 1 1 are displayed at the menu items 3 XTL to 7 DEP TIME You c...

Page 41: ...press the NU CU ENT key 7 If necessary change the settings of the route 8 Select 9 Add to enter the waypoint 9 Repeat steps 4 to 8 to enter all waypoints 10 Press the MENU ESC key to complete the route and close the main menu From the mark list 1 Press the MENU ESC key to open the main menu 2 Select 3 Navigation then 2 Route Registration 3 With the cursor on the New line press the NU CU ENT key 4 ...

Page 42: ...the Jump position to select the route to edit then press the NU CU ENT key 4 To change the name select 3 Name 5 To add characters use the cursorpad to select a character to add then press the NU CU ENT key To delete characters use the cursorpad to select BS then press the NU CU ENT key 6 Use the cursorpad to select Enter then press the NU CU ENT key 7 To change the color select 4 Color then select...

Page 43: ...to select a character to add then press the NU CU ENT key To delete characters use the cursorpad to select BS then press the NU CU ENT key 5 Use the cursorpad to select Enter then press the NU CU ENT key 6 To change the position select 2 POS then enter latitude and longitude for the waypoint with the numeric keys To change the coordinate select N or E then press one of keys from 0 to 9 7 Use the c...

Page 44: ...he NU CU ENT key 18 Press the MENU ESC key to close the context menu 4 2 3 How to temporarily deselect a waypoint in a route You can temporarily deselect an unnecessary waypoint from a route Using the route created in the illustration shown below as an example deselect POINT0003 If you reconstruct the route without POINT0003 it would look like the illustration be low 1 Press the CURSOR ON OFF key ...

Page 45: ... Select 6 WPT List The icon is displayed on the skipped waypoint 4 Use the cursorpad S or T to select the skipped waypoint then press the NU CU ENT key 5 Select 8 Skip 6 Select 1 Off 7 Press the MENU ESC key to close the context menu 4 2 4 How to delete a waypoint from a route How to erase a waypoint from the context menu 1 Press the CURSOR ON OFF key to turn the cursor on 2 Use the cursorpad to s...

Page 46: ...ct 0 Delete 7 Press the MENU ESC key to close the main menu 4 2 5 How to insert a waypoint in a route You can insert a waypoint backward or forward of the selected waypoint in a route For example to insert a waypoint backward or forward of POINT0003 do the following 1 Press the CURSOR ON OFF key to turn the cursor on 2 Use the cursorpad to select the waypoint in this example POINT0003 then press t...

Page 47: ...w the waypoints in reverse order The arrows on the route point in the direction to follow the route see the illustration on page 5 1 6 Press the MENU ESC key to close the main menu The icon is displayed on the route for which Reverse is selected 4 2 7 How to copy the route The copy feature lets you save a registered route under a new route number This is useful for creating a new route with parts ...

Page 48: ... ON OFF key to turn the cursor on 2 Put the cursor on any route line of the route to delete then press the key to open the context menu 3 Select 2 Delete How to erase a route from the route list 1 Press the MENU ESC key to open the main menu 2 Select 3 Navigation then 2 Route Registration 3 Use the cursorpad S or T to select the route to delete then press the NU CU ENT key 4 Select 2 Delete 5 Pres...

Page 49: ... position as a destination You can set a destination at the position selected with the cursor 1 Press the CURSOR ON OFF key to turn the cursor on 2 Use the cursorpad to place the cursor on the location for a destination 3 Press the GO TO key Note This destination set is erased when a new destination is entered 5 1 2 How to set a waypoint as a destination You can set a waypoint as a destination 1 P...

Page 50: ...er the mark number to set as a destination with the numeric keys 4 Move the cursor to Enter then press the NU CU ENT key 5 Press the MENU ESC key to close the main menu From the context menu 1 Press the CURSOR ON OFF key to turn the cursor on 2 Use the cursorpad to place the cursor on a mark as a destination 3 Press the key to open the context menu 4 Select 1 GoTo Cancel Scroll bar Indicates menus...

Page 51: ...the CURSOR ON OFF key to turn the cursor on 2 Put the cursor on any route line of the route as a destination 3 Press the key to open the context menu 4 Select 1 GoTo Cancel 5 2 How to Cancel a Destination To cancel a destination do one of the following three methods 5 2 1 How to cancel a destination with the GO TO key 1 Press the CURSOR ON OFF key to turn the cursor on 2 Use the cursorpad to place...

Page 52: ...line or a waypoint select 1 Yes then GoTo Cancel For a MOB mark select 1 GoTo Cancel 5 3 How to Calculate the Distance Bearing and TTG Time To Go Between Two Points You can display the distance bearing and time to go between two points 1 Press the MENU ESC key to open the main menu 2 Select 1 Display then 7 Manual Calculation 3 Enter latitude and longitude for the starting and ending positions wit...

Page 53: ... the departure date and time set is before the current date and time the ETA and TTG are calculated by the staying time set When the departure date and time set is after the current date and time the ETA and TTG are calculated by the departure time set See Staying time and Departure time on page 4 2 1 Press the MENU ESC key to open the main menu 2 Select 3 Navigation then 3 Display ETA TTG 3 Selec...

Page 54: ...ets the trip distance 5 Press the MENU ESC key to close the main menu You can receive a notice when your ship has travelled a preset distance See section 6 5 for details 5 6 How to Set the Drift You can set the time for which the drift value is averaged The longer the time setting the more stable the drift value 1 Press the MENU ESC key to open the main menu 2 Select 1 Display then 8 Set Drift AVR...

Page 55: ...t the top right hand corner of the display You can silence the buzzer by pressing the ACK DELETE key Note You can not set both arrival and anchor notices at the same time 6 1 Audio Notice Type You can select the audio notice type as follows When the conditions of a notice are met the icon color related to the notice changes regardless of the audio notice type 1 Press the MENU ESC key to open the m...

Page 56: ... specified distance from a desti nation waypoint Before setting arrival notice set the arrival radius see Arrival radius on page 4 2 1 Press the MENU ESC key to open the main menu 2 Select 4 Notice Setting then 1 Arrival Anchor 3 Select 1 Arrival The arrival notice icon appears in gray at the top right hand corner of the display 4 Press the MENU ESC key to close the main menu To turn off the arriv...

Page 57: ...efore setting XTE notice set the XTL range see XTL Cross track limit range on page 4 1 1 Press the MENU ESC key to open the main menu 2 Select 4 Notice Setting then 2 XTE 3 Select 2 On The XTE notice icon appears in gray at the top right hand corner of the display 4 Press the MENU ESC key to close the main menu To turn off the XTE notice select 1 Off at step 3 6 4 Ship Speed Notice The ship speed ...

Page 58: ... the MENU ESC key to close the main menu To turn off the ship speed notice select 1 Off at step 4 6 5 Trip Notice The trip notice alerts you when your ship s trip has travelled the distance specified 1 Press the MENU ESC key to open the main menu 2 Select 4 Notice Setting then 4 Trip 3 Select 2 Range 4 Enter the trip distance with the numeric keys 5 Move the cursor to Enter then press the NU CU EN...

Page 59: ...ondition of satellite positioning system Number azi muth and elevation angle of all satellites if applicable in view of your receiver appear Use the cursorpad W or X to change the satellite positioning system in the following sequence The following illustration is an example integrity display for GPS GNSS Beacon Graph signal noise ratio Graph satellite angle Press the key Press the key GPS GLONASS...

Page 60: ...rmation Elevation mask is set to 10 Elevation mask is set to 30 Press the NU CU ENT key Beacon station information Press the NU CU ENT key Detailed beacon station information Type 16 message Press the NU CU ENT key Press the or key to select Next 1 or Next 2 Receive Station used for positioning the nearest station Next 1 Second nearest station Next 2 Third nearest station w internal beacon receive...

Page 61: ...7 DISPLAYS 7 3 Graph The graph displays show signal to noise ratio and satellite angle used for positioning for the last six hours Signal to noise ratio Satellite angle ...

Page 62: ...ad W or X to change the data at the right hand of the display Press the key Press the key Attitude gauge North mark Weather data wind direction and speed When weather data is received from the beacon station When the data for roll pitch or heave is received Waypoint ROLL Starboard Port PITCH Up Down See paragraph 2 1 14 See page 9 3 ...

Page 63: ...pilot connec tion Velocity to destination Autopilot mode Speed over ground Cross track distance indication Autopilot set heading Rudder angle Course angle Trip distance With autopilot connection No autopilot connection Estimated time and date of arrival Required time to destination Required time to next destination Range Heading for autopilot Bearing from own ship to destination waypoint ...

Page 64: ...Press the MENU ESC key to open the main menu 2 Select 8 System Setting then 2 Plotter Own ship s position Speed over ground Estimated time of arrival at the final destination Range Press the or key Own ship s position Course over ground Heading Route total distance Time to go to destination Estimated time of arrival and planned estimated time of arrival at destination Shows the ship s position adj...

Page 65: ...G Time to go to destination TRIP Distance to go to destination TRIP TIME Time elapsed since the destination was set Route TTG Time to go to the final destination VTD Velocity to destination ETA ETA Plan ETA is estimated time of arrival at destination ETA Plan is planned estimated time of arrival at destination Press the or key Custom 1 Custom 2 Custom 3 Custom 4 Custom 5 Custom 6 Custom 7 Custom 8...

Page 66: ...ws 2 Use the cursorpad S or T to select the information to zoom in SOG is highlight ed in the following example 3 Press the ZOOM IN key to zoom in the SOG information To go to the original display press the ZOOM OUT key 4 Press the CURSOR ON OFF key to deselect the SOG information An information highlighted ...

Page 67: ...to 3D D3D turned to 2D D2D turned to 3D D2D turned to 2D S3D turned to 3D S3D turned to 2D S2D turned to 3D S2D turned to 2D D3D turned to No Fix D2D turned to No Fix S3D turned to No Fix S2D turned to No Fix Abbreviated messages D3D 3D D3D 2D D2D 3D D2D 2D S3D 3D S3D 2D S2D 3D S2D 2D D3D No Fix D2D No Fix S3D No Fix S2D No Fix Caution The positioning system turns from DGPS to GPS 210 HDOP exceede...

Page 68: ...gnal Caution More than 10 seconds have passed since the last beacon message is received 215 Differential integrity status Abbreviated messages DGNSS integrity status Caution The beacon station selected auto matically is unhealthy 009 or 401009 Antenna short circuited Abbreviated messages ANT short circuited Warning The antenna has shorted out 950 or 401950 Communication error with BAM Caution Comm...

Page 69: ... 1 Press the MENU ESC key to open the main menu 2 Select 5 Alert then 1 Active Alert to show the alert list Unacknowledged alerts flash except for a caution 3 Press the MENU ESC key to close the alert list Type Icon Visual indication Warning Circle Acknowledged Yellow orange Not acknowledged Yellow orange flashing Caution Square Yellow Not acknowledged Acknowleded Alert icon Alert number Alert nam...

Page 70: ...e display Press the ACK DELETE key to acknowledge the alert The buzzer stops for a warning If multiple alerts are violat ed a high priority alert is acknowledged in order How to acknowledge an alert from the alert list 1 Open the alert list see section 8 2 2 Use the cursorpad S or T to select the alert to acknowledge then press the NU CU ENT key How to acknowledge all alerts from the alert list 1 ...

Page 71: ... of Depth Water temperature Select 3 Unit of Temperature 4 Select the unit 5 Press the MENU ESC key to close the main menu Note When changing the units of measurement the setting values for the notice set ting can exceed the setting range Reset the values see paragraph 4 1 1 and chapter 6 9 2 Correction Offset Menu Position offset You may apply an offset to the position to further refine its accur...

Page 72: ...ges to 999 User Defined Time difference You can display time in UTC or local For local time enter the time difference between local time and UTC 1 Press the MENU ESC key to open the main menu 2 Select 8 System Setting then 4 Correction Offset 3 Select 2 Local Time 4 Select 1 Off or 2 Manual Input Off Uses UTC Universal Time Coordinated Go to step 7 Manual Input Sets the time manually Go to step 5 ...

Page 73: ...tude Gauge 4 Select 1 On or 2 Off On Displays the attitude gauge see the illustration in Highway Display on page 1 7 instead of the ship s icon on the highway display When the data for roll pitch or heave is not received the ship s icon is displayed Off Hides the attitude gauge on the highway display 5 Press the MENU ESC key to close the main menu 1 2 1 Set the width and length of your ship Enter ...

Page 74: ...de and longitude This is especially noticeable at high ship s speeds Increase the setting if the GPS fix changes randomly Speed smoothing During position fixing ship s velocity speed and course is direct ly measured by receiving GPS satellite signals The raw velocity data may change ran domly depending on receiving conditions and other factors You can reduce this random variation by increasing the...

Page 75: ...sk 5 Enter the elevation with the numeric keys 6 Move the cursor to Enter then press the NU CU ENT key 7 Press the MENU ESC key to close the main menu Disable satellite Every GPS satellite is broadcasting abnormal satellite number s in its Almanac which contains general orbital data about all GPS satellites Using this information the GPS receiver automatically eliminates any malfunctioning satelli...

Page 76: ...curacy of the GPS signal To use the RAIM function enter the range from own ship in meters for which you want to know position confidence The receiver esti mates position confidence using range value and detected satellite error and displays provided the RAIM function is active the results as one of three levels of position con fidence at the top right hand corner of the display The three levels ar...

Page 77: ...MENU ESC key to open the main menu 2 Select 8 System Setting then 5 GNSS 3 Select 5 Datum 4 Select an option For 6 Other go to step 5 For others go to step 7 5 Enter the datum number with the numeric keys 6 Move the cursor to Enter then press the NU CU ENT key 7 Press the MENU ESC key to close the main menu 9 3 6 How to set the initial position You can set the initial position to use when the equi...

Page 78: ...en the main menu 2 Select 8 System Setting then 5 GNSS 3 Select 9 Cycle 4 Select 1 1Hz 2 5Hz or 3 10Hz The confirmation message appears 5 Select 1 Yes The GP 170 restarts 9 3 8 How to turn the anti multipath mode on off You can prevent multipath reflection of the satellite signal by some object to prevent position jump 1 Press the MENU ESC key to open the main menu 2 Select 8 System Setting then 5...

Page 79: ...g differential bea con SBAS and no use The priority is Differential beacon SBAS No use See the table below 5 Press the MENU ESC key to close the main menu 9 4 2 How to set SBAS and beacon SBAS 1 Press the MENU ESC key to open the main menu 2 Select 8 System Setting then 6 Beacon SBAS 3 Select 2 SBAS Search 4 Select 1 Auto or 2 Manual Auto Automatically selects the satellite on the highest elevatio...

Page 80: ...tering the frequency or selecting the bit rate Go to step 5 Select Station ID Selects the station from the station list requires the internal beacon receiver Go to step 7 5 Select 1 Frequency or 2 Bit Rate 6 For Frequency enter the frequency with the numeric keys and move the cursor to Enter then press the NU CU ENT key For Bit Rate select the bit rate from five options Go to step 8 7 Use the curs...

Page 81: ...eacon stations Note This menu requires the internal beacon receiver 1 Press the MENU ESC key to open the main menu 2 Select 8 System Setting then 6 Beacon SBAS 3 Select 5 Registered Stations to show the Edit Station Information list Enter the station no e g 0001 with the numeric key then press the NU CU ENT key to display the information of the selected station at the right side of the screen ...

Page 82: ... then 6 Beacon SBAS 3 Select 6 Not Used Satellite 4 Select 1 SBAS or 2 QZSS 5 Enter the disable satellite numbers with the numeric keys setting range 120 to 138 for SBAS 183 to 187 and 193 to 197 for QZSS 6 Move the cursor to Enter then press the NU CU ENT key 7 Press the MENU ESC key to close the main menu 9 5 Language The available languages are English and Japanese 1 Press the MENU ESC key to o...

Page 83: ...equipment are prefixed with a two character code called a talker The same talker must be shared by the transmitting and receiving equipment to transmit and receive data successfully 9 6 1 How to set the output 1 2 3 or 4 1 Press the MENU ESC key to open the main menu 2 Select 7 I O 3 Select 1 Output Data1 4 Select 1 Mode 5 Select 1 IEC NMEA or 2 RTCM IEC NMEA NMEA sentence output RTCM Binary outpu...

Page 84: ...e cannot be guaranteed if the rate exceeds 100 Note 2 For the TX interval of 0 1s or 0 2s set the positioning cycle refer to paragraph 9 3 7 as follows For 0 1s set the positioning cycle at 10Hz For 0 2s set the positioning cycle at 5Hz or 10Hz 16 Set 2 Output Data2 3 Output Data3 and 4 Output Data4 as well 17 Press the MENU ESC key to close the main menu 9 6 2 How to set the Ethernet 1 Press the ...

Page 85: ...setting dual configuration see section 9 7 set 239 192 000 004 for IP address and 60004 for port 12 Move the cursor to Enter then press the NU CU ENT key 13 Select 3 MP 14 Select 1 Enable or 2 Disable For 1 Enable go to step 15 For 2 Disable go to step 18 15 Select 4 MP IP ADR Port 16 Enter the MP IP address and port with the numeric keys 17 Move the cursor to Enter then press the NU CU ENT key 18...

Page 86: ...inate overlap with other ones 6 Select 1 HDG 7 Select 7 User Priority 8 Enter the priority for heading data by data number For ex ample to set the priority order as Data1 Data2 Data4 enter 1 2 4 9 Set the input data for 2 STW speed through water 3 SST sea surface temperature and 4 DPT water depth as well 10 Press the MENU ESC key to close the main menu 9 6 4 Line monitor log Line monitor The data ...

Page 87: ...4 00 01 11 2012 09 00 42 YCMTW 027 32 C GPZDA 012614 00 01 11 2012 09 00 42 YCMTW 027 32 C GPZDA 012614 00 01 11 2012 09 00 42 YCMTW 027 32 C GPZDA 012614 00 01 11 2012 09 00 42 YCMTW 027 32 C GPZDA 012614 00 01 11 2012 09 00 42 YCMTW 027 32 C GPZDA 012614 00 01 11 2012 09 00 42 YCMTW 027 32 C GPZDA 012614 00 01 11 2012 09 00 42 YCMTW 027 32 C GPZDA 012614 00 01 11 2012 09 00 42 YCMTW 027 32 C GPZ...

Page 88: ... connecting the ECDIS FMD 3x00 series via LAN you can display the ECDIS set monitored route on the display of the GP 170 1 Press the MENU ESC key to open the main menu 2 Select 3 Navigation then 4 ECDIS Sync 3 Select 2 ECDIS IP ADR 4 Enter the IP address for the connected ECDIS with the numeric keys 5 Move the cursor to Enter then press the NU CU ENT key 6 Select 3 ECDIS SFI 7 Press the ACK DELETE...

Page 89: ...he GP 170 turn it off see paragraph 6 2 1 Note 3 The no 100 route on the route list is reserved for the monitored route output from the ECDIS This route is automatically written over when the GP 170 receives a new monitored route 9 9 How to Change the User Password You can set a four character password to prevent unauthorized entry into certain menus The default setting is no password 1 Press the ...

Page 90: ...e in UTC Position Set the starting position To change the coordinate select N or E then press one of keys from 0 to 9 1 Direction Set the direction for translatory movement 2 SOG Set the speed for translatory movement in kn 3 Direction Select the direction for rotary motion from CW clockwise and CCW counterclockwise 4 Radius Set the radius for rotary motion in NM 5 Angular Speed Set the angular sp...

Page 91: ...markings Wipe the LCD carefully to prevent scratching using tissue paper and an LCD clean er To remove dirt or salt deposits use an LCD cleaner wiping slowly with tissue paper so as to dissolve the dirt or salt Change paper frequently so the salt or dirt will not scratch the LCD Do not use solvents such as thinner acetone or benzene for cleaning Also do not use degreaser or antifog solution as the...

Page 92: ...sing the BRILL key There is no response when a key is pressed Turn off and on the power If no change ask your dealer Position is not fixed Check if the antenna connector is firmly fastened Check the number of satellites on the integrity display If there are two or less check for obstructions between antenna unit and satellites Clear the GPS memory on the 8 System Setting 9 Clear Memory 2 Clear GPS...

Page 93: ...ENU ESC key to open the main menu 2 Select 6 Maintenance then 1 Information 3 Select 1 Main 2 Panel 3 GPS 4 Beacon requires internal beacon receiver or 5 Database 4 Press the NU CU ENT key to close each information window 5 Press the MENU ESC key to close the main menu X Board version no XX Program version no Main Panel GPS Beacon Database ...

Page 94: ...echnician in troubleshooting Memory test 1 Press the MENU ESC key to open the main menu 2 Select 6 Maintenance then 2 Self Test 3 Select 1 Memory Test The test results are displayed as OK NG No Good or If any NG is displayed contact your dealer The test result of DATA3 checked using a dedicated connector at the factory is normally displayed as 4 Press the MENU ESC key to close the memory test wind...

Page 95: ... Keyboard Test 4 Press each key one by one A key s corresponding location on the display turns blue if the key is normal 5 Press the MENU ESC key three times to close the keyboard test window LCD test 1 Press the MENU ESC key to open the main menu 2 Select 6 Maintenance then 2 Self Test 3 Select 3 LCD Test The operation instructions display opens ...

Page 96: ...creen refer to section 10 4 Memory Keyboard LCD Note 1 You can cancel the test at any time by pressing the MENU ESC key Note 2 The test stops if the check result for an item other than Data3 is NG or 4 Press the MENU ESC key to close the automatic test window 10 6 Backup The GP 170 can save or load the settings and registered data 1 Set a USB flash memory in the USB port Note 1 Do not use an encry...

Page 97: ...USB flash memory The confirmation message appears 5 Select 1 Yes The message Now Processing appears After the process is complete the GP 170 operates as follows or do the following according the menu item selected at step 4 Backup User Setting The message window automatically closes Load User Setting Import GPX Overwrite Import GPX Addition The GP 170 restarts Export GPX After the message window s...

Page 98: ...ain menu 2 Select 8 System Setting then 9 Clear Memory 3 Select 1 Clear Display Setting 2 Clear GPS 3 Clear All or 4 Clear Mark Route Clear Display Setting Clears the display setting Clear GPS Clears the GPS memory Clear All Clears both display setting and GPS memory Clear Mark Route Clears marks and routes The confirmation message appears 4 Select 1 Yes The equipment restarts ...

Page 99: ...nged Integrity 1 On Highway On Off Course On Off Data On Off Data Overlay Weather Type16 On Off 2 Track Mark Track REC Time Distance Track Color DeepPink GreenYellow Green Cyan Purple Blue White Black Mark Shape Default Mark Color DeepPink GreenYellow Green Cyan Purple Blue White Black Mark Color DeepPink GreenYellow Green Cyan Purple Blue White Black Mark Line None Solid Dash Alternate Dash Line ...

Page 100: ...kup Backup User Setting Yes No Load User Setting Yes No Import GPX Overwrite Yes No Import GPX Addition Yes No Export GPX Yes No SW Database Update 2 Chk the available software Main Application Main Boot GPS Application Beacon Application Beacon Application Beacon Boot Chk the new data table Datum WMM Exchange 2 Service 2 Tech Menu 2 7 I O 3 Reserved for Output Data1 to 4 future use Mode IEC NMEA ...

Page 101: ...1 SOG COG RNG BRG SST DPT XTD Average COG Average SOG TTG ETA TRIP TRIP TIME Route Distance Route TTG ETA Next VTD SET DRIFT STW HDG Mark MAX Mark ETA Next VTD SET DRIFT STW HDG Mark MAX Mark Track MAX Track ETA ETA Plan Custom 2 Same as Custom 1 SOG Custom 3 Same as Custom 1 HDG Custom 4 Same as Custom 1 COG Custom 5 Same as Custom 1 ETA Custom 6 Same as Custom 1 Route Distance Custom 7 Same as C...

Page 102: ...1 4 GNSS Beacon Data2 4 GNSS Beacon Data4 4 Auto SBAS Search Auto Manual Beacon Station 4 See the table below Auto Set Parameter Frequency Open the setting window Bit Rate 25bps 50bps 100bps 150bps 200bps Bit Rate 25bps 50bps 100bps 150bps 200bps Select Station ID 5 Open the station list Station Database 5 Open the station list 5 Requires internal Registered Stations 5 Open the station information...

Page 103: ...rate CCRP Consistent Common Reference Point CLR Clear CNCL Cancel COG Course Over the Ground CONT COntrast CPU Central Processing Unit CRS Course CU Course Up CURS Cursor DATE Date DAY Day DEC December DEL Delete DEP Departure DEST Destination DGLONASS Differential GLONASS DGNSS Differential GNSS DGPS Differential GPS DISP Display DIST Distance DNV Det Norske Veritas DPT Depth DR Dead Reckoning De...

Page 104: ...X GPS eXchange Format GRID Grid HDG Heading HDOP Horizontal Dilution Of Precision HL Heading Line H UP Head Up ID Identification IEC International Electrotechnical Commission IN In IND Indication INFO Information INP Input INT Interval I O Input Output JAN January JUL July JUN June LAT Latitude L L Latitude and Longitude LOG Log LON Longitude MAG Magnetic MAN Manual MAR March MAY May MENU Menu MIN...

Page 105: ...ange ROT Rate Of Turn ROUTE Route Rx RX Receive S South SAT Satellite SBAS Satellite Base Argument System SEL Select SEP September SET Set i e set and drift or setting a value SIM Simulation SNR Signal to Noise Ratio SOG Speed Over the Ground SPD Speed SST Sea Surface Temperature STN Station STW Speed Through the Water SV Space Vehicle SYM Symbol s T True TCPA Time to CPA TIME Ship s Time Time TM ...

Page 106: ...MOB Man Overboard mark North mark Chart mode The cursor is turned off Cursor mode The cursor is turned on Plotting stopped Skipped waypoint Reversed route Active unacknowledged warning Active acknowledged warning Active responsibility transferred warning Rectified unacknowledged warning Silenced warning Caution Attitude gauge Anchor notice Arrival notice Ship speed notice Trip notice XTE notice Hi...

Page 107: ...AP 9 APPENDIX 3 TIME DIFFERENCES ...

Page 108: ...MERICAN 1927 Cont d Alberta British Columbia 095 NORTH AMERICAN 1927 Cont d East Canada 096 NORTH AMERICAN 1927 Cont d Manitoba Ontario 097 NORTH AMERICAN 1927 Cont d 098 NORTH AMERICAN 1927 Cont d Yukon 099 NORTH AMERICAN 1927 Cont d Canal Zone 100 NORTH AMERICAN 1927 Cont d Caribbean 101 NORTH AMERICAN 1927 Cont d Central America 102 NORTH AMERICAN 1927 Cont d Cuba 103 NORTH AMERICAN 1927 Cont d...

Page 109: ...ugmentation System Europe EGNOS Euro Geostationary Navigation Overlay Service Japan MSAS Multi Functional Satellite Augmentation System India GAGAN GPS And GEO Augmented Navigation These four systems have interoperability The illustration below shows the coverage area for each provider This manual uses SBAS for these four providers generically As of March 6th 2014 Provider Satellite type Longitude...

Page 110: ...ese components is of no value for shipboard maintenance therefore they are not listed in this manual Major modules can be located on the parts location photos below Parts location Display unit cover opened Unit Display Unit GP 170 ELECTRICAL PARTS LIST Code No PRINTED CIRCUIT BOARD GR 1700 20P8208 BEACON 20P8209 MAIN 20P8210 PNL 20P8211 GPS 20P8220 UFL ANT NL6448BC18 01F LCD 20P8220 UFL ANT 20P821...

Page 111: ...or 0 2s interval 10 Hz for 0 1s interval 2 DISPLAY SECTION 2 1 Display type Color LCD 116 16 x 87 12 mm 640 x 480 dot matrix 2 2 Brilliance 700 cd m2 typical 2 3 Visible distance 0 625 m nominal 2 4 Display modes Plotter Highway Course Data Integrity 2 5 Projection Mercator 2 6 Track plotter display Scale 0 125 to 1024 NM 14 steps Latitude limits Between 88 N and 88 S Plot interval By time 0 to 60...

Page 112: ...CM SC 104 V2 3 4 4 Data port 3 IN MOB from external device contact closure OUT AAM ALC ALF ALR APA APB ARC BOD BWC BWR BWW DTM GBS GGA GLL GNS GRS GSA GST GSV HBT MSK MSS POS RMB RMC Rnn RTE VDR VTG WCV WNC WNR WPL XTE ZDA RTCM Mode Output MSK MSS DGPS correction data in RTCM SC 104 V2 3 4 5 Proprietary sentences output only PFEC GPals GPasc GPdst GPmr2 GPmsk GPrai GPreq GPrt2 GPtrp IIalr pidat rm...

Page 113: ...R 62 100 110 115 220 230 VAC 1 phase 50 60Hz 6 ENVIRONMENTAL CONDITIONS 6 1 Ambient temperature Antenna unit 25 C to 70 C Display unit 15 C to 55 C 6 2 Relative humidity 95 or less at 40 C 6 3 Degree of protection Antenna unit IP56 Display unit IP25 USCG CFR 46 IPX0 USB port cover opened 6 4 Vibration IEC 60945 Ed 4 7 UNIT COLOR 7 1 Antenna unit N9 5 7 2 Display unit N2 5 ...

Page 114: ...FURUNO GP 170 SP 4 E4482S01C This page is intentionally left blank ...

Page 115: ...information 10 3 ETA 5 5 Ethernet setting 9 14 Event marks editing 3 7 presetting 3 5 putting 3 5 G Geodetic chart list AP 10 GPS smoothing 9 4 Grid 2 3 H Heading line on off 2 4 Highway display 7 4 I Input data selection 9 15 Integrity display 7 1 K Key sound 1 2 L Language selection 9 12 Life of LCD 10 1 Line monitor log 9 16 List overview 1 9 M Magnetic variation 2 6 Main menu overview 1 8 Main...

Page 116: ...m configurations vii T Terms AP 5 Time difference 9 2 AP 9 Time mark 2 5 Tracks color 2 8 erasing 2 8 plotting and recording 2 7 plotting interval 2 7 Trip distance 5 6 Troubleshooting 10 2 TTG 5 4 5 5 U Unit 9 1 W Waypoint deleting 4 9 editing 4 7 inserting 4 10 temporarily deselecting 4 8 X XTL line on off 2 3 Z Zoom function 2 1 ...

Page 117: ......

Reviews: