3. MARKS, LINES
14
2.
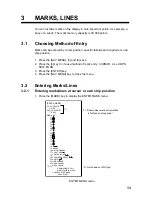
For entry at own ship’s position,
enter mark number to choose desired
mark, followed by the [ENTER] key. The chosen mark appears at own ship
position.
3.
For entry by cursor,
operate the trackball to place the cursor on the
position desired for the mark. Enter mark number to choose desired mark
and then press the [ENTER] key. The chosen mark appears at the cursor
position.
4.
To inscribe a line,
first select the mark entry method (see paragraph 3.1)
for “cursor.” Then, do the following:
a) Use the trackball to place the cursor on the starting point of the line.
b) Enter desired line number with the numeric keys and press the [ENTER]
key.
c) Use the trackball to place the cursor on the ending point of the line and
then press the [ENTER] key.
d) Repeat c) to continue drawing the line.
5. To escape the mark entry mode, press the [CANCEL] key.
3.2.2
Entering marks at desired position
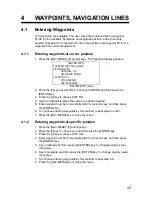
1. Press the [MARK] key to open the MARK menu.
2. Enter latitude by the numeric keys and then press the [ENTER] key. To
change polarity, press [5] for North; [6] for South.
3. Enter longitude and then press the [ENTER] key. To change polarity, press
[7] for East; [8] for West.
4. Enter mark number to choose desired mark.
5. Press the [ENTER] key.
6. To escape the mark entry mode, press the [CANCEL] key.
3.2.3
Line change feature
The line change feature allows you to change line type, or to inscribe a separate
line. For example, you may want to quit making nav lines and start making a
coastline.
1. Press the [MARK] key to open the ENTER MARK menu.
2. Inscribe a line as mentioned in paragraph 3.2.1.
3. Press the [2] and [1] keys to choose LINE CHANGE.
4. Enter line no. to be changed.
5. Use the trackball to place the cursor at the beginning of the line and then
press the [ENTER] key.
6. Use the trackball to place the cursor at the end of the line and then press
the [ENTER] key.
7. Repeat step 6 to continue drawing the line.
8. Press the [MARK] key to close the menu.

