background image

© Copyright Fusion Sport Pty Ltd, 2018. All Rights Reserved 


STEP 4 

 SET UP YOUR GATES FOR TESTING 

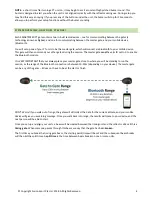
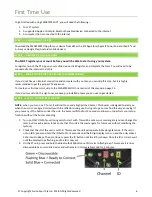
When set up correctly each gate should look like this 


TRIPOD ASSEMBLY 

1.


Loosen tripod knob and pull legs away from stem.  

2.


Push down on knob assembly until supports are horizontal.  

3.


Extend Tripod to Desired height. We recommend extending one segment of the tripod to full extension 

4.


Connect reflectors and remote data units and ensure tripod neck is firmly tightened.  
 

ATTACHING THE TIMING GATE 

1.


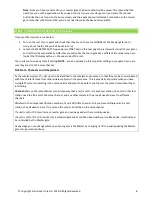
Line up the tripod connection with the bayonet the top of the tripod.  

2.


Press down, into the tripod, and twist the timing unit into a locked position 

3.


When ready, you may turn the unit on by pressing the power button, verify the unit turns on by viewing the 
power LED on the back of the unit 

ALIGNING YOUR TIMING GATES 

1.


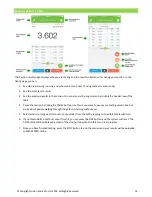
Place the reflector tripod opposite the PT unit. The Reflector can be up to 5 meters away from the PT timing 
unit.  

2.


Stand behind the PT Timing unit.  Hold the unit with one hand, and the tripod neck with the other hand to 
hold the tripod in place  

3.


Turn the PT unit on by pressing the power button 

4.


Adjust the beam until the red alignment light on the back of the unit is on. This can be done by aiming the 
photocell and directional laser at the center of the reflector. Once aligned, the laser will stay illuminated for 
an additional 5 seconds before turning off.  

5.


In windy environments, ensure the unit is remains aligned when wobbling the unit slightly side to side. 

Summary of Contents for SmartSpeed PT

Page 1: ...USER MANUAL Version 2 1...

Page 2: ...e the rest of your gates 8 STEP 4 Set up your gates for Testing 9 STEP 5 Register Your Account 10 STEP 6 Run Your Session 10 STEP 7 Pack up and Charging 10 DETAILED SOFTWARE OVERVIEW 11 The Home Scree...

Page 3: ...thank you for purchasing SMARTSPEED PT The system has been designed to offer simple yet accurate single lane timing For more information on regarding PT Accessories or other SMARTSPEED system versions...

Page 4: ...h LED Button Press and hold 3 seconds Button will turn green and unit will emit a triple beep Initial pairing of Master unit to your mobile device No action Button flashing blue Unit is waiting for Bl...

Page 5: ...er gates during the session The master gate must have its ID set to 0 to enable the Bluetooth module It is VERY IMPORTANT that your always place your master gate close to where you will be standing to...

Page 6: ...SMARTSPEED Online is synchronized with the PT Mobile App on your mobile device whenever you connect to the internet and allows you to 1 Create new team lists to download and use on your mobile device...

Page 7: ...installed a team you can use to get started STEP 4 SET UP YOUR MASTER GATE NOTE when you turn on a PT unit it will start to sound a high pitched buzzer This buzzer is designed to alert you when the un...

Page 8: ...ll become invisible Note If you are connected to your master gate but the Bluetooth button is still visible try pressing the Bluetooth button to check the connection Bluetooth NOT connected Bluetooth...

Page 9: ...re sure they are all on the same channel Side Note Channels and ID Explained As the wireless system PT units need to be identified in the wireless environment so that they can be communicated with fre...

Page 10: ...on 3 When ready you may turn the unit on by pressing the power button verify the unit turns on by viewing the power LED on the back of the unit ALIGNING YOUR TIMING GATES 1 Place the reflector tripod...

Page 11: ...options and team for the session If you haven t created any of your own teams yet using SMARTSPEED Online you can use the Default team 3 Once you have configured your settings press START to start te...

Page 12: ...and more information about PT Bluetooth Connection Status This icon demonstrates the connectivity status of Bluetooth If you can see this icon it means Bluetooth is not currently connected Message Bo...

Page 13: ...ess gates off Instead you can select the exact number of gates you need for the session and the other gates will be ignored once the session starts DRILL There are two timing modes available 1 One way...

Page 14: ...e from the list as long as the next athlete hasn t broken the start gate Use this mode if you don t have people walking around that might break your gates by accident 3 RFID SMARTSPEED PT is fully com...

Page 15: ...row of the table 4 Pause the session by licking the PAUSE button Use this is you want to pause your testing session and not worry about people walking through the gates or starting without you 5 Sele...

Page 16: ...G THE LEDS BLUETOOTH LED Flashes green when the unit is connectable and discoverable To make the unit discoverable make sure it has the ID set to 0 and hold the Bluetooth button for 3 seconds The unit...

Page 17: ...sole judgment of Fusion Sport has been subjected to abuse misuse neglect improper installation accidental damage nor any damage due to use or misuse produced from integration of the product into any...

Page 18: ...the receiving antenna Increase the separation between the equipment and receiver Connect the equipment into an outlet on a circuit different from that to which the receiver is connected Consult the d...

Reviews: