MANUAL
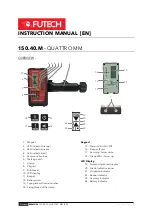
150.40.M – QUATTRO MM [EN]
V1.0 – 05.2022 |
3
Adjusting the volume
Press the Beeper/Enter button
[
16
]
cycles
•
High: Beeper indicator
[
22
]
is displayed,’ Hi’ shows for one second on Numeric digits/text
display
[
19
]
.
•
Low: Beeper indicator
[
22
]
is displayed, ’LOW’ shows for one second on Numeric digits/text
display
[
19
]
.
•
Off: no Beeper indicator
[
22
]
is displayed, ’OFF’ shows one second on Numeric digits/text
display
[
19
]
.
Work with the laser receiver
•
Switch on your construction laser. In case of line laser, activate the receiver mode on the laser.
•
Switch on the device Quattro MM and select the correct laser type (rotary or liner laser) on your
Quattro MM
•
Move the device up and down/left and right through the laser beam until the LED indicator (green)
[
3
]
lights.
•
The LED indicator (orange )
[
2
]
and the LED indicator (red)
[
4
]
show in which direction you should
move the Quattro MM to find on-grade level.
•
Mark the measured height at the Marking notch
[
6
]
Note:
When you started using your Quattro MM with red laser level, you need to switch off and then switch
on our Quattro MM to start working with a green laser level. Also, for switching from green to red, you
need to power off/on the Quattro MM.
Adjusting the accuracy
§
Press Accuracy/Arrow down button
[
17
]
once. The Numeric digits/text display
[
19
]
shows
current accuracy setting on the LCD display
[
10
]
.
§
Press again, while the accuracy is displayed (within one second), to change the current
selection. Subsequent presses will cycle through five accuracy options-Ultra
fine/Fine/Medium/ Coarse/ Ultra coarse.
mm
cm
inch
Fract.In
Display
Ultra fine
0,5
0,05
0,02
-
Flashing
Fine
1,0
0,1
0,05
1/8
Non-flash
Medium
2,0
0,2
0,1
1/4
Non-flash
Coarse
5,0
0,5
0,2
1/2
Non-flash
Ultra coarse
10,0
1,0
0,5
-
Flashing
Activate/deactivate LEDs
•
Press Grade LEDs /Arrow up button
[
18
]
.
•
‘ON’ appears on Numeric digits/text display
[
19
]
and three LED Indicators (
[
2
]
,
[
3
]
,
[
4
]
) flash for 3
seconds, The LEDs are activated, and the move direction is shown by the LEDs in addition to the display.
•
Press Grade LEDs /Arrow up button
[
18
]
again to switch off the LED indications.
User defined on-grade level
An arbitrary level within-10 and +10 mm around the Marking notch
[
6
]
can be used as on-grade level.
§
Hold the Accuracy/Arrow down button
[
17
]
for two seconds while the device is in laser beam.
§
The device beeps one time, and an asymmetric symbol arrow
[
20
]
&
[
21
]
appears on LCD display
[
10
]
.
This means the user defined on-grade level succeeds.
§
When the laser beam is outside of allowed area (10 and +10 mm), you hear one beep sound and text
‘E30’ appears on Numeric digits/text display
[
19
]
. This means user defined on-grade level fails.
§
Reset user defined on-grade level to default


