background image

FUTEK F9300


21


5.1.3   Menu configurations 
Every printer is shipped with factory default settings. Basic settings such as emulation, 
character size, form length etc., which many applications make use of, are set. At the end of 
this chapter you will find a menu printout which shows you the printer’s default settings. 
Your printer allows you to set and use five independent menu configurations. If one of your 
applications, for example, requires an IBM printer while another program works better with an 
EPSON printer, you can set an IBM emulation configuration with the desired settings, and set 
the second configuration as an EPSON emulation. 
The active menu is always the one you used last. When you switch on the printer for the very 
first time, menu no. 1 is loaded. Menu no.1 only remains active until you load another menu. 
The last active menu is stored even after the printer is switched off and is reloaded 
automatically when the printer is switched on again. 
For example, to change from menu no. 1 to menu no. 3: 


Press Setup key.


Press Menu (1) key.


Press Menu (3) key. 


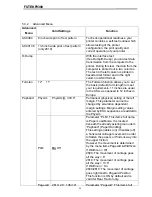
Now the following message appears in the LC display: 
Now press the < (2) or > (3) key repeatedly until Load Menu=3 
appears. 
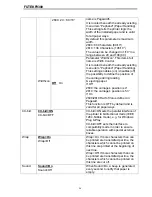
Then select menu no. 3 as the current setting using the Set key 
(1). The currently active setting is marked with an asterisk (*). 


If changing menus it is possible that the printer initializes due to different 

emulation settings.


Summary of Contents for F9300

Page 1: ...FUTEK F9300...

Page 2: ...t mains voltage Always disconnect the printer from the mains before opening the device to perform maintenance work or remedy errors Do not expose the printer to high temperatures direct sunlight or du...

Page 3: ...emark of Centronics Data Computer Corporation DOS is a trademark of Microsoft Corporation SAP is a trademark of SAP AG Windows Windows 7 Windows 8 Windows 95 Windows 98 Windows NT Windows 2000 Windows...

Page 4: ...Top Of Form adjustment 16 4 Control Panel Operation 17 4 1 Operation of the LCD Panel 17 4 1 1 The LC display 17 4 1 2 Online mode 18 4 1 3 Offline mode 18 4 1 4 Setup mode 19 4 2 5 Power on functions...

Page 5: ...00 1 1 Printer at a glance 1 1 Unpacking the printer Besides this manual the package will contain a power cord a ribbon cartridge a tractor a CD and 6 pieces of U wire paper support 1 2 Remove transpo...

Page 6: ...FUTEKF9300 2 1 3 Prepare your printer Front View Rear View...

Page 7: ...FUTEKF9300 3 For Fanfold For Cut Sheets...

Page 8: ...l parts and reduce the noise 8 Head Gap Lever Adjusts the gap between the print head and various form thickness 9 Paper Path Lever Selects various paper sources 10 Upper Friction Guides the form when...

Page 9: ...e substances 2 Do not expose the printer to direct sunlight If you cannot avoid placing the printer near a window protect it from the sunlight with a curtain 3 When connecting a computer to the printe...

Page 10: ...off and connect the parallel cable between the printer and the computer Lock the connector with the 2 clips on the printer interface connector tighten up the 2 screws on the other end connecting to th...

Page 11: ...in the power cord to the printer power socket as shown in the diagram Connect the printer to the correct voltage power source The socket outlet shall be installed near the equipment and shall be easil...

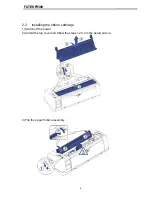
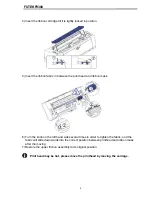
Page 12: ...FUTEKF9300 8 2 3 Installing the ribbon cartridge 1 Switch off the power 2 Unfold the top cover and follow the steps 1 2 3 4 in the below picture 3 Flip the upper friction assembly...

Page 13: ...bbon mask 6 Turn the knob on the left hand side several times in order to tighten the fabric and the fabric will slide downwards into the correct position between printhead and ribbon mask after the m...

Page 14: ...is on the left side of the printer inside the top cover Take care to adjust the print gap lever to a suitable position whenever you change the number of copies being printed Using the wrong print gap...

Page 15: ...sary see 3 1 4 It is recommended to align the left paper guide exactly to the mark I This marks the left edge of the stationery Slide the right guide to the position of the right edge of the stationer...

Page 16: ...r to one of the desired tractor positions 2 Move the paper path lever to the desired position 3 Adjust the head gap lever if necessary 4 Open the front cover by tilting the cover from bottom to the to...

Page 17: ...ock the lever again 6 Align the right hand tractor to the width of the paper and insert the paper Make sure that it is inserted by the same length as on the left hand tractor in order to avoid any pap...

Page 18: ...FUTEKF9300 14 3 2 2 2 Rear tractors for fanfold...

Page 19: ...FUTEKF9300 15 3 2 2 3 Top pull tractors for fanfold For the steps and please refer to the 2 3...

Page 20: ...Cover so you can see the transparent ribbon guide in front of the print head 4 Install the paper into the pull tractor 5 Move the paper with the hand wheel so the perforation of the fanfold paper lies...

Page 21: ...function The quick switch option was included so that you can change the most important parameters for example adjustments character density font paper path adjustments directly without having to ent...

Page 22: ...mode Only in this mode is it possible to perform step line or form feeds from the control panel however data cannot be received Park key 1 If fanfold paper is loaded in the printer it is fed to the pa...

Page 23: ...on again keeping the Setup key pressed 4 2 5 Power on functions If you keep one of the following keys pressed during power on until the printer has completed initialization the corresponding function...

Page 24: ...r control systems All programming via the interface is lost after you turn off the printer whereas the programming carried out using the control panel is saved and stored even after you turn off the p...

Page 25: ...d configuration as an EPSON emulation The active menu is always the one you used last When you switch on the printer for the very first time menu no 1 is loaded Menu no 1 only remains active until you...

Page 26: ...FUTEKF9300 22 Menu Printout...

Page 27: ...ameter groups in the menu or you can press the Back key to access the two previous parameter groups in the menu If you want to change a setting e g the line density then press the LPI key LPI lines pe...

Page 28: ...permanently you need to change the appropriate setting in the menu Press the next key 4 several times until the display indicates Language Press the Language key 3 The display now changes to Parameter...

Page 29: ...erface 2 Only if ENQ STX ETX ACK or ACK NAK protocol is selected MENU Back Next Print Menu Reset Font CPI LPI Skip ESCChar Emulate Bidir I O Serial 1 Interf Buffer ETH INT Baud 1 Format 1 Special 1 2...

Page 30: ...nus Reset Reset Menu Yes No Press the No 1 or Yes 2 key to select the desired setting All manually altered settings in the current menu are lost when it is reset to the default settings We therefore r...

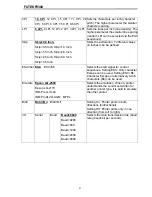
Page 31: ...in inches can be defined ESCChar ESC ESC Selects the start signal for control sequences Setting ESC Only character Escape can be used Setting ESC Character Escape or alternatively two characters can...

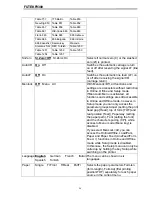
Page 32: ...ves to select the type of protocol i e a certain set of rules and procedures for ensuring error free data exchanges between computer and printer DTR DTR DTR DTR Ready Defines the conductor to which th...

Page 33: ...peed to 100 MBit half duplex per second ETH INT EthSpeed 100Mbit Full Sets the transmission speed to 100 MBit full duplex per second CG Tab Graphic DLL Italic Only available for Epson LQ 2550 LQ 2170...

Page 34: ...e and Setup mode If MenLock Menu is activated all functions and settings are still accessible in Online and Offline mode however in Setup mode you can only access the parameter groups Adjust setting t...

Page 35: ...a value is selected by the Line function or ESC sequences which does not correspond to a standard format FormAdj FormAdj 0 220 72 Default 12 72 Sets the first print position of a form in n 72 inch sep...

Page 36: ...Off On With this function selected it is possible to print different barcodes and LCP Large Character Printing Barmode Unsecured Secured Allows printing of normal characters on the left and right of t...

Page 37: ...are usual in the USA as opposed to 12 inches in Europe Physlm Physlm 0 30 10 Permanent physical setting of the left margin This parameter cannot be changed by emulation dependent margin settings Margi...

Page 38: ...e carriage s position is 4 2610 the carriage s position is 5 3 If On 2600 2610 Half of Value defined in Pagewid This function is OFF by default and is valid for all paper ways CX bid CX bid ON CX bid...

Page 39: ...f the printer The number can be written with any ASCII character between hex 20 and hex 7E AssetN 10 digits empty With the AssetN function you have the possibility to change the 10 digit asset number...

Page 40: ...eed Initializing This message appears during the printer s initializing phase after switching on the printer Load error The printer fails to load the paper Loading default Factory defined parameters w...

Reviews: