11
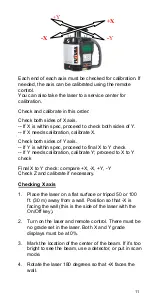
Each end of each axis must be checked for calibration. If
needed, the axis can be calibrated using the remote
control.
You can also take the laser to a service center for
calibration.
Check and calibrate in this order:
Check both sides of X axis.
-- If X is within spec, proceed to check both sides of Y.
-- If X needs calibration, calibrate X.
Check both sides of Y axis.
-- If Y is within spec, proceed to final X to Y check
-- If Y needs calibration, calibrate Y; proceed to X to Y
check
Final X to Y check: cX, -X, +Y, -Y
Check Z and calibrate if necessary.
U
Checking X axis
1. Place the laser on a flat surface or tripod 50 or 100
ft. (30 m) away from a wall. Position so that -X is
facing the wall (this is the side of the laser with the
On/Off key).
2. Turn on the laser and remote control. There must be
no grade set in the laser. Both X and Y grade
displays must be at 0%.
3. Mark the location of the center of the beam. If it’s too
bright to see the beam, use a detector, or put in scan
mode.
4. Rotate the laser 180 degrees so that +X faces the
wall.
+Y
+X
-X
-
Y


