15
4. Use either scan or rotation mode. Using the
scanning beam is easier, but if you cannot see the
beam, work in rotation mode with a detector.
To change from rotation to scan mode: press scan
key (17) and choose the widest scan length – 3 –
with the up arrow of the multi key (10).
5. Move the scan to the wall over the plumb line, using
the left and right arrows. You can also slide the
laser left or right to line up the beam over the plumb
line.
6. Move the scan up and down the entire length of the
plumb line. If the beam is slanted, and not vertical
like the plumb line, the Z axis needs to be calibrated.
U
Calibrating Z axis
The laser must be calibrated to bring the rotating Z beam
parallel to the plumb line. Calibration is electronic, using
the keys on the remote control.
Follow the directions carefully, as once you start moving
the beam while in the calibration mode, you cannot
cancel and return to the original position.
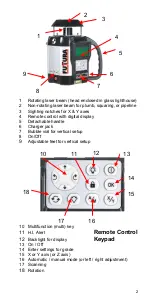
1. To put the laser in calibration mode, simultaneously
press the backlight key (12) and X / Y key (15). A
symbol V over a point appears on the display (27) to
indicate that you are calibrating the vertical axis.
2. Choose either scan or rotation mode. Using the
scanning beam is easier, but if you cannot see the
beam, work in rotation mode with a detector.
To scan: Press scan key (17) and choose the widest
scan length – 3 – with the multi key (10). Move the
scan so that it’s over the plumb line.
To rotate: Press rotation key (18) and choose a
rotation speed with the multi key (10).
3. Press the X/Y key (15) to re-activate the calibration
mode. The V symbol will blink.
4. Use the Up and Down arrows on the multi key
(10) to move the rotating beam until it’s perfectly
vertical and parallel to the plumb line. Move the laser
slightly so that the beam is over the plumb line for
the final check.


