4
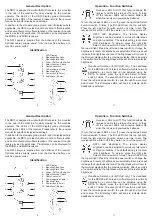
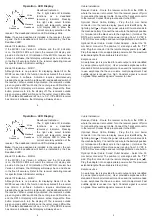
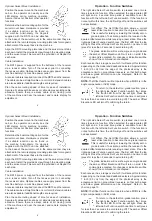
Optional Swivel Mount installation:
Position the swivel mount in the machine's
cab so the operator can easily see the
LED display during machine operation.
Assure it does not obstruct other operator
functions.
Determine the best mounting option for the
swivel mount base. Hardware is provided
if a suitable location can be found on
the machine. Alternatively, the magnets
supplied with the RD15 can be attached
to the base of the swivel mount in the same manner they are
attached to the remote display mounting plate tabs for magnetic
attachment of the swivel base to the machine.
Align the RD15 mounting plate tabs and the swivel mount tabs
as shown. Install the provided screw through the mounting plate
and the swivel mount. Secure with the provided nut. Repeat for
each side.
Cable Installation
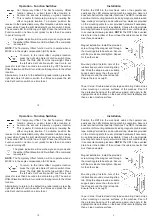
The RD15 power is supplied from the batteries of the receiver
via a receiver cable. Turn off the receiver prior to connecting
the receiver cable. Optional cables can supply power from the
machine battery or a machine power outlet.
A receiver cable is required to connect the RD15 and the receiver.
The cable can be a straight cable or a coil cord. Extension cables
are also available if additional lengths are required.
Plan the cable routing ahead of time for ease of installation.
Secure all cables with tie wraps or cable clamps avoiding cable
abrasion. Ensure there is excess cable at all moving joints
of the machine and near the receiver and remote display for
adjustment.
9
Operation - Function Switches
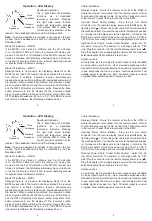
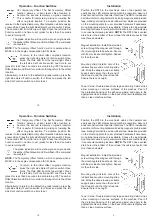
The right side Select Function switch is pressed one or more
times to select a function. When selected, the appropriate LED
will light and a 4 second time period is available to set the
function with the left side Set Function switch. If the function is
not set within this time, the LED will go off and the switches will
be deactivated.
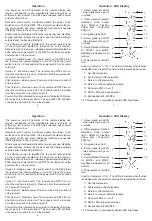
Set Offset:
The Set Offset function allows a current
laser strike location to become the on-grade location.
This is useful for raising or lowering the initially set on-
grade location. To activate, position the receiver to the
desired offset elevation while receiving a laser strike. Press the
right side Select Function switch once. The first LED from the top
will light. Press the left side Set Function switch one time to set
(press for less than 2 seconds to avoid turning off).
The grade indication will now show green on-grade and
the amber Offset Elevation LED will turn on solid if the
command is accepted. No changes or indications will be
shown if the command is not accepted.
Each receiver has a range over which it will accept this function
depending on the model and deadband selected. Approximately
1 inch (2.5 cm) from the edge of the photocell array is the
acceptance limit on proportional receivers so that both above
and below grade information can be displayed. Refer to the
chart on page 13.
NOTE:
The Offset function will not operate when a MCR3 is in the
angle compensation (ACE) mode.
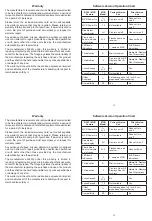
To return to the default on-grade location, press
the right side Select Function switch four times.
The fourth LED from the top will light. Press the
left side Set Function switch one time to set (press
for less than 2 seconds to avoid turning off). The amber Offset
Elevation LED will turn off confirming the return.


