background image

4 | 

P a g e


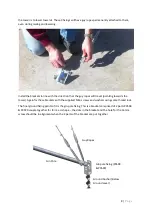
P0253, M12 x 90 Long Screw 


3 off 

P0597, Key clamp Tee piece 


1 off 


Parts Required But Not Supplied With the (basic) Kit 


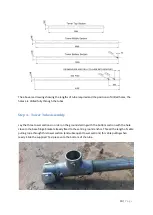
3mtr Length of 48mm O/D x 4mm Wall Scaffold Tube 


2 off 

3.1mtr Length of 48mm O/D x 4mm Wall Scaffold Tube   

1 off 

2mtr Length of 48mm O/D x 4mm Wall Scaffold Tube 


1 off 

Tools & Equipment Required For Installation 


6mtr (minimum) Length of Rope (capable of loading with 250 kg) 

10mtr length of light rope or string (for pulling cables through the tower) 

A Builders Trestle  

Slide Hammer or Sledge Hammer. 

Drill & 12.5mm Drill Bit (If tube drilling is required) 

Grinder with cutting disc (If tube cutting is required) 

Tools for tightening bolts, grub screw and key clamp screws 

Personal safety equipment 

Tower Location  


Location of a wind turbine to get maximum performance is not covered here at least to say they 
work best in open spaces with few surrounding trees or buildings. Futurenergy strongly recommends 
that its turbines are not installed on buildings because of poor performance, due to turbulent air 
flow, damage to building structure and noise generated within the building. A tower should always 
be used. 

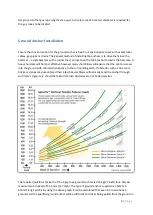
The kit is supplied with ground anchors so no concrete foundation is required, these fixings can also 
be removed so the whole tower could be relocated at any time. (See the following chapter regarding 
ground anchor installation). As stated above the best position for the turbine and therefore the 
tower is in open space away from trees and buildings, if there are obstructions then at least a clear 
view towards the prevailing wind direction for the area should be sort.  It is preferable to install on 

Summary of Contents for AirForce1

Page 1: ...AirForce1 Tower Kit Installation and Training Manual FuturEnergy Limited Ettington Park Business Centre Stratford upon Avon CV37 8BT 44 0 1789 451070...

Page 2: ...4 Tower Location 4 Ground Anchor Installation 5 Installation Procedure 6 Step 1 Setting out 6 Step 2 Fitting Ground Brackets 7 Step 3 Prepare Tower Tubes and Gin Pole 9 Tube Drilling 9 Step 4 Tower Tu...

Page 3: ...lowing is a list of key safety points 1 Install the tower turbine well away from a distance greater than the tower height overhead power cables buildings livestock roads vehicle parking areas paths ch...

Page 4: ...Tower Location Location of a wind turbine to get maximum performance is not covered here at least to say they work best in open spaces with few surrounding trees or buildings Futurenergy strongly rec...

Page 5: ...y short blows will ensure that the anchor screws into the ground with minimal disturbance to the surrounding earth If obstacles such as tree roots bricks or stones are encountered then a few heavier b...

Page 6: ...ound anchors to be loaded in varying directions over time so it is important to check the anchors on a regular basis the frequency dependant on weather and ground conditions Installation Procedure Ste...

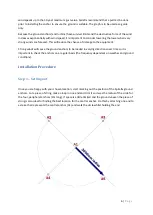
Page 7: ...oid problems with guy rope lengths and that the anchors are positioned accurately in a square pattern with an anchor in each corner The distance from anchor A2 to A3 is 4 25m All corner ground anchors...

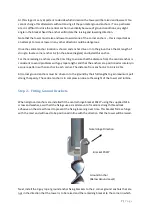
Page 8: ...Again fix these brackets with the supplied M16 screws and washers using some thread lock The final ground fixing point to fit is the gin pole fixing This is a bracket comprised of 2 parts P0598 P0599...

Page 9: ...ng or hand railing in the building industry and is generally galvanised as standard and readily available from a builder merchants or steel stockholders The tube is typically supplied in 6m lengths 2...

Page 10: ...be Assembly Lay the three tower sections in order on the ground starting with the bottom section with the hole close to the base hinge bracket already fixed to the centre ground anchor Thread the leng...

Page 11: ...round anchors when the tower is erected and tighten the grub screws using thread lock adhesive to clamp the coupling to the tube Repeat the tower assembly with the remaining two tower sections and cou...

Page 12: ...iently to prevent movement using thread lock adhesive on the screw threads Step 6 Assembly Guy Ropes Supplied with the kit are eight guy rope assemblies four long and four short All guy ropes are inst...

Page 13: ...he opening in the end of the socket body Then insert the wedge part loosely into the housing pointed end first so that it sits beside the guy rope The end of the rope can then be looped back and threa...

Page 14: ...tower is vertical when erected It is a lot easier to do this without the 22 Kg turbine on top It is strongly recommended that three people are involved with tower lifting and lowering Using a device t...

Page 15: ...specification as load on this anchor will be significant similar to a 50 year maximum gust event During all work that involves items above head height always wear appropriate health and safety equipme...

Page 16: ...er directly and two people taking the rope strain lower the tower to the floor The person supporting the tower directly should not be stood directly under the path that the tower will fall and whilst...

Page 17: ...omplete tower and turbine assembly ensure all guy ropes are attached only the gin pole bolt should need to be attached when raised Be aware that the tower now has an extra 22Kgs on the top so lifting...

Page 18: ...ions and the average wind speed in the area which will change with season Items that need checking are Ground anchors for their key with the ground Guy ropes guy rope tension Nuts and bolts check tigh...

Page 19: ...owing days Higher level parts can only be checked visually whilst the tower is up however if it is taken down due to expected extreme weather then all items should be checked at this opportunity At th...

Reviews:

Related manuals for AirForce1