14
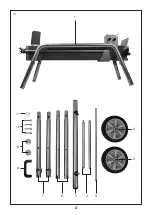
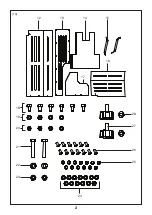
Take the parts from box and check that all the
packages are in good order and undamaged. If a part
missing or if some part is faulty, contact the dealer
immediately.
ASSEMBLING THE BACK LEGS
1.
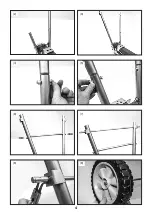
Turn the log splitter upside down and attach the
two back legs to the log splitter, Fig.2 & 3
2.
Attach the back legs to the log splitter with 2
Inner hexagon bolts as shown in Fig.4 & 5. only
finger tighten the bolts at this stage.
3.
Install the horizontal shaft into the holes on the
back leg and finger tighten the bolts, Fig.6.
4.
Slide the wheel shaft through the holes at the
bottom of the back legs, Fig.7.
5.
Attach a circlip into the recessed area on one
side of the wheel shaft, Fig.8. To open the circlip
you will need some circlip pliers.
6.
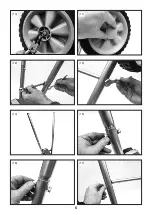
Install a wheel onto the wheel shaft so it sits
against the circlip, Fig.9.
7.
Attach another circlip onto the wheel shaft to hold
the wheel in place, Fig.10.
8.
Install the wheel cover onto the wheel, Fig.11.
9.
Repeat steps 5-8 to attach the second wheel to
the wheel shaft.
10. Tighten all the bolts with a spanner that were
previously finger tightened , Fig.12 & 13.
ASSEMBLING THE FRONT LEGS
1.
With the log splitter still upside down, attach the
two front legs to the log splitter, Fig.14.
2.
Attach the front legs to the log splitter with 2
Inner hexagon bolts as shown in Fig.15 & 16. only
finger tighten the bolts at this stage.
3.
Install the horizontal shaft into the holes on the
back leg and finger tighten the bolts, Fig.17 & 18.
4.
Insert the horizontal leg onto the two front legs,
Fig.19.
5.
Finger tighten the bolts, Fig.20.
6.
Tighten all the bolts with a spanner that were
previously finger tightened , Fig.21.
When the legs are attached ensure that all fastening
bolts are fully tightened with a spanner.
The fully assembled log splitter should look like the
picture in Fig.22.
ATTACHING THE HANDLE
1.
Attach the handle to the front of the machine with
the 2 screw provided, Fig.23.
ATTACHING THE GUARD
1.
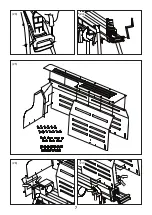
Unscrew the bolts attached to the upper parts of
the front legs and connect the wood supporting
brackets. Screw the bolts back into place, Fig.24.
2.
Connect the guard as shown in Fig.25 with the
outside hex bolts (M5x10), spring washers (Ø5)
and gaskets (Ø5). There are 13 pieces of each.
3.
Attach the guard to the log splitter. Connect the
rear of the guard using 2 x outside hex bolts
(M8x16), 2 x gasket (Ø8) and 2 x lock nuts (M8),
Fig.26.
Connect the sides of the guard using 4 x outside
hex bolts (M6x12), 4 x gasket (Ø6) and 4 x lock
nuts (M6), Fig.27.
4.
Connect the log catcher to the guard at
attachment points 1 & 2, Fig.28. For attachment
point one use 1 x outside hex bolt. Repeat for
the other side of the guard.
For attachment point two use 1 x knob and 1 x
gasket (Ø6). Repeat for the other side of the
guard. To adjust the height of the log catcher
loosen the knobs and retighten when the desired
height is reached.
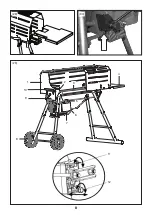
COMPONENTS & CONTROLS (FIG.29)
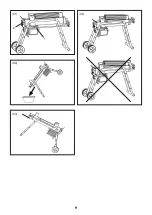
PREPARATION FOR OPERATION
WARNING! Before operating the log splitter, the bleed
screw should be loosened by some rotations until air
can go in and out of the oil tank smoothly.
Air flow through the bleed screw hole should be
detectable while the log splitter is under operation.
Before moving the log splitter, make sure the bleed
screw is tightened to avoid oil leaking from this point.
Failure to loosen the bleed screw will keep the
sealed air in the hydraulic system being
compressed after being decompressed.
Continuous air compression and decompression
will blow out the seals of the hydraulic system and
cause permanent damage to the log splitter.
1.
Guard
2.
Log pusher
3.
Work table
4.
Log catcher
5.
Switch
6.
Motor
7.
Pushbutton box
8.
Wheels
9.
Hydraulic control lever
10. Control lever guard
11. Bleed screw
12. Oil drain bolt with dipstick
Summary of Contents for FXA502018666
Page 2: ...2 1 1 7 11 2 2 6 5 3 4 10 8 9...
Page 3: ...2 12 1A 28 27 24 18 22 21 13 14 15 16 17 19 20 23 26 25...
Page 4: ...4 2 3 4 5 6 7 9 8...
Page 5: ...5 10 11 12 13 14 15 17 16...
Page 6: ...6 22 18 19 20 21...
Page 7: ...7 23 24 25 26 27...
Page 8: ...8 28 30 29 6 2 1 3 2 5 6 4 1 7 8 9 10 11 12...
Page 9: ...9 31 32 33 34 1 2...
Page 35: ...35...


