background image

4

Selecting a Location

1)Select a correct location to place the unit

2)Determine input power cord length according to its actual operation
  requirement.Input power cord must have a  minimum inside diameter of

2

  6mm

3)Do not move or operate unit where it could tip

4)Use cart or unit handle to move unit 

.

Do not  pull the cords to move

   unit

.

5)Moving gas cylinder and main unit to hight sparaely.Use lifting eye
   to lift unit only ,not running gear,gas cylinders,or any other ac-
   cessories.
6

)

Optional


order


for


individual


wire


feeder


is


available

.

The wire


fe-

  eder


and


welding


gun


divide


from


the


main


unit

.

It


is


more


convenient


to


operate


Page.8

Summary of Contents for FY-4280/2E

Page 1: ...Owner s Manual FY 4280 2E The equipment is approved by a number of car manufacturers China ...

Page 2: ...ration 5 1 Controls 5 2 Holding And Positioning Welding Gun 5 3 Conditions That Affect Weld Bead Shape 5 4 Gun Movement During Welding 5 5 Poor Weld Bead Characteristics 5 6 Good Weld Bead Characteristics 6 Troubshooting 6 1 Excessive Spatter 6 2 Porosity 6 3 Excess Penetration 6 4 Lack Of Penetration 6 5 Incomplete Fusion 6 6 Burn Through 6 7 Waviness Of Bead 6 8 Distortion 6 9 Troubleshooting Gu...

Page 3: ...rs can explode if damaged Gas cylinders contain gas under high pressure If damaged a cylinder can explode Be sure to treat them carefully Electric shock can kill 1 Do not touch live electrical parts 2 Wear dry hole free insulating gloves and body protection 3 Do not wrap electrical cable around your body 4 Ground the workpiece with a good elect rical ground Keep away from the torch tip Remove all ...

Page 4: ...o2 AR CO2 AR CO2 O etc Suitable for welding of variou metallic materials such as mild steel low carbon steel low alloy steel stainless steel steel iron copper aluminum nicket etc Extensively used in the welding and field operation of oil pipeline chemical car fabrication shipyard etc Gas Input Gas Output Do Not switch While welding Amperes Volts Gas Metal Arc Welding GMAW Gun On Percent Wire Feed ...

Page 5: ...003 Ouput Cable NO C005 Collect Body NO C008 Wire Guide NO C011 Fuse Socket NO C014 Electromagnetism NO C017 15AK Gooseneck NO C020 24AK Gooseneck NO C018 Control Transformer NO C023 Digital Display NO C026 Hose NO C029 Spool Spindle NO C006 Fan NO C009 Shield Cup NO C012 Chain NO C015 Feeder Motor NO C021 NO C024 Front Wheel NO C027 Circuit Board NO C030 Remarks 1 Optional orders for above access...

Page 6: ...racket Caster 8 inner hexangular screw Install the gun holer to the side panel install the side plates to the fender panel install the wheel axle and wheels to the fender panel install the fender panel to the back panel using 6 torx screws and nuts install casters to the caster bracket using 8 inner hexagonal screws put the rubber mat on the fender panel Page 4 ...

Page 7: ...ve Input Current A No load Voltage V Welding Current A Output Current Voltage Insulation Grade Wire Diameter Type Dimensions mm Voltage Adjustment Weight kg Duty Cycle 100 13 5 35 850 380 890 35A 17V 280A 28V F 17 6 20 38 35 280A 50 60 10 stages One piece Mild Steel Solid Wire 0 8 1 0 1 2mm FY 4280 2E AC 380V 3ph ...

Page 8: ...ctifier The unit products heat while welding 2 If unit overheats output stops and cooling fan runs 3 Wait fifteen minutes for unit to cool Reduce amperage or voltage or duty cycle before welding Overheating Stop working Wait 15 minutes for unit to cool Reduce amperage or reduce duty cycle 0 15 A Weld again Page 6 ...

Page 9: ...der sunshine The worksite should be in low humidity and without dust 5 Operating Temperature range 10 40 6 Storage Temperature range 25 56 7 At least 20cm of space for airflow 30cm of space for two units located side by side 8 Use tent to protect the machine from stormy weather when operate outdoor 9 Welding produces fumes and gases Breathing these fumes and gases 3 can be hazardous to your health...

Page 10: ... not move or operate unit where it could tip 4 Use cart or unit handle to move unit Do not pull the cords to move unit 5 Moving gas cylinder and main unit to hight sparaely Use lifting eye to lift unit only not running gear gas cylinders or any other ac cessories 6 Optional order for individual wire feeder is available The wire fe eder and welding gun divide from the main unit It is more convenien...

Page 11: ...l 5 Flow Adjust Typical pressure is 0 05 0 15MPa 6 Hose 7 Hose Connection Connect gas hose between regulator flowmeter and the unit 8 Regulator Flowmeter heating socket For low temperature worksite please plug the regulator flowmeter to the socket for heating 5 Installing Gas Supply DO NOT use other gases regulator flowmeter with Co2 shielding gas Rear Panel Page 9 7 8 ON OFF CO2 1 2 3 4 5 6 ...

Page 12: ...le Close and secure door on disconnect device Remove lockout tagout device and place switch in the on position 6 Connecting Input Power Page 10 1 2 3 L1 L2 1 4 3 2 L3 L1 L2 The power supply must have a ground connection The welder must also be connected to circuit breaker The power supply must have a ground connection The welder must also be connected to circuit breaker ON OFF CO2 National and Loc...

Page 13: ...y to prevent slipping Feed wire to check wire spool installation 2 Set a desired drive roll pressure close and tighten pressure adjustment knob 3 Press gun trigger and let go of wire 4 Remove gun nozzle and contact tip 5 Press gun trigger until wire comes out of gun Reinstall contact tip and nozzle 6 Feed wire to check drive roll pressure tighten knob enough to prevent slipping 7 Cut off wire if w...

Page 14: ... adjustment knob Press wire device springs open 2 Loosen securing nut Remove drive roll 3 The drive roll consists of two different sized grooves Reinstall the desired wire sized groove close to the motor shaft 4 Tighten securing nut 5 Replace press wire device and set a desired pressure 6 Make sure drive roll groove lines up with wire guide Page 12 ...

Page 15: ... Weld current can damage electronic parts in vehicles Disconnect both battery cables before welding on a vehicle Place work clamp as close to the weld as possible Regulator Flowmeter Wire feeder Gun Work clamp and workpiece Hose Page 13 ON OFF CO2 ...

Page 16: ...10 1 2 3 4 5 6 1 Shield cup C012 2 Contact tip C004 3 Front adaptor C010 4 Gooseneck 15 24AK C020 018 5 Trigger 6 Spanner Welding Gun Page 14 ...

Page 17: ...1 Controls Operation Page 15 1 Display 2 Wire speed adjustment 3 Weld time extension 4 Weld current adjustment 5 Indicator light 5 4 2 3 1 ...

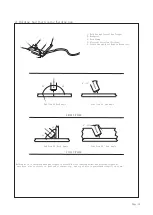
Page 18: ...radle Gun and R est Hand on Workpiece End View Of Work Angle Side View Of Gun Angle GROOVE WELDS End View Of Work Angle Side View Of Gun Angle FILLET WELDS Welding wire is energized when gun trigger is pressed Before lowering helmet and pressing trigger be sure wire size is correct to past end of contact tip and tip of wire is positioned correctly on seam Page 16 ...

Page 19: ...rt Normal Long ELECTRODE EXTENSIONS STICKOUT Short Normal Long FILLET WELD ELECTRODE EXTENSIONS STICKOUT Slow Normal Fast GUN TRAVEL SPEED Weld bead shape depends on gun angle direction of travel electrode extension stickout travel speed thickness of base metal wire feed speed weld current and voltage Page 17 ...

Page 20: ...vement During Welding 1 2 3 1 Stringer Bead Steady Movement Along Seam 2 Weave Bead Side To Side Movement Along Seam 3 Weave Patterns Use weave patterns to cover a wide area in one pass of the electrode Page 18 ...

Page 21: ...5 Poor Weld Bead Characteristics 1 2 3 4 5 1 Large Spatter Deposits 2 Rough Uneven Bead 3 Slight Crater During Welding 4 Bad Overlap 5 Poor Penetration Page 19 ...

Page 22: ...6 Good Weld Bead Characteristics 1 2 3 4 5 1 Fine Spatter 2 Uniform Bead 3 Moderate Crater During Welding 4 No Overlap 5 Good Penetration into Base Metal Page 20 ...

Page 23: ...ire feed speed Select lower voltage range Use shorter electrode extension stickout Remove all grease oil moisture rust paint un dercoating and dirt from surface before welding Insufficient shielding gas at welding arc Increase flow of shielding gas at regulator flowmeter and or prevent drafts near welding arc Use clean dry welding wire Eliminate pickup of oil or lubricant on welding wire from feed...

Page 24: ...ead at end of weld until molten metal solidifies Use welding grade shielding gas change to different gas Use clean dry welding wire Eliminate pick up of oil or lubricant on welding wire from feeder or liner Remove all grease oil moisture rust paint coatings and dirt from work surface before welding Use a more highly deoxidizing welding wire contact supplier Do not extend wire too far beyond nozzle...

Page 25: ...Page 23 ...

Page 26: ...nd arc ch aracteristics Maintain normal gun angle of 0 to 15 degrees to achieve maximum penetration Keep arc on leading edge of weld puddle Do not extend wire too far from nozzle Select higher wire feed speed and or select higher voltage range Reduce travel speed Insufficient heatinput Possible Causes Corrective Actions Improper joint preparation Page 24 Lack Of Penetration Shall fusion between we...

Page 27: ...ltage range and or adjust wire feed speed Place stringer bead in proper location s at joint du ring welding Adjust work angle or widen groove to access bottom du ring welding Momentarily hold arc on groove side walls when using weaving technique Keep arc on leading edge of weld puddle Use correct gun angle of 0 to 15 degrees Workpiece dirty Insufficient heat input Improper welding technique Possib...

Page 28: ...elting completely through base metal resulting in holes where no metal remains Select lower voltage range and reduce wire feed speed Increase and or maintain steady travel speed Possible Causes Corrective Actions Excessive heat input Page 26 ...

Page 29: ...metal that is not parallel and does not cover joint formed by base metal Support hand on solid surface or use two hands Welding wire extends too far out of nozzle Unsteady hand Possible Causes Corrective Actions Do not extend wire too far from nozzle ...

Page 30: ...e Excessive heat input Use restraint clamp to hold base metal in position Make tack welds along joint before starting welding operation Select lower voltage range and or reduce wire feed speed Increase travel speed Weld in small segments and allow cooling between welds Possible Causes Corrective Actions ...

Page 31: ...1 Insufficient shieldinggas at welding arc 2 Regulator flowmeter damaged 3 Contact tip damaged 4 Leakage outside gas mix with shielding gas Wel di ng ar c no t sta bl e 1 Wel din g wire dirt y 2 B ad co nt ac t of work clam p 3 Wr ong size gun li ner or con tact tip or con tact tip worn 1 Use clean dry wel di ng wire 2 C onne ct wo rk clamp to get goo d metal to metal as cont act 3 R epla ce con t...

Page 32: ...ge 30 Left side view Right side view Control transformer Circuit board Output voltage current adjustment Main transformer Electromagnetic valve A C contactor Fan Rectifier Reactor Wire feeder Fan Rectifier Welding wire ...

Page 33: ...Page 31 Circuit Diagram 380V 3ph ...

Page 34: ...NO 32 Circuit Diagram 380V 1ph 220V 1ph ...

Reviews: