background image

FYTTER |

WWW.FYTTER.COM


PAG- 3 


16- When you finish your workout, let the pedals decrease the speed slowly.  
17-Drink water before, during and after the workout.  
18-f you start feeling pain or dizziness while training: 

STOP IMMEDIATELY.  

19-You must preserve the original packaging with its protections, manual and components during the guarantee period.  
20-The accessories can be different to the other models.  
21-This electronic product can't be thrown under any circumstances into the municipal rubbish bins. With the aim of preserving 
the environment, this product must be recycled according to the applicable law of your country. Please contact your town council 
to know more about this procedure.  
22-Should you need technical assistance or advise with the installation of pieces, visit our website 

www.fytter.com

, where you 

will find the section 

“CUSTOMER SERVICE“

 You can also get in touch with us by Email 

service@fytter.com


YOU MUST KEEP THE PURCHASE RECEIPT IN ORDER TO HAVE ACCESS TO THIS SERVICE 
KEEP THESE ADVISES FOR FUTURE REFERENCES 


(SPANISH) ADVERTENCIAS

:  


Para  reducir  el  riesgo  de  lesiones,  lea  todas  las  precauciones  e  instrucciones  que  encontrará  en  los  manuales  al  adquirir  su 
producto 

FYTTER.  

La empresa no se responsabilizará por lesiones personales o daños a la propiedad que ocurran por el uso de este producto o a 
través del mismo. 
1-Antes  de  iniciar  cualquier  programa  de  ejercicios  consulte  con  su  médico.  Es  especialmente  importante  en  personas  que 
sobrepasen los 35 años o con problemas previos de salud. 
2-Es responsabilidad del propietario del aparato que todos los usuarios estén adecuadamente informados sobre todos los avisos 
y precauciones. 
3-Utilice el aparato tal y como se indica en el manual de instrucciones. 
4-Guarde su aparato en un lugar cerrado, lejos del polvo o de la humedad. No lo guarde en un garaje o en un patio cubierto o 
cerca  del  agua.  La  humedad,  el  polvo  y  el  agua  podrían  dañarlo  y  verse  afectado  su  funcionamiento,  invalidando  por  tanto  su 
garantía. 
5-Coloque  su  aparato  en  superficies  planas.  Si  la  superficie  no  es  plana  y  presenta  desniveles,  su  funcionamiento  podría  verse 
afectado.  Algunos  modelos  incluyen  niveladores  o  roscas  de  nivelación  que  se  ubican  debajo  de  las  patas  y  que  ayudan  a  su 
nivelación. Consulte el manual para comprobar si su aparto dispone de éstos. 
6-El aparato debe estar ubicado en un lugar ventilado. No lo utilice en lugares donde se usen aerosoles o donde se administre 
oxígeno. El nivel de aire que usted aspira puede verse afectado y provocarle un accidente. 
7-Mantenga a los niños menores de 12 años y animales domésticos alejados del aparato. Mantenga una distancia de seguridad. 
8-Este aparato está diseñado para un uso doméstico y en un espacio interior, no para ser utilizada en un entorno comercial ni en 
un espacio exterior. 
9-Revise el peso máximo que admite su aparato en el manual. Un peso excesivo provocaría un mal funcionamiento, que no será 
cubierto por la garantía.  
10-Debe realizar una lubricación adecuada de las partes móviles de su máquina (cierta tornillerí

a, transmisión por cadena…) Está 

lubricación debe realizarse de manera periódica en función del uso de cada persona, incluso antes de su primer uso. Los daños 
causados en cualquier componente de la máquina por falta de una lubricación adecuada no serán cubiertos por la garantía. 
11-Vista un vestuario y calzado adecuado. No use ropa suelta que pueda engancharse. 
12-Si su aparato dispone de sensor de pulso, debe saber que no es un dispositivo médico. El sensor está diseñado como ayuda 
para  el  ejercicio  y  determina  las  tendencias  del  ritmo  cardíaco  en  general.  Existen  varios  factores  que  pueden  afectar  a  la 
exactitud de la lectura del pulso como el propio movimiento de la persona. 
13-Inspeccione y apriete todos los tornillo con regularidad, ya que debido a la vibración las tuercas y tornillos tienden a aflojarse. 
En caso de que se produzca algún daño en la máquina por falta de mantenimiento, éste no será cubierto por la garantía. 
14-Si su aparato funciona con fuente de alimentación eléctrica: desconecte siempre el cable eléctrico antes de limpiarla, cuando 
termine el ejercicio y para realizar cualquier operación de mantenimiento. 
15-  Si  su  aparato  funciona  con  fuente  de  alimentación  eléctrica:  Nunca  deje  la  máquina  sin  atención  mientras  esté  en 
funcionamiento. Coloque el botón de encendido en posición de apagado y desenchufe el cable eléctrico.  
16-Cuando pare de hacer sus ejercicios, permita que los pedales se paren lentamente.  
17-Hidratese correctamente antes, durante y después del entrenamiento 


ADVERTENCIA:


ES MUY IMPORTANTE QUE REALICE UNA LUBRICACIÓN ADECUADA DEL PRODUCTO CON ACEITE DE 
SILICONA O DE TEFLÓN. ESTÁ LUBRICACIÓN DEBE REALIZARSE DE MANERA PERIÓDICA EN FUNCIÓN 
DEL USO DE CADA PERSONA, INCLUSO ANTES DE SU PRIMER USO. 


DEBE CONSERVAR EL EMBALAJE ORIGINAL CON TODAS SUS PROTECCIONES, FACTURA DE COMPRA, 
MANUALES Y PIEZAS DURANTE EL PERIODO DE GARANTÍA. 

Summary of Contents for RACER RC MSR

Page 1: ...REF RCM05R...

Page 2: ...OVER A M QUINA 6 COMPUTER ORDENADOR ORDINATEUR COMPUTER KOMPUTER BEDIENINGSPANEEL COMPUTADOR 7 PARTS LIST LISTA PIEZAS LISTE PI CES ELENCO PARTI ST CKLISTE LIJST MET ONDERDELEN LISTA DE PE AS 8 PERIOD...

Page 3: ...s away from the equipment Keep the security distance 8 This unit is designed for a domestic purpose and in an interior place not for business environment or outside 9 Check in the manual the maximum w...

Page 4: ...ventilado No lo utilice en lugares donde se usen aerosoles o donde se administre ox geno El nivel de aire que usted aspira puede verse afectado y provocarle un accidente 7 Mantenga a los ni os menore...

Page 5: ...Placez votre appareil sur des surfaces planes Si la surface n est pas plane et pr sente des d nivel s son fonctionnement pourrait tre affect Certains mod les incluent des niveleurs ou des vis de nive...

Page 6: ...compromesso Alcuni modelli includono livellatori o filetti di livellamento ubicati al disotto delle gambe che aiutano il livellamento Consultare il manuale per verificare se il suo apparecchio ne dot...

Page 7: ...ne Oberfl chen k nnten den korrekten Betrieb verhindern Manche Modelle verf gen ber Justierf e die bei der Nivellierung helfen In der Bedienungsanleitung werden Sie herausfinden ob Ihr Ger t ber die T...

Page 8: ...orden aangetast Sommige modellen beschikken over stelknoppen onder de poten voor het verkrijgen van een vlakke plaatsing Raadpleeg de handleiding om te zien of uw toestel hierover beschikt 6 Het toest...

Page 9: ...antia 5 Coloque o seu equipamento em superf cies planas Se a superf cie n o plana e apresenta desn veis o seu funcionamento poder ser afetado Alguns modelos incluem niveladores ou roscas de nivela o q...

Page 10: ...assessoramento na montagem ou pe as dirija se web www fytter com onde encontrar a sec o de SERVI O AO CLIENTE Tamb m pode contactar atrav s do email service fytter com DEVE CONSERVAR O TICKET DE COMP...

Page 11: ...ult of a robbery or accident D As a result of a introduction of objects between the slots and of animals and animal hair Keeping your equipment in a garage indoor backyard or near the water under humi...

Page 12: ...garantie Dans le cas o le poids de l utilisateur exc derait le poids maximum admis par votre appareil conform ment au manuel un dysfonctionnement pourrait se produire lequel ne sera pas couvert par la...

Page 13: ...tage van onderdelen materialen en componenten van de machine Evenmin worden hieronder verstaan de volgende schaden en tekortkomingen A Als gevolg van de normale slijtage van onderdelen materialen en c...

Page 14: ...r coberto pela garantia No caso de que se produza algum dano na m quina sem que esta esteja assegurada como pode ser o caso nos tapetes rolantes ou nos remos sistema de dobragem este n o estar coberto...

Page 15: ...PART NO DESCRIPTION Q TY 1 Main frame 1 9 Front support tube 1 40 Rear support tube 1 43 Seat post 1 3 Front stabilizer tube 1 7 Rear stabilizer tube 1 13 Handlebar for seat 1 10 Console 1 45 Seat 1...

Page 16: ...ARDWARE PARTS LIST NO DESCRIPTION DRAWING QTY 2 Allen bolt 4 4 Curved washer 8 18 Spring washer 4 19 Quick release knob 1 21 Allen bolt 30 28 Carriage bolt 2 29 Domed nut 2 38 Flat washer 8 39 Stopper...

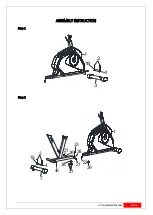
Page 17: ...FYTTER WWW FYTTER COM PAG 16 ASSEMBLY INSTRUCTION Step 1 2 3 4 1 18 Step 2 1 22 23 4 2 7 21 21 2138 38 38 40 39 18...

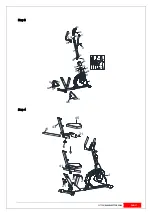
Page 18: ...FYTTER WWW FYTTER COM PAG 17 Step 3 1 35 33 22 46 4 21 21 21 38 38 34 32 16 34 35 33 32 10 20 9 12 21 21 11 21 82L 51 51 51 82R 51 16 34 Step 4 1 21 21 21 21 19 45 43 41 41...

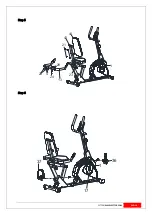
Page 19: ...FYTTER WWW FYTTER COM PAG 18 Step 5 1 24 29 4 28 21 44 23 13 43 Step 6 1 36 37 17...

Page 20: ...et de letter L Schroef de as in de tegenovergestelde richting rechtsom Fig A POR Pedal esquerdo O pedal esquerdo vem marcado no seu eixo com a letra L Aparafusar o eixo em sentido contr rio aos pontei...

Page 21: ...FYTTER WWW FYTTER COM PAG 20 5 MOVING THE BIKE DESPLAZAR LA MAQUINA LE DEPLACEMENT DE L APPAREIL SPOSTANDO LA LAVORAZIONE BEWEGEN DES BEARBEITUNGS VERPLAATSEN DE BEWERKING MOVER A M QUINA...

Page 22: ...FYTTER WWW FYTTER COM PAG 21 6 COMPUTER ORDENADOR ORDINATEUR COMPUTER KOMPUTER BEDIENINGSPANEEL COMPUTADO...

Page 23: ...FYTTER WWW FYTTER COM PAG 22...

Page 24: ...FYTTER WWW FYTTER COM PAG 23...

Page 25: ...23 24 29 30 39 2 3 4 4 2 7 5 6 8 4 4 9 14 15 15 17 20 21 21 21 21 21 21 21 21 21 21 21 21 21 25 25 26 26 27 27 27 27 28 34 36 37 38 38 38 38 38 40 41 19 43 44 45 22 31 46 47 48 49 18 18 82R 51 35 33 3...

Page 26: ...ushing 2 15 Foam grip for handlebar 2 16 Upper pulse wire 1 17 Crank 1 18 Spring washer 4 19 Quick release knob 1 20 Cross head screw 2 21 Allen bolt 32 22 Middle pulse wire 1 23 Lower pulse wire 1 24...

Page 27: ...BB sets 1 55 Belt pulley 1 56 Belt 1 57 Magnet assembly 1 58 Nylon nut 2 59 Bolt 1 60 Flywheel fixed plate 2 61 Flange nut 2 62 Bearing 3 63 Axle for flywheel 1 64 Bearing 1 65 flywheel 1 66 Screw 1...

Page 28: ...utilice productos abrasivos Un trapo humedecido ser suficiente NIVELACI N Si su aparato dispone de ruedas de nivelaci n reg lelas para evitar vibraciones y por lo tanto un mal funcionamiento LUBRICACI...

Page 29: ...ONDERHOUD OPSLAG Bewaar het toestel in een afgesloten ruimte vrij van stof en vocht Bewaar het niet in een garage open binnenplaats of in de buurt van water Vocht stof en water kunnen schade veroorzak...

Page 30: ...ormalen Hausm ll entsorgt werden Gem gesetzlicher Bestimmung muss dieses Produkt zur Erhaltung der Umwelt nach der Nutzungsdauer der Wiederverwertung zugef hrt werden NETHERLANDS Dit product mag niet...

Page 31: ...t pas d un dispositif m dical Divers facteurs peuvent affecter la pr cision des lectures du rythme cardiaque Le capteur de pouls est uniquement pr vu comme une aide aux exercices et tablit une tendanc...

Page 32: ...u Voer uw oefeningen uit gedurende 20 tot 30 minuten met uw hartslagritme op trainingsniveau Tijdens de eerste weken van uw trainingsprogramma dient u het hartslagritme nooit meer dan 20 minuten op tr...

Page 33: ...inconsistent 1 Make sure that the wire connections for the hand pulse sensors are secure 2 To ensure the pulse readout is more precise please always hold on to the handlebar grip sensors with two han...

Page 34: ...TECTIONS LE TICKET D ACHAT SES MANUELS ET SES PIECES PENDANT LA PERIODE DE GARANTIE ITA DEVE CONSERVARE L IMBALLAGGIO ORIGINALE CON TUTTE LE PROTEZIONI LO SCONTRINO MANUALI E PEZZI DURANTE IL PERIODO...

Reviews: