


gm-elektronik.swiss | adm@gm-elektronik.swiss
USO
I
•
per l’invio selettivo di messaggi vivavoce
dopo aver attivato la modalità emergenza (vedi fig.
3.1.1), premere i pulsanti relativi alle zone interessate:
soltanto i led verdi delle zone selezionate lampeggeranno
ad indicare la prenotazione (fig. 3.5.1) mentre gli altri si
spegneranno. Premere e mantenere premuto il pulsante
P.T.T.
: i led verdi e rossi corrispondenti alle zone attivate
si accendono in modo fisso ed è possibile parlare nel
microfono per inviare così il messaggio d’emergenza
in vivavoce esclusivamente sulle zone selezionate
(nell’esempio di fig. 3.5.2, le zone 1-2-3-5-10-12).
Al rilascio del tasto, si attiverà automaticamente la
selezione generale (tutti i led verdi lampeggianti).
•
per l’invio selettivo di messaggi pre-registrati
dopo aver attivato la modalità emergenza (vedi fig.
3.1.1), premere i pulsanti relativi alle zone interessate:
soltanto i led verdi delle zone selezionate lampeggeranno
ad indicare la prenotazione (fig. 3.5.1). Premere quindi
ALERT
oppure
EVAC.
per inviare solo sulle zone
selezionate rispettivamente il messaggio d’allerta o
quello d’evacuazione. L’attivazione del messaggio verrà
confermata dal led rosso della zona corrispondente:
Led acceso
fisso
=
EVAC
Led acceso
lampeggiante
=
ALERT
A messaggio inviato, si attiverà in automatico la
selezione generale (tutti i led verdi lampeggianti).
•
per l’invio selettivo in broadcast
Selezionare le zone desiderate, i corrispondenti led di
zona lampeggeranno, quindi seguire le indicazioni del
paragrafo 3.4. I led di zona si accenderanno in modo
fisso per confermare l’attivazione.
3.5 Selezione zone
(solo FMD 2012)
Il modello
FMD 2012
è dotato di una tastiera da utilizzare per la
pre-selezione di una o più zone sulle quali inviare comunicazioni in
vivavoce oppure inviare/resettare i messaggi pre-registrati.
Ciascun tasto di selezione è corredato di tre led per l’indicazione
dello stato della rispettiva zona:
LED
Stato
Indicazione
Zone selected
(verde)
Lampeggiante
Zona selezionata
Fisso (in stato d’emergenza)
con led “zone alarm” acceso
Annuncio vivavoce d’emergenza in corso
Fisso (in stato broadcast)
Annuncio vivavoce broadcast in corso
Zone alarm
(rosso)
Lampeggiante
Messaggio ALERT in corso
Fisso, con led “zone selected” spento
Messaggio EVAC in corso
Zone fault/disable
(giallo)
Lampeggiante
- Linea in guasto o
- Linea non disponibile per guasto amplificatore
Fisso
Linea impostata in “stato di disabilitazione”
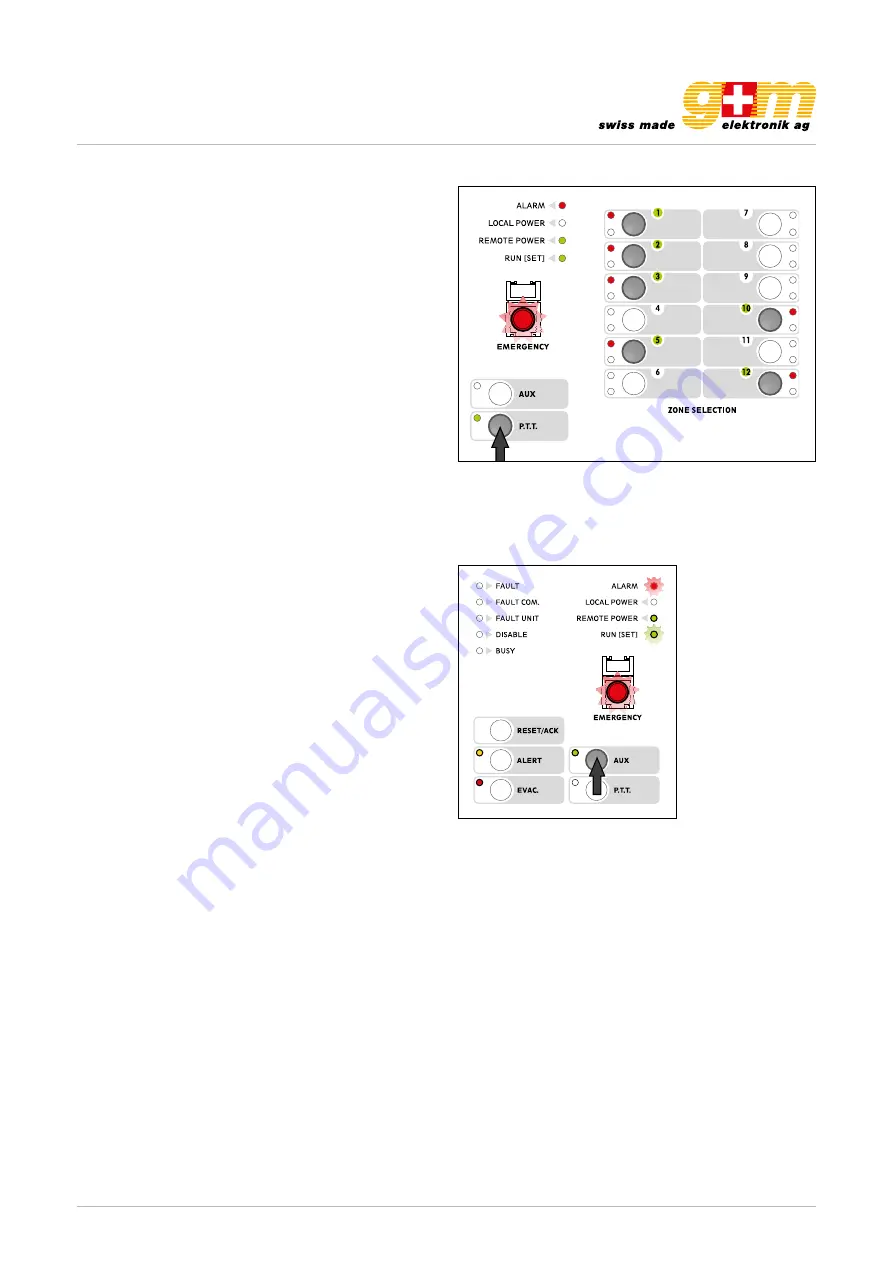
Fig. 3.5.1
Fig. 3.5.2
USE
UK
1
3.7 RESET/ACK function
The
RESET/ACK
key has multiple functions depending on the status of the system:
Message RESET (RESET function)
• ALL-CALL: When there is an on-going alarm and with the station in the emergency mode, hold the
RESET/ACK
key down for 2 seconds. This will enable the messages to be stopped, although the system will remain in an
emergency status.
• PARTIAL: when there is an on-going alarm and with the station in the emergency mode, select the zones to be
muted and hold the
RESET/ACK
key down for 2 seconds.
Resetting the failure acknowledgement buzzer (ACK function)
• In the event of failures with the station on stand-by, press the
RESET/ACK
key briefly. The buzzer will be reset
only on the actual base, while the LEDs corresponding to the failure in question will remain ON.
• In the event of failures, press the
EMERGENCY
key to enter the emergency mode. Then press the RESET/ACK
key briefly. The buzzer will be reset on all the devices of the system. The LEDs referred to the failure in question
will in any case remain ON.
3.6 AUX function
The AUX function can be used to call up a specific combination of
messages/broadcasting zones set previously via the VAIE 2250.
To do this,
enter the emergency mode
(Fig. 3.1.1), then press
the
AUX
key.
The green
AUX
LED will light up to confirm activation. The red
ALARM
LED and those indicating the type of message sent
(ALERT or EVAC) will light up to indicate the existing alarm.
If a
FMD 2012
station is used, the LEDs referred to the zones
concerned will also light up.
Once the messages have been sent out, press
EMERGENCY
again
to leave the emergency mode, then close the cover again.
Fig. 3.6.1
Datasheet 1811.001
DIGITAL MICROPHONE CONSOLE VA-FMC-512
Page 6 | 9
• To send pre-recorded messages
After activating the emergency mode, press the keys corre-
sponding to the zones concerned. Only the green LED’s of
the selected zones will light up to indicate the booking. Then
press ALERT or EVAC to send the alert or evacuation mes-
sage only to those zones that have been selected. Activation
will be confirmed by the red LED corresponding to the zones
in question:
LED steady ON = EVAC
LED flashing = ALERT
Once the message has been sent out, the All-Call mode will
be activated automatically (all the green LED’s will flash).
• To send selective messages in the broadcast mode
Select the required zones. The LEDs corresponding to the
selected zones will light up. Then follow the instructions pro-
vided under point ”Broadcast calls“ on page 5. The zone
LEDs will light up steadily to confirm the activation.
2.6. AUX function
The AUX function can be used to call up a specific combina-
tion of messages / broadcasting zones set previously via the
VA-500. To do this, enter the emergency mode then press
the AUX key. The green AUX LED will light up to confirm ac-
tivation. The red ALARM LED and those indicating the type
of message sent (ALERT or EVAC) will light up to indicate the
existing alarm. If a VA-FMC-512 station is used, the LEDs
referred to the zones concerned will also light up.
Once the messages have been sent out, press EMERGENCY
again to leave the emergency mode, then close the cover
again.
2.7. RESET / ACK function
The RESET / ACK key has multiple functions depending on the status of the system:
Message RESET (RESET function)
• ALL-CALL: When there is an on-going alarm and with the station in the emergency mode, hold the RESET/ACK key down
for 2 seconds. This will enable the messages to be stopped, although the system will remain in an emergency status.
• PARTIAL: when there is an on-going alarm and with the station in the emergency mode, select the zones to be muted
and hold the RESET / ACK key down for 2 seconds.
Resetting the failure acknowledgement buzzer (ACK function)
• In the event of failures with the station on stand-by, press the RESET/ACK key briefly. The buzzer will be reset only on the
actual base, while the LEDs corresponding to the failure in question will remain ON.
• In the event of failures, press the EMERGENCY key to enter the emergency mode. Then press the RESET / ACK key brief-
ly. The buzzer will be reset on all the devices of the system. The LEDs referred to the failure in question will in any case
remain ON.


