background image

p.42

Maintenance for Your Drive

G DOCK

ev

with Thunderbolt™

G DOCK

ev

with Thunderbolt™

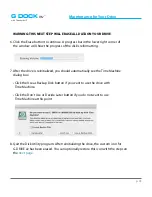
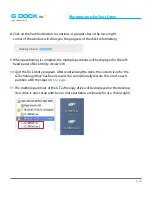
4. Choose the Format option that you prefer. 

    •  Mac OS Extended (Journaled): Use this format if you intend to use the drive for Time 

Machine or to create a separate bootable installation of OS. 

    •  Mac OS Extended: Use this format for best performance and media storage. To select, 

click the Format pop-up and its option to Mac OS Extended.

5.  Click the Erase button in the lower right corner of the window. A dialog box will appear 

asking if you want to erase the G-DOCK ev partition.

format options

Summary of Contents for G DOCK ev

Page 1: ...g technology com G DOCK ev with Thunderbolt An expandable storage solution with two removable hard drives PRODUCT MANUAL Welcome to Evolution Series ...

Page 2: ...17 Getting Started Unpack and Setup 19 Power On the System 20 Disconnect the Dock 22 Table of Contents Using Your G DOCK ev G Technology Assistant Utility 24 G Technology Assistant Menu 25 G Technology Assistant Notifications 27 Use with Time Machine 28 Configuring with Disk Utility Supported Media Configurations 31 Set Up as JBOD 31 About RAID Sets 31 Set Up in RAID 0 Mode 32 Delete RAID 0 Config...

Page 3: ...G DOCK ev with Thunderbolt Safety General Use Safety Precautions p 4 Backup Your Data p 5 ...

Page 4: ...e device away from moisture or liquids To reduce the risk of damage do not expose this drive to rain or moisture Do not use it in damp or wet conditions Never place objects containing liquids on the drive as they may spill into its openings Ventilation Place the device in a vented area The drive should never be placed near or over a radiator or heat source Temperature Do not expose this drive to t...

Page 5: ...ology be held liable for the recovery or restora tion of lost data Any loss corruption or destruction of data while using a G Technology drive is the sole responsibility of the user Make Two Backups To help prevent the loss of your data we highly recommend that you keep TWO copies of your data in separate storage locations Keep one copy on your G Technology drive Keep a second copy on your interna...

Page 6: ...About Your Evolution Series Introduction p 7 What s in the Box p 8 System Requirements p 8 ...

Page 7: ...is user configurable in RAID 0 Performance or RAID 1 Protected and is designed to optimize your digital content workflow The Evolution Series today consists of G DOCK ev and G DRIVE ev A high performance and flexible hard drive module G DRIVE ev offers high transfer speeds up to 136MB s features USB 3 0 for use as a stand alone drive and has a SATA connector for use in the G DOCK ev Series docking...

Page 8: ...rives 2 USB 3 0 cables compatible with USB 2 0 1 Thunderbolt cable Power cord AC power adapter Quick Start Guide 3 Year Limited Warranty If any items are missing please contact G Technology at www g technology com contact contact_support System Requirements G DOCK ev is set up at the factory for use with Mac OS systems and formatted as HFS with Journaling Thunderbolt enabled Mac computer Mac OS 10...

Page 9: ...G DOCK ev with Thunderbolt Overview of G DOCK ev Storage System About G DOCK ev Storage System p 10 Overview of G DOCK ev p 11 G DOCK ev Indicator LEDs p 12 ...

Page 10: ... RAID and G DRIVE storage systems which are the same width The G DOCK ev TB ships in JBOD mode and has RAID 0 1 support By using the Mac OS Disk Utility application the dock is easily configurable for RAID 0 Performance or RAID 1 Protected For maximum flexibility G DOCK ev TB works with any Evolution Series G DRIVE ev products The dock ships with two removable G DRIVE ev hard drives with USB 3 0 L...

Page 11: ...en a RAID configuration needs attention or a drive is Safe to Remove Read more in G DOCK ev Indicator LEDs On the rear of the unit is a Kensington Security Slot two high speed Thunderbolt Ports DC Power Port and a Soft touch On Off Switch IMPORTANT G DOCK ev has been pre configured in JBOD mode To configure your G DOCK ev TB to RAID 0 Performance mode or RAID 1 Protected mode read Configuring with...

Page 12: ...nclosure automatically powers on As confirmation the Activity Lights on the G DRIVE ev hard drives will glow Using Evolution Series Hard Drives When a G DRIVE ev hard drive module is ejected the light next to the Eject button will turn green indicating that it s safe to remove the module Data Transfer The G DRIVE ev hard drives have Activity Lights to indicate that the drives are inserted and on a...

Page 13: ...lice is missing a red light will come on to indi cate an issue with the RAID configuration If you have a RAID 1 configuration and a G DRIVE ev hard drive is ejected during data transfer the Dock Indicator LED on that bay will glow orange to indicate that the RAID set is in a degraded state To learn more about troubleshooting RAID configurations visit www g tech nology com support raid led ...

Page 14: ...Overview of G DRIVE ev About G DRIVE ev Drives p 15 G DRIVE ev Activity Lights p 17 ...

Page 15: ...ht on the front of the ev Series hard drives and a SATA Port and USB 3 0 Port on the back Top Features Capture transfer and distribute all with one storage solution Pair with G DOCK ev or an adapter to work with a variety of interfaces Works as standalone drives for field capture Up to 136MB s transfer rates High speed USB 3 0 interface Rugged design can withstand a 1M drop onto carpeted concrete ...

Page 16: ...al interfaces USB 3 0 for use as a stand alone drive and a SATA connector for use with G DOCK ev storage solutions G DRIVE ev is designed to meet the storage needs of the creative professional The hard drives can be used with an Evolution Series G DOCK or as a standalone device with compatible accessories Two G DRIVE evs ship with G DOCK ev and they are also available for purchase separately 1 met...

Page 17: ... Activity Light will be on Data Transfer If an ev hard drive is in a G DOCK ev bay and it is copying material its Activity Light will flash to show that it s working properly When no data is being transferred the lights will remain on but dim to indicate an idle state Ejecting a G DRIVE ev When you eject an ev hard drive from your computer desktop the G DOCK ev light will turn green indicating tha...

Page 18: ...Getting Started Unpack and Setup p 19 Power On the System p 20 Disconnect the Dock p 22 ...

Page 19: ... dock Begin the Setup To begin your setup first remove the included cables then the drives and then re move the dock Place the G DOCK ev unit so it sits upright and flat Unwrap the G DRIVE evs The two G DRIVE ev drives are individually wrapped and need to be prepared prior to inserting them into the G DOCK ev enclosure On the back of each G DRIVE ev hard drive module are two interfaces There is a ...

Page 20: ... Power Cord Connect the power adapter to the unit and plug the other end into a surge protector or wall outlet gdock power Attach the Thunderbolt cable G DOCK ev attaches to your system via a Thunderbolt interface and cable Plug one end into the Thunderbolt port on your system and the other end into either Thunderbolt port on the rear of G DOCK ev One of the great features of Thunderbolt technolog...

Page 21: ...ctivity lights turn on The drive s will automatically mount on the desktop Activity Lights Once G DOCK ev powers on the white Activity Lights in each inserted G DRIVE ev hard drive will flash briefly to let you know it is being accessed Then the light will dim to indicate an idle state in which no data is being transferred Learn about G DOCK ev Indicator LEDs and G DRIVE ev Activity Lights Install...

Page 22: ...w when disconnecting or unmounting the drive from your computer 1 Before powering down and disconnecting the drive unmount the system by simply dragging the G DRIVE ev or G DOCK ev icon to the trash located in the system dock Keyboard shortcut Select the drive icon and hit Command E 2 It is safe to remove the drive from your system when the drive icon is no longer present on your desktop 3 To powe...

Page 23: ...G DOCK ev with Thunderbolt Using Your G DOCK ev G Technology Assistant Utility p 24 G Technology Assistant Menu p 25 G Technology Assistant Notifications p 27 Use with Time Machine p 28 ...

Page 24: ...often to check for updates Recommended Installation When you first setup G DOCK ev you will want to install the G Technology Assistant on your computer The utility drives the Dock Indicator LEDs and also provides use ful notifications and shortcuts to enhance your experience with the Evolution Series G DOCK ev To install the G Technology Assistant utility follow the onscreen instructions Once you ...

Page 25: ...electing the G icon the G Technology Assistant menu will appear Unmount All Volumes Unmounts G Technology drives attached to the system You will need to confirm your selection prior to unmounting the drives Disk Utility Opens the Disk Utility application G Technology Assistant Menu There are helpful menu items in the G Technology Assistant utility assist menu ...

Page 26: ...te www g technology com support Preferences Provides a variety of settings to customize your experience with G Technology Assis tant Update is based on the G Technology Assistant utility version Quit Quits the G Techno logy Assistant utility You can relaunch it from the Applications folder or by restarting your system ...

Page 27: ... degraded on drive slot mimics the orange Dock LEDs G Technology Assistant Notifications The G Technology Assistant uses the Mac OS Notifications feature to provide visual notifications and updates to you Here are examples of these notifications It is safe to remove an ev drive An ev drive has been inserted G Technology Assistant also has menu items that match the Indicator LEDs of G DOCK ev assis...

Page 28: ...ickly set up G DOCK ev with Time Machine NOTE G DOCK ev must have G DRIVE ev drives inserted to work with Time Machine 1 When you attach G DOCK ev for the first time the Time Machine dialog box should automatically appear Click the Use as Backup Disk button 2 If the Time Machine dialog box did not launch go to the Apple Menu System Prefer ences Click on the Time Machine icon The Time Machine Prefe...

Page 29: ...DOCK ev Click the Use Disk button 4 Make sure the Time Machine switch is set to ON You can set its options by clicking the Options button Do this to choose volumes folders or files you do NOT want to backup G DOCK ev will now back up your important files automatically with Time Machine It s that easy ...

Page 30: ...with Disk Utility Supported Media Configurations p 31 Set Up as JBOD p 31 About RAID Sets p31 Set Up in RAID 0 Mode p 32 Delete RAID 0 Configuration p 35 Set Up in RAID 1 Mode p 36 Delete RAID 1 Configuration p 39 ...

Page 31: ...0 and Set Up as RAID 1 give you the general steps for configuring your G DOCK ev For additional information please visit www g technology com support or Apple s support site RAID User Guide or the Disk Utility Help Center in the Disk Utility application Set Up as JBOD G DOCK ev with Thunderbolt has been configured at the factory in a Just a Bunch of Drives JBOD configuration This configuration sup...

Page 32: ...e files such as digital video and databases To configure G DOCK ev with Thunderbolt into RAID 0 Performance mode you need to launch the Mac OS Disk Utility found in Applications Utilities Disk Utility 1 Select an ev Hard Drive module and click on the RAID tab In the RAID Type field select Striped RAID Set from the drop down 2 Name the RAID set with something that identifies your selected configu r...

Page 33: ... now ready to create your striped RAID set Click the Create button and the system will begin to build the RAID set 5 The RAID configuration process will delete all of the data on the selected disks You will need to confirm the process before the RAID set is created WARNING THIS NEXT STEP WILL ERASE ALL DATA ON YOUR DRIVE 6 The Disk Utility window has a progress indicator which provides a status of...

Page 34: ...p 34 Configuring with Disk Utility G DOCK ev with Thunderbolt 7 The RAID configuration process is complete You should now find a volume on your system with a RAID Set Name that you created ...

Page 35: ...rocess will remove the RAID 0 set and delete all of the data on the selected disks To delete the RAID set select it in the Disk Utility window then click the Delete button You will be asked to confirm the process before the RAID set is deleted Once completed you can reformat the drives as needed raid 0 delete ...

Page 36: ...econnect a disk you disconnected the RAID set can rebuild it in the background so that it contains the latest data To configure G DOCK ev with Thunderbolt into RAID 1 Protected mode you need to launch the Mac OS Disk Utility found under Applications Utilities Disk Utility 1 Select an ev Hard Drive module and click on the RAID tab In the RAID Type field select Mirrored RAID Set from the drop down 2...

Page 37: ... now ready to create your mirrored RAID set Click the Create button and the system will begin to build the RAID set 5 The RAID configuration process will delete all of the data on the selected disks You will need to confirm the process before the RAID set is created WARNING THIS NEXT STEP WILL ERASE ALL DATA ON YOUR DRIVE 6 The Disk Utility window has a progress indicator which provides a status o...

Page 38: ...p 38 Configuring with Disk Utility G DOCK ev with Thunderbolt 7 The RAID configuration process is complete You should now find a volume on your system with a RAID Set Name that you created ...

Page 39: ...rocess will remove the RAID 1 set and delete all of the data on the selected disks To delete the RAID set select it in the Disk Utility window then click the Delete button You will be asked to confirm the process before the RAID set is deleted Once completed you can reformat the drives as needed raid 1 delete ...

Page 40: ...Maintenance for Your Drive Initialize Drive for Mac p 41 Restore the Drive Icon p 44 Reformat with Partitions p 46 ...

Page 41: ... Utility program This application is located on your hard drive under Applications Utilities Disk Utility The window below will appear Your G DOCK ev will be displayed in the left hand column 2 Select a G DRIVE ev hard drive module by clicking its drive icon in the left side col umn Information about the drive will be displayed at the bottom of the window 3 Select the Erase tab to view the formatt...

Page 42: ...drive for Time Machine or to create a separate bootable installation of OS Mac OS Extended Use this format for best performance and media storage To select click the Format pop up and its option to Mac OS Extended 5 Click the Erase button in the lower right corner of the window A dialog box will appear asking if you want to erase the G DOCK ev partition format options ...

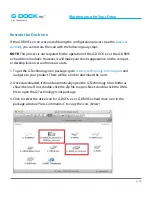
Page 43: ...ting 7 After the drive is reinitialized you should automatically see the Time Machine dialog box Click the Use as Backup Disk button if you want to use the drive with Time Machine Click the Don t Use or Decide Later button if you do not want to use Time Machine at this point 8 Quit the Disk Utility program After reinitializing the drive the custom icon for G DRIVE ev has been erased You can option...

Page 44: ...ve s appearance on the comput er desktop look nicer and more accurate 1 To get the G Technology icon package go to www g technology com support and navigate to your product There will be a link to download the icons 2 Once downloaded it should automatically open the G Technology Icons folder as shown below If not double click the Zip file to open Next double click the DMG file to open the G Techno...

Page 45: ...is opens the Get Info window below left 5 Select the default icon in the Get Info window below left 6 Press Command V to paste the custom G DOCK ev or G DRIVE ev hard drive module icon into the Get Info window below right The icon for your DOCK ev or G DRIVE ev has been restored and you can close the Get Info window Your dock is now ready for use ...

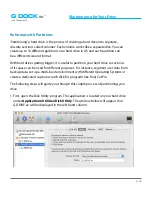
Page 46: ...seful to partition your hard drive so sections of its space can be used for different purposes For instance segment user data from backup data set up a multi boot environment with different Operating Systems or create a dedicated capture scratch disk for programs like Final Cut Pro The following steps will guide you through this simple process of partitioning your drive 1 First open the Disk Utili...

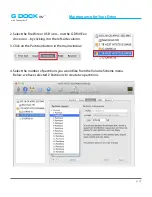
Page 47: ...reWire or USB icon not the G DRIVE ev drive icon by clicking it in the left side column 3 Click on the Partition button in the main window 4 Select the number of partitions you would like from the Volume Scheme menu Below we have selected 2 Partitions to create two partitions ...

Page 48: ... on Mac OS it is recommended to use Mac OS Extended or Mac OS Extended Journaled For info about formats go here In the Size field type in a size for the partition Alternately you can drag the bar in between each partition to quickly change the size 6 Repeat this process for each partition you have created 7 Click the Apply button in the lower right corner of the window A dialog box will appear ask...

Page 49: ...le partitions will be displayed in the left hand panel of Disk Utility below left 10 Quit the Disk Utility program After reinitializing the drive the custom icon for the G Technology drive has been erased You can optionally restore this icon to each partition with the steps on this page 11 The multiple partitions of the G Technology drive will be displayed on the desktop Your drive is now setup wi...

Page 50: ...Support Warranty Technical Support p 51 Limited Warranty p 52 Copyright p 54 ...

Page 51: ...nest service and support If you encounter any difficulties while installing or using the Evolution Series please contact G Technology Technical Support at www g technology com contact contact_support Helpful information for support When contacting Technical Support it s best to be in front of your computer and have the following information available Your G DOCK ev serial number on bottom of unit ...

Page 52: ...ll be measured from the date of sale from HGST to the authorized distributor What does this limited warranty not cover The limited warranty does not cover damage resulting from commercial use misuse accident modification or alteration to hardware or software tampering unsuitable physical or operat ing environment beyond product specifications improper maintenance or failure caused by a product for...

Page 53: ... delivery to carrier at HGST shipping point You are responsible for importation of the replaced product if applicable HGST will not return the original drive to consumers therefore the consumer is responsible for moving data to another media before returning Data Recovery is not covered under this warranty and is not part of the warranty returns process HGST warrants that the replaced products are...

Page 54: ...n bytes when referring to hard drive capacity Accessible capacity will vary depending on the operating environment and formatting Thunderbolt and the Thunderbolt logo are trademarks of Intel Corporation in the U S and or other countries Design by G Technology in California G DRIVE and G Technology are registered trademark of HGST Inc and its affiliates in the U S and other countries G DOCK ev is a...

Reviews: