background image


Page 1 

G-SAFE Product Guide  

G-SAFE™ 

Installation Guide 


G-Technology Inc.


Tel:  (310) 449-4599 
Fax: (310) 449-4670 

support@g-technology.com


P/N GS1207 RevA 

TABLE OF CONTENTS 


1.


INTRODUCTION 


2.


SAFETY PRECAUTIONS 


3.


SYSTEM REQUIREMENTS 


4.


WHAT’S IN THE BOX 


5.


G-SAFE OVERVIEW 


6.


INSTALLING G-SAFE


7.


G-SAFE  OPERATION


7.1 Powering on G-SAFE for the First Time 
7.2 Front Panel STATUS LED & Alarm 
7.3 LCD Panel Messages 


8.


REPLACING A DISK DRIVE MODULE 


9.


USING G-SAFE FOR OFFSITE DATA BACKUP  

9.1 Disaster Recovery using Offsite Backup Module 


10.


INITIALIZING G-SAFE 

10.1 Mac OS X (10.4.x) 
10.2 Windows 2000/XP 

10.3 Cross Platform Use


11.


UNMOUNTING/DISCONNECTING G-SAFE 

11.1 Mac OS X Computers 

11.2 Windows Computers 


12.


OPTIMIZING DATA TRANSFER RATES 


13.


TECHNICAL SUPPORT 


14.


LIMITED WARRANTY STATEMENT 


Summary of Contents for G-SAFE

Page 1: ...FE OPERATION 7 1 Powering on G SAFE for the First Time 7 2 Front Panel STATUS LED Alarm 7 3 LCD Panel Messages 8 REPLACING A DISK DRIVE MODULE 9 USING G SAFE FOR OFFSITE DATA BACKUP 9 1 Disaster Recovery using Offsite Backup Module 10 INITIALIZING G SAFE 10 1 Mac OS X 10 4 x 10 2 Windows 2000 XP 10 3 Cross Platform Use 11 UNMOUNTING DISCONNECTING G SAFE 11 1 Mac OS X Computers 11 2 Windows Compute...

Page 2: ...Page 2 G SAFE Product Guide ...

Page 3: ...Page 3 G SAFE Product Guide ...

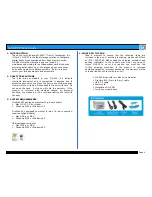
Page 4: ... damage caused by improper handling the warranty will be void and liability will rest with the user 3 SYSTEM REQUIREMENTS FireWire 800 equipped computer 9 pin connection Mac OS X 10 2 4 or higher Windows 2000 or Windows XP FireWire 400 equipped computer 4 pin or 6 pin connection requires optional cable Mac OS 9 x or OS X Windows 2000 or Windows XP USB equipped computer Mac OS 9 x or OS X Windows 2...

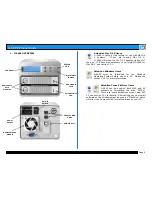
Page 5: ...System before use on a PC Please see section 10 2 for more information Attention Cross Platform Users G SAFE can be used on both MAC and PC systems by formatting the drive FAT32 There are some limitations when using FAT 32 see section 10 3 for details Alternatively you can install software on the Windows machine such as MacDrive which will allow you to mount MAC formatted drives on your PC Drive A...

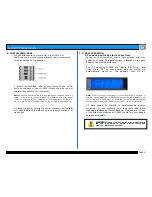
Page 6: ...1 Powering on G SAFE for the First Time Power on your computer wait a few seconds and then power on G SAFE The power switch is located on the back panel of the G SAFE enclosure The LCD panel on G SAFE will indicate that Drive 1 and Drive 2 are OK as shown below and the system will automatically mount on the desktop Mac OS X Note G SAFE is set up at the factory for use with Mac OS X systems If you ...

Page 7: ...drive module on power up the following message will appear on the LCD Power off G SAFE and ensure that the drive modules are completely inserted in to the G SAFE enclosure If a drive failure occurs the LCD will indicate which disk must be replaced as shown below See Section 7 REPLACING A DISK DRIVE MODULE If the fan malfunctions the LCD will display the message below Stop using G SAFE until the fa...

Page 8: ...ailed drive as soon as possible Contact G Tech Technical Support at 310 449 4599 or at support g technology com to request a new disk drive module Follow the directions below to replace the failed disk drive module 1 Power on G SAFE Note It is not necessary to have your computer powered on during this process 2 Identify the failed disk drive module indicated by the LCD panel and the blue LED on th...

Page 9: ...torage capacity So the rebuild time for a 250GB drive is approximately 100 minutes While it is possible to access the G SAFE during rebuild data access may be very slow 9 USING G SAFE FOR OFFSITE DATA BACKUP With the addition of a third drive module it is possible to add a greater level of protection by storing a copy of your data offsite By rotating drive modules offsite at regular intervals you ...

Page 10: ...ill ask if you would like to rebuild the array in this case G SAFE will rebuild from Drive 1 top to Drive 2 bottom 7 Push the ENT button to begin the process or ESC button to cancel the process will automatically cancel in 10 seconds 8 G SAFE will now rebuild the data to the target drive 9 Reset the MUTE button to re enable the audible alarm Note The rebuild process takes approximately one minute ...

Page 11: ...ill ask if you would like to rebuild the array in this case G SAFE will rebuild from Drive 1 top to Drive 2 bottom 8 Push the ENT button to begin the process or ESC button to cancel the process will automatically cancel in 10 seconds 9 G SAFE will now rebuild the data to the target drive 10 Reset the MUTE button to re enable the audible alarm Note The rebuild process takes approximately one minute...

Page 12: ...P installations proceed to Section 10 2 For Cross Platform use see section 10 3 9 1 Mac OS X 10 4 x 1 Open the Apple Disk Utility The Apple Disk Utility is in the Utilities Folder located in the Applications Folder on the Macintosh HD A dialog box like the following will appear G SAFE will be displayed in the left hand column as shown 2 Select G SAFE by clicking on the entry in the left hand colum...

Page 13: ...tiple volumes by selecting the desired number of partitions from the Volume Scheme pull down menu 5 Click on the Partition button The dialog box shown below will appear Click on the Partition button to continue 6 When partitioning is complete G SAFE will be displayed in the left hand panel as shown below 7 Exit the Apple Disk Utility 8 G SAFE is now mounted on the desktop as shown below G SAFE is ...

Page 14: ...rop down menu as shown below 3 The Computer Management console will appear as shown below Click on Disk Management in the left hand panel G SAFE is identified as Disk 1 in this example Right click on Disk 1 and select Initialize Disk from the pull down menu as shown The window shown on the next page will appear 4 Click on the OK button to continue 5 The following window will appear G SAFE Disk 1 i...

Page 15: ...n the Next button to continue 8 The following window will appear Click on the Next button to continue 9 The window shown below will appear Click on the Next button to continue This will create one large volume using all of the available space on G SAFE Note Multiple partitions can be created on G SAFE Consult your Windows documentation for instructions on setting up multiple partitions ...

Page 16: ... continue 11 Enter a Volume Label in this example G SAFE check the Perform a quick format box and click on the Next button to continue 12 The following window will appear Click on the Finish button to continue 13 Windows will format the volume and then display the following window Disk 1 is now identified as G SAFE E Exit the Computer Management console ...

Page 17: ... as shown Select MS DOS File System from the drop down menu and Enter G SAFE in the Name field 3 Click on the erase button and the screen on the next page will appear 4 Click Erase and your drive will be formatted to its full capacity as FAT32 With this format you will be able to READ WRITE on both windows 2000 XP and MAC OS machines NOTE You could format your drive on a Windows machine FAT32 howe...

Page 18: ...G SAFE from your system 11 OPTIMIZING DATA TRANSFER RATES G SAFE FW can be connected to any Mac or PC equipped with a FireWire 400 using optional 4 or 6 pin to 9 pin cables FireWire 800 or USB 2 0 port For best performance G SAFE should be connected via FireWire 800 12 TECHNICAL SUPPORT If you encounter any difficulties while installing G SAFE please contact G Tech Technical Support via one of the...

Page 19: ... period to an authorized G Tech service facility or to G Tech The purchaser shall bear all shipping packing and insurance costs and all other costs excluding parts and labor necessary to effectuate repair replacement or refund under this warranty All returned product must be shipped to G Tech in the original shipping container For more information on how to obtain warranty service an RMA number or...

Reviews: