background image


G-SPEED Product Guide 

Page 14 

9.1 Silencing the Audible Alarm 

During a Failure event, the audible alarm is silenced 

through the web GUI or by the LCD panel. (to disable 
the audible alarm see section 10.1)  

 
1. Silencing Through Web GUI 

Select “View Events/Mute Beeper” under the “System 
Control” section on the left navigation bar.  This will 

silence the beeper and open the “View Events” page 
with information regarding the failure. 
 

2. Silencing Through LCD Panel 


Enter the system through the LCD panel by pressing the 

“ENTER” button once.  You will be prompted for your 
password.  Use the UP / DOWN buttons to change the 
characters and ENTER button to move the cursor to the right. 

For example, using the default password, hit the UP button 
once and “0” will appear on the LCD screen.  Press ENTER to 

move the cursor right and repeat this process until four (0) 
zeros are visible.  Hit ENTER 12 more times to move the 

cursor completely to the right and you will be logged in.  Hit 
the DOWN button until “Raid System Functions” is displayed 

in the window.  Hit ENTER and “Mute the Alert Beeper” will 
be displayed.  Hit ENTER one more time to mute the beeper. 
Hit ESCAPE 2 times to exit the system.  


10. SYSTEM CONTROL 

This section outlines the user configurable options in the 
“System Control” section of the G-SPEED web GUI.  Clicking 

on the links will bring up windows described below.   
 

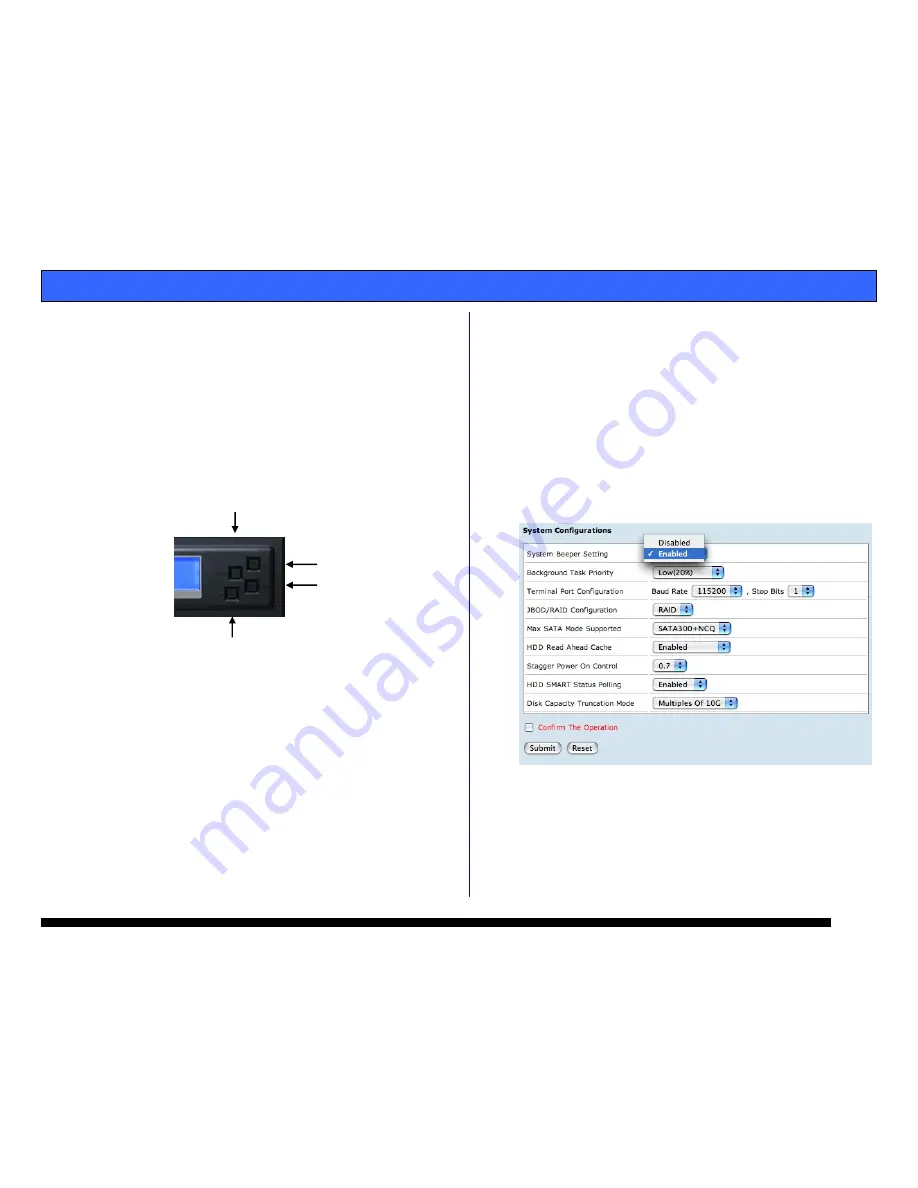
10.1 Disable Audible Alarm 

G-SPEED has an audible alarm that sounds in the event of a 

disk drive failure.  To disable this alarm select “Disabled” in 
the System Beeper Setting pull-down menu as shown below. 
We recommend that you leave all other settings in this menu 

at the preset values. You must click the “Confirm The 
Operation” box and then click on the “Submit” button for 

your changes to take effect. 


ENTER /FORWARD 

UP 

DOWN 

ESCAPE / BACK 

Summary of Contents for G-SPEED FC

Page 1: ...ules 7 3 Installing SFP and Optical Cable FC version 7 4 Installing SCSI Terminator and Cables SCSI version 7 5 Setting SCSI ID 7 6 Formatting G SPEED 8 MANUAL CONFIGURATION 8 1 Connecting to the GUI...

Page 2: ...G SPEED Product Guide Page 2...

Page 3: ...G SPEED Product Guide Page 3...

Page 4: ...void and liability will rest with the user 3 SYSTEM REQUIREMENTS A Fibre Channel Fibre Channel Host Adapter Equipped Computer Mac OS X 10 2 4 or higher Windows 2000 or Windows XP NOTE We recommend the...

Page 5: ...er and configuring your system takes just a few steps If an ATTO Host Bus Adapter was included in your kit 7 1 Install the ATTO HBA 1 Install the adapter into an empty PCI X or PCI E slot in your syst...

Page 6: ...ushing on the lever Note The G SPEED writes a signature to each drive so the drive modules can be installed in any position in the G SPEED enclosure 3 Replace the G SPEED Bezel 7 3 Fibre Channel Insta...

Page 7: ...umbscrews to hold the cable in place 3 Attached the other end of the SCSI cable to your system s SCSI Host adapter 7 5 SCSI Setting the SCSI ID 1 The G SPEED is set at the factory with a default SCSI...

Page 8: ...Hit ENTER once and then hit the UP or DOWN buttons to adjust the SCSI ID Hit ENTER when you are satisfied Hit the BACK button and you will be prompted to confirm your action Hit ENTER 2 times to accep...

Page 9: ...by connecting an Ethernet cable from the Ethernet port on the G SPEED to your host computer or network 2 G SPEED will auto configure to your network or direct attached computer and display the IP add...

Page 10: ...Note If the G SPEED is currently configured with a RAID Set You must delete the RAID Set before continuing See Section 8 4 for instructions on deleting a RAID Set 1 To create a RAID Volume set on the...

Page 11: ...se Quick Create select your RAID level and leave the default setting of No under Greater Two Terabyte Volume Support This will create the maximum Volume size of 2047 97GB 2199GB from disk allowed in 3...

Page 12: ...ar as a blank disk ready to be formatted Refer to your system documentation for instructions on formatting G SPEED for your operating system 8 4 Deleting a RAID set 1 Select Delete Raid Set under the...

Page 13: ...in a protected RAID mode the data on the array will be safe however the array is now in an unprotected state and a further drive failure will result in loss of the array and the data it contains The...

Page 14: ...rsor right and repeat this process until four 0 zeros are visible Hit ENTER 12 more times to move the cursor completely to the right and you will be logged in Hit the DOWN button until Raid System Fun...

Page 15: ...he Operation box and then click on the Submit button 10 3 View Events Mute Beeper G SPEED keeps a log of events that may be viewed by clicking this link If a hardware failure occurs and the audible al...

Page 16: ...be either new or reconditioned All replaced parts or Products shall become the Property of G Tech This warranty shall not apply if the Product has been damaged by accident misuse abuse or as a result...

Page 17: ...ad write performance fault tolerant disk failure has insignificant impact on performance Content creation applications requiring high performance and data security 5 Disk striping with distributed par...

Reviews: