B. Assembly Instructions
Important:
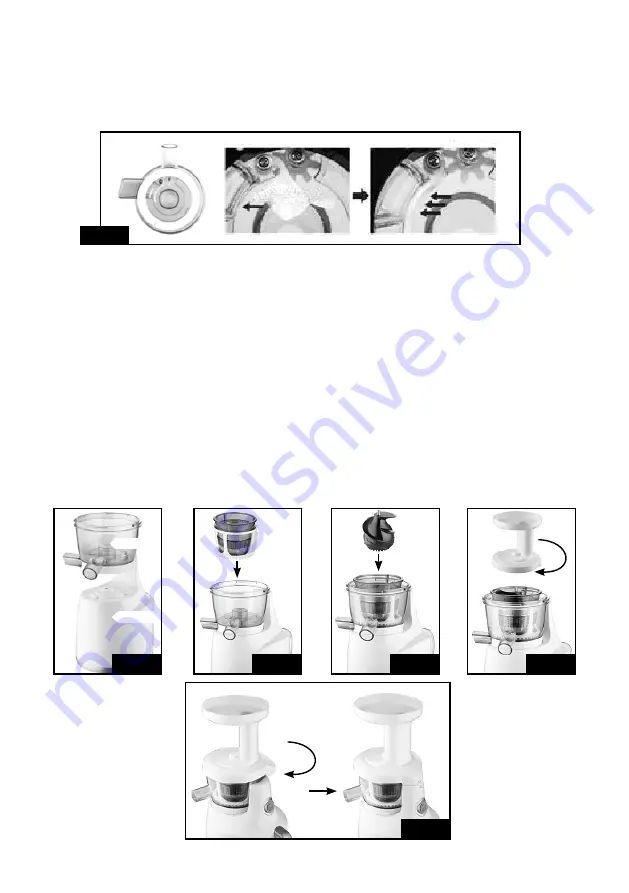
Prior to assembling the juicer please check this point: At the base of the bowl there
is a rubber stopper. When in place the stopper ensures all of the juice only exits via the juice outlet.
Before juicing always ensure that the rubber stopper is firmly in place. (Fig 2)
1. Assemble the bowl on the base. (Fig3)
A. Make sure the bowl is placed all the way into the shaft of the base.
2. Choose which strainer you need to use. The Yellow Strainer is a fine strainer and will redu-
ce the amount of pulp in your juice. The Orange Strainer is a coarse strainer and will increase
the amount of pulp in your juice. Insert the strainer into the spinning brush. Align the red dot
on the strainer with the red dot on the bowl and insert st spinning brush into the bowl.
When the dots are correctly aligned the st spinning brush will lock in place. (Fig 4)
3. Insert the squeezing screw into the strainer and turn until it drops into position. (Fig 5)
4. Assemble the hopper onto the bowl. (Fig 6)
A. Align the small arrow on the hopper with the red dot on the bowl.
B. Twist the hopper so that the plastic tab with the arrow on it points to the closed sign
on the base. (Fig 7)
Note:
The small arrow from part 4. A will no longer be aligned with the red dot once the hopper
is locked to the close position. (Fig 7)
Fig 2
Fig 3
Fig 4
Fig 7
Fig 5
Fig 6
bowl
base


