background image


10 

 4 screws (4). 
6)


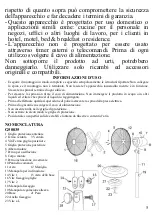
Insert the fan (3) onto the shaft (6) and secure the fixing screw of the fan (2) in its hole.


7)


Remove the fixing screw (16).  

8)


Place the front grid (1) in front of the rear grid (5) matching the holes on the grids. 

9)


Close the locking pins and fasten the two grids tightening the securing screw (16) previously removed. The 
fan is now correctly assembled. 

10)


To lift up the fan, loosen the height regulation knob (19), lift the head and tighten the knob. 


OPERATING 

Once finished assembling the unit, place the fan following the safety instructions, then plug it to the electrical 
outlet. By using control panel (10) the rotation power can be adjusted on different speeds. 

-


0: fan is OFF 

-


I: low speed 

-


II: medium speed 

-


III: high speed 


OSCILLATION 

The oscillation of the head is only possible when the fan is turned on and it can be activated by pressing the 
pin (7) downwards until it locks. Lifting the pin (7) until the locking function is disabled. It is recommended 
to enable or disable oscillation of the fan only when the unit is off. 
  

VERTICAL ADJUSTMENT 

To ensure a always good ventilation, the fan can be adjusted vertically. 
Turn off the fan and wait for the blades to stop. 

-


Loosen the knob (13) and tilt the head of the fan to the desired position. 

-


Tighten the knob (13) by holding the fan in that position. 


CLEANING 

Disconnect the plug from the electrical outlet before attempting any cleaning operation. 

Do not immerse the unit in water. In any case prevent splashes of water or other liquids reaching the motor 
body. Do not clean the unit with metallic sponges or abrasive cleaners, only use neutral detergents and a soft 
cloth moistened with water to clean the outer parts. 
Dry the product completely before operating the unit. 
 

TECHNICAL FEATURES 


Power supply: AC 230V

~

50Hz. Power 50W 


Fan diameter: 40cm 


3 operation speeds – Oscillation 


PORTUGUÊS

: ADVERTÊNCIAS  

As indicações seguintes são muito importantes no que se 
refere  à  instalação,  uso  e  manutenção  deste  aparelho; 
conserve com cuidado este manual para eventuais futuras 
consultas;  utilize  o  aparelho  apenas  do  modo  indicado 
neste  manual  de  instruções;  outro  tipo  de  utilização 

Summary of Contents for MARINO

Page 1: ...Ventilatore a colonna in metallo Metal stand fan Ventilateur MARINO MANUALE D USO MOD G50035 www g3ferrari it IT EN PT FR USER MANUAL...

Page 2: ...ristiche tecniche p 7 Trattamento dei rifiuti delle apparecchiature elettriche ed elettroniche p 20 ENG INDEX Symbols p 2 Safety instructions p 7 General information p 9 G50035 p 9 Assembling p 9 Oper...

Page 3: ...anti ad alta tensione non apritelo in nessun caso This symbol warns the user that un insulated dangerous voltage inside the system may cause an electrical shock Do not open the case Questo simbolo ind...

Page 4: ...potenziali fonti di pericolo inoltre ricordiamo che questi devono essere oggetto di raccolta differenziata Accertarsi che i dati di targa siano compatibili con quelli della rete elettrica l installaz...

Page 5: ...prodotto con mani bagnate o a piedi nudi Questo apparecchio pu essere utilizzato da bambini dagli 8 anni in su e da persone con ridotte capacit fisiche sensoriali o mentali o con mancanza di esperien...

Page 6: ...e la spina al termine di ogni utilizzo Per staccare la spina non tirare il cavo di alimentazione Non immergere il prodotto in acqua o in altri liquidi ed evitare che spruzzi di liquidi lo raggiungano...

Page 7: ...i perni di fissaggio e fissare le due griglie stringendo la vite di sicurezza 16 tolta precedentemente Il montaggio del ventilatore cos completato Per alzare il ventilatore allentare la Manopola rego...

Page 8: ...astic bags polystyrene foam nails staples etc within the reach of children as they are potential sources of danger always remember that they must be separately collected Make sure that the rating info...

Page 9: ...etc Always store it in a dry place This appliance can be used by children of 8 years and above and persons with reduced physical sensory or mental capabilities or lack of experience and knowledge if...

Page 10: ...otection grid 6 Drive shaft 7 Oscillation pin 8 Motor housing 9 Inclination pin 10 Control panel 11 Pole 12 Handle 13 Tilt knob 14 Screw 1 15 Base top 16 Front grid fixing screw 17 Screw 2 18 Fixing k...

Page 11: ...to enable or disable oscillation of the fan only when the unit is off VERTICAL ADJUSTMENT To ensure a always good ventilation the fan can be adjusted vertically Turn off the fan and wait for the blade...

Page 12: ...do a pot ncia m xima do aparelho indicada na placa uma errada instala o poder causar danos a pessoas animais ou objectos pelos quais o fabricante n o poder ser considerado respons vel Caso seja necess...

Page 13: ...nsorial ou mental ou ainda com falta de experi ncia na sua utiliza o desde que lhes seja assegurada uma adequada supervis o ou se tiverem sido instru das no uso do aparelho em seguran a as opera es de...

Page 14: ...ntados e fixados Para m xima seguran a realizar a instala o de uma completa e exaustiva NOMENCLATURA G50035 1 Grelha de protec o anterior 2 Fecho de ventoinha 3 Ventoinha 4 Parafusos grelha posterior...

Page 15: ...ota o do ventilador e por conseguinte a for a de ventila o 0 desligado I velocidade baixa II velocidade m dia III velocidade alta OSCILA O A oscila o horizontal do ventilador s poss vel quando o venti...

Page 16: ...ongles agrafages etc la port e des enfants car elles constituent des potentielles sources de danger en autre il faut rappeler que ces parties doivent tre objet de coll cte differenci de r sidus Certif...

Page 17: ...s ou encore en cas de court circuits dans ce cas l apporter l appareil a un centre d assistence autoris L appareil n est pas indiqu pour tre expos des conditions m t orologiques d favorables pluie ve...

Page 18: ...EMPLOI Ef ctuez l installation compl te en suivant soigneusement les instructions indiqu es sur Montage Ne connectez pas au s cteur el ctrique sans que l installation ne soit compl te Ne laissez pas l...

Page 19: ...le haut Faire coincider les trous sur la partie central de la grille avec ceux du corps moteur 8 et bloquer les deux parties avec les 4 vis 4 6 Mettez le ventilateur 3 sur l axe 6 et serrez le bouton...

Page 20: ...d eau ou n importe quel autre liquide atteignent le bloc du moteur Nettoyez l ext rieur de l appareil avec un chiffon humide et non abrasif vitant les detergents ou agents chimiques abrasives et aggre...

Page 21: ...to protect the environment 2002 96 EC 2003 108 EC 2002 95 EC and must be properly disposed at the end of its lifetime If you need further information ask for the dedicated waste disposal areas at you...

Page 22: ...21...

Page 23: ...22...

Page 24: ...l si riserva il diritto di apportare a questi apparecchi modifiche ELETTRICHE TECNICHE ESTETICHE e o sostituire parti senza alcun preavviso ove lo ritenesse pi opportuno per offrire un prodotto sempr...

Reviews: