background image

13 


6 INSTRUCCIONES DE USO DE LA CALDERA 


6.1 ENCENDIDO INICIAL 

PRECAUCIÓN:LA POTENCIA MÁXIMA LIMITADA DEBE SER AJUSTADA ANTES DEL ENCENDIDO 

INICIAL. LA CALDERA NUNCA DEBE SER ENCENDIDA CON LA INSTALACIÓN DE 

CALEFACCIÓN O EL DEPÓSITO DE ACS VACÍOS. PUEDEN OCURRIR DAÑOS. 


Cuando la caldera se conecta por primera vez se completará 

un auto diagnóstico general y si se detecta un fallo será indicado en 

el display con un código. 


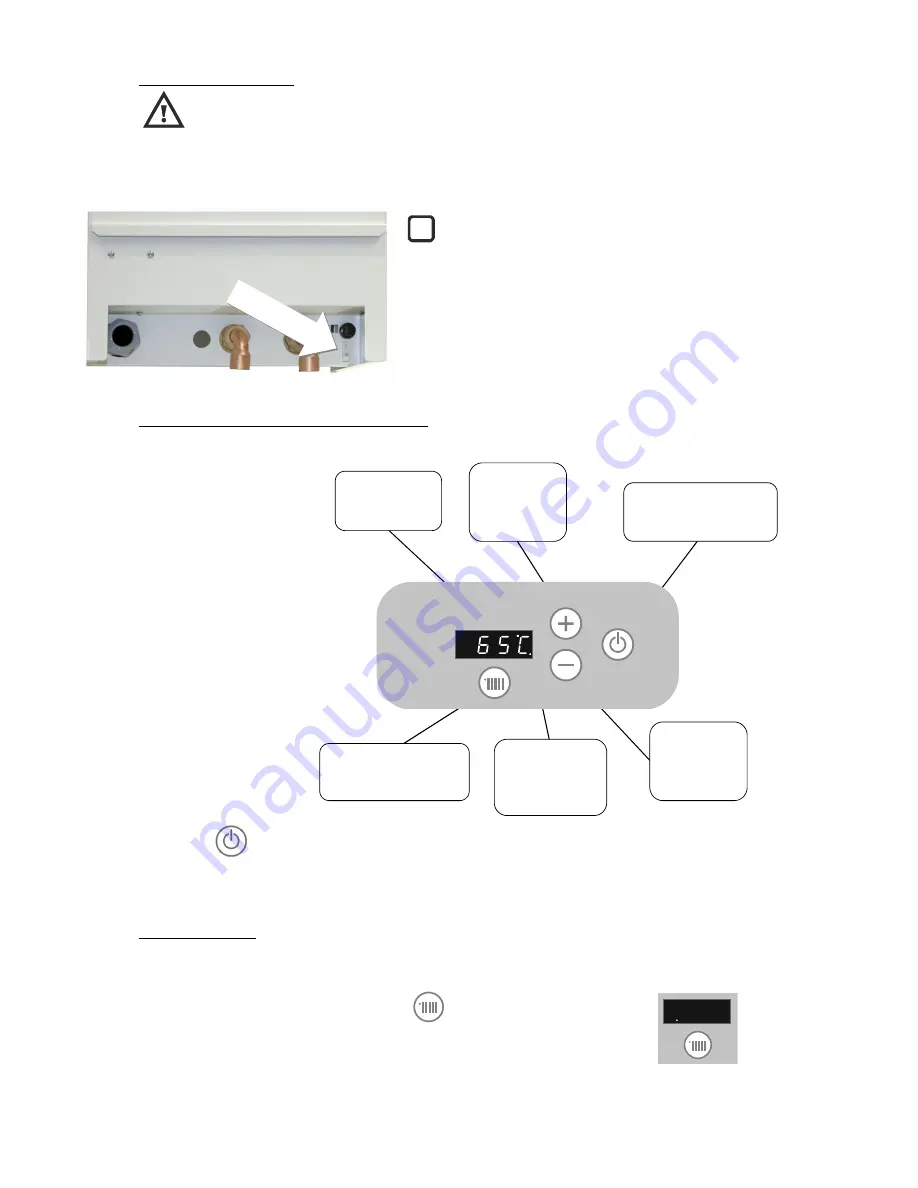
Encienda la caldera mediante el interruptor de 
encendido/apagado situado en la parte posterior. 


6.2 DESCRIPCIÓN DEL CUADRO DE MANDOS 


Pulse la tecla

para encender la caldera. Esta misma tecla apaga la caldera al pulsar de nuevo. 


Si la función de calefacción no está encendida el display correspondiente sólo mostrará un punto rojo. 


6.3 CALEFACCIÓN 

 
Primero asegúrese de que los controles externos como termostatos de ambiente se encuentran demandando 

calor. 

Encienda la función calefacción pulsando la tecla

. Pulsándola de nuevo 

apagará la función calefacción y el display mostrará otra vez sólo un punto 

rojo. 
 

i

Aumentar 

temperatura 

del agua de 

calefacción 

Temperatura de 

calefacción y 

otros mensajes

Tecla encendido/apagado 

bloqueo/desbloqueo de 

teclado 

Tecla encendido/apagado 

calefacción 

Indicador  de 

funcionamiento 

resistencias 

calefacción

Disminuir 

temperatura 

del agua de 

calefacción 

Summary of Contents for MATTIRA MAS15

Page 1: ... Cualquier problema fallo o daño ocasionado por la no observancia de estas instrucciones no será cubierto por la garantía del fabricante Este manual debe ser guardado con el aparato por el usuario para futuras consultas Please read these instructions before installing or using this appliance for the first time These instructions must be followed for the safe installation of the boiler Any problem ...

Page 2: ...ÁXIMA 10 5 3 ENJUAGE CIRCUITO DE CALEFACCIÓN 11 5 4 CALEFACCIÓN LLENADO INICIAL 12 5 5 COMPROBACIÓN DE LA BOMBA 12 5 6 VISUALIZACIÓN DE OTROS DATOS 12 6 INSTRUCCIONES DE USO DE LA CALDERA 6 1 ENCENDIDO INICIAL 13 6 2 DESCRIPCIÓN DEL CUADRO DE MANDOS 13 6 3 CALEFACCIÓN 14 6 4 MODO ANTI HIELO 14 6 5 PARÁMETROS DE USUARIO 15 6 6 MODULACIÓN EN CALEFACCIÓN 15 6 7 REGULACIÓN DE LA CALEFACCIÓN EN FUNCIÓN...

Page 3: ...nos 3 mm o El circuito de alimentación de la caldera debe incorporar un interruptor diferencial o Esta caldera debe ser conectada a tierra o Todos los modelos incorporan distintos dispositivos de seguridad En caso de actuación de uno o varios de ellos acuda a la sección 7 PROBLEMAS Y SOLUCIONES o La presencia en el aire de humo polvo y polución puede con el tiempo manchar las paredes y zonas próxi...

Page 4: ...deben ser adecuados para soportar el peso total la caldera MAS pesa 50kg Mantenga suficiente espacio alrededor para trabajos de mantenimiento y reparaciones La caldera debe estar protegida de humedades La instalación debe cumplir con la normativa vigente si se instala en baños La protección de la caldera es IP20 IP2X Esta caldera no está diseñada para funcionar a la intemperie La caldera debe ser ...

Page 5: ...a de tal forma que los interruptores u otros controles no puedan ser tocados por alguien que esté usando el baño o la ducha No debe existir posibilidad de que el agua gotee o salpique a la caldera Existe normativa específica para la instalación en baños o en zonas de duchas Cuando sea posible la caldera debe instalarse lo más cerca posible de los puntos de suministro de agua caliente Los cables de...

Page 6: ...rdazas o extensiones que pueden causar daños o fugas de agua Instale purgadores en los radiadores en los puntos altos de la instalación Calefacción Ida y Retorno Estas conexiones son de para la conexión de tubería de 22 mm En este punto deben instalarse llaves de corte que permitan aislar la caldera sin tener que vaciar toda la instalación Las válvulas deben tener el calibre adecuado para no obstr...

Page 7: ... la bomba Color verde Funcionamiento correcto Parpadeo verde rojo Baja tensión U 180V sobretensión U 253V sobretemperatura del módulo Parpadeo rojo Bomba bloqueada 4 10 CONEXIÓN ELÉCTRICA Conexión al suministro eléctrico Las calderas MAS15 y MAS18 deben ser instaladas en redes de suministro que tengan una impedancia de no más de 0 25 j0 25Ω Las calderas MAS15 y MAS18 cumplen con los requisitos téc...

Page 8: ...uestra a continuación Las bornas de conexión se encuentran después de retirar el panel frontal de la caldera Los cables de alimentación deben ser conducidos de forma segura a este punto a través de la protección pasamuros de la parte posterior de la caldera PRECAUCIÓN Una conexión incorrecta en las bornas de conexión puede destruir la electrónica Asegúrese de que los cables están apretados de mane...

Page 9: ...NEXIÓN DE UNA SONDA DE TEMPERATURA EXTERIOR Una sonda de temperatura en el exterior de la vivienda puede ser conectada a la caldera para poder activar el modo regulación de la calefacción en función de la temperatura exterior Conecte una termistancia NTC de 10kΩ a 25ºC en los bornes marcados con T EXT en la placa principal Ver 12 ESQUEMAS ELÉCTRICOS 5 PUESTA EN MARCHA 5 1 PARÁMETROS DE INSTALACIÓN...

Page 10: ...da es posible activar la calefacción automática Valores posibles 1 activada 0 desactivada TIMAX Temperatura máxima de impulsión del agua en calefacción AUTO TIMIN Temperatura mínima de impulsión del agua en calefacción AUTO TEMAX Temperatura exterior a partir de la cual el agua en calefacción será impulsada a TIMIN TEMIN Temperatura exterior por debajo de la cual el agua en calefacción será impuls...

Page 11: ...LDERA PARA VACIAR O ENJUAGAR LA INSTALACIÓN PORQUE LAS IMPUREZAS Y PARTICULAS ATRAPADAS PODRÍAN AFECTAR AL FUNCIONAMIENTO CORRECTO DE LA VÁLVULA Utilizar el punto de vaciado de la instalación Potencia máxima limitada a INTENSIDAD MÁXIMA L1 INTENSIDAD MÁXIMA L2 INTENSIDAD MÁXIMA L3 18kW 26 0A 26 0A 26 0A 15kW 26 0A 26 0A 13 0A 12kW 26 0A 13 0A 13 0A 9kW 13 0A 13 0A 13 0A 6kW 13 0A 13 0A 3kW 13 0A P...

Page 12: ...comprobar que la bomba está convenientemente purgada y que gira libremente Para purgar la bomba encienda la caldera y mediante el selector de la bomba alterne la posición III con la posición Min cada quince segundos Realice esta operación durante 5 minutos Si el exceso de aire permanece en la instalación o no existe caudal suficiente la caldera mostrará fallo en el display con el código E3 Un indi...

Page 13: ...S Pulse la tecla para encender la caldera Esta misma tecla apaga la caldera al pulsar de nuevo Si la función de calefacción no está encendida el display correspondiente sólo mostrará un punto rojo 6 3 CALEFACCIÓN Primero asegúrese de que los controles externos como termostatos de ambiente se encuentran demandando calor Encienda la función calefacción pulsando la tecla Pulsándola de nuevo apagará l...

Page 14: ...odificar una serie de parámetros para ajustar algunas funciones de la caldera a las necesidades de cada usuario Para acceder al menú de parámetros de usuario estando la caldera en OFF pulsar la tecla y la tecla simultáneamente durante unos segundos Para avanzar o retroceder por el menú utilizaremos las teclas y respectivamente Para modificar un parámetro pulsaremos la tecla y veremos el valor actu...

Page 15: ...interior de la vivienda Para poder activar este modo de funcionamiento de la calefacción será necesario que el instalador conecte una sonda de temperatura exterior no suministrada y activar los parámetros P05 y P11 Existen cuatro parámetros que definen esta función TIMAX Temperatura máxima a la que la caldera impulsa el agua del circuito de calefacción En el ejemplo TIMAX 80ºC TIMIN Temperatura mí...

Page 16: ...visualizaran alternativamente cada 10 segundos la temperatura real del agua y el tiempo que falta para abandonar este estado En cualquier momento será posible cancelar este estado sin más que apagar y volver a encender la caldera 6 8 BLOQUEO DEL CUADRO DE MANDOS Es posible bloquear las teclas del panel del control para prevenir desajustes no deseados Manteniendo pulsada la tecla por unos segundos ...

Page 17: ...letamente Comprobar purgador automático esté abierto Purgar la bomba 5 5 Error E3 continuación Pérdidas en la instalación demasiado elevadas o instalación cerrada Probar con la bomba a velocidad III Comprobar la bomba 4 9 Abrir todas las válvulas Instalar by pass Error E8 Sensor temperatura EXTERIOR Sensor de temperatura EXTERIOR defectuoso o no presente Elemento opcional Comprobar la presencia de...

Page 18: ... instalación Será necesario rellenar hasta los 1 5 bar Bomba parada o bloqueada Comprobar tal y como se muestra en el punto 5 5 Bloqueo en el circuito de calefacción por residuos u objetos extraños Caudal insuficiente debido a pérdida de carga por estrechamientos diámetro de tuberías insuficiente demasiadas curvas o llaves de corte de poca sección interna Válvulas termostáticas de los radiadores c...

Page 19: ...ntro de un sistema de gestión ambiental certificado Todas las fases del proceso productivo desde su diseño se realizan teniendo en cuenta las máximas exigencias medioambientales Por ejemplo la selección de materiales se efectúa garantizando su biodegradabilidad reutilización y reciclaje Al finalizar la larga vida útil de esta caldera se debe entregar al punto de recolección de equipos eléctricos p...

Page 20: ... A 43 5 Intensidad máxima cuando limitada a 9kW A 39 1 39 1 Intensidad máxima cuando limitada a 8kW A 34 8 Intensidad máxima cuando limitada a 7kW A 30 4 Intensidad máxima cuando limitada a 6kW A 26 1 26 1 Intensidad máxima cuando limitada a 5kW A 21 7 Intensidad máxima cuando limitada a 4kW A 17 4 Intensidad máxima cuando limitada a 3kW A 13 0 13 0 Peso kg 32 32 Calderín de calefacción de acero c...

Page 21: ...ACA PRINCIPAL K1 En el modelo CM18i las seis resistencias son de 3000W RESISTENCIA CALEFACCIOÓN CALEFACCIÓN A C S limitador térmico Interruptor general Limitador térmico calefacción 2000W 3000W 2000W 3000W 2000W 3000W FUSIBLE detector de caudal termostato de ambiente sonda de ida calefacción TR3 TR4 TR5 TR6 TR2 TR1 R6 R5 R4 R3 R2 R1 sonda retorno calefacción 230V N L PE 230V En la conexión 230V ut...

Page 22: ...AXIMUM OUTPUT 9 5 3 HEATING SYSTEM FLUSHING 10 5 4 HEATING SYSTEM INITIAL FILLING 11 5 5 PUMP CHECKING VENTING 11 5 6 MORE INSTALLATION DATA 11 6 OPERATING THE BOILER 12 6 1 INITIAL SWITCHING ON 12 6 2 CONTROL PANEL DESCRIPTION 12 6 3 CENTRAL HEATING OPERATION 13 6 4 ANTI FREEZE MODE 13 6 5 USER PARAMETERS 14 6 6 HEATING MODULATION FEATURE 14 6 7 AUTO HEATING REGULATION 14 6 8 BLOCKING THE CONTROL...

Page 23: ...ut off switch with a separation between the contacts of at least 3 mm o The electricity supply circuit must incorporate a Residual Current Device o This boiler must be earthed o All the models incorporate different safety elements If one or more of them are activated consult the section 7 TROUBLE SHOOTING o In time the presence in the air of smoke dust and pollution may stain the walls and areas c...

Page 24: ...l weight MATTIRA MAS boiler when full is 50kg Allow sufficient clearance and access for operating maintenance and repair work Boiler must be protected from any water moisture or dampness Where installations are in a bathroom the installation must comply with the relevant electrical regulations Boiler electrical protection rating is IP20 IP2X This boiler is not designed to be installed in the open ...

Page 25: ...e and frost The boiler must be sited so that the boiler and controls are not accessible to any persons whilst using a bath or shower and there should be no possibility of water dripping or splashing onto the boiler or controls Electrical safety regulations for clearances must be followed if installed in a bathroom or shower area Where possible the boiler should be sited to minimize the pipe distan...

Page 26: ... wrenches extensions or unsuitable tools that may cause damage or water leaks Install purges in the radiators and high points of the installation Heating Flow Return These connections are for connection to 22mm pipe Service valves should be installed at this position to allow the boiler to be isolated for maintenance without the need to drain the entire system The valves should be of sufficiently ...

Page 27: ...en correct operation Green red flashing Lower voltage U 180V overvoltage U 253V Module overheating Red flashing pump blocked 4 10 ELECTRICAL CONNECTIONS Connection to Mains Supply The MAS15 and MAS18 boilers must be installed in premises having a system impedance of not more than 0 25 j0 25Ω The MAS15 and MAS18 boilers comply with the technical requirements of EN 61000 3 3 The MAS15 and MAS18 boil...

Page 28: ...rminals of the connection block as shown The terminal connection block is accessed after removing the boiler front panel The supply cable should be safely routed to this point through the cable entry point on the right hand bottom of the boiler CAUTION A mains voltage at the incorrect plug terminal can destroy the electronics Make sure the connectin cables are securely fastened to the plug termina...

Page 29: ...TEMPERATURE SENSOR CONNECTION An outdoor temperature sensor must be fitted to the boiler to activate the auto heating regulation depending on the outdoors temperature Connect a NTC sensor 10kΩ 25ºC across the terminals marked T EXT on the PDC See 12 WIRING DIAGRAMS 5 COMISSIONING 5 1 INSTALLATION PARAMETERS These parameters must be adjusted by the installer to match the requirements of the install...

Page 30: ...vate the auto heating regulation by shifting this parameter value to 1 TIMAX Maximum water flow temperature in AUTO heating mode TIMIN Minimum water flow temperature in AUTO heating mode TEMAX Outdoor temperature from which the water flow temperature will be TIMIN TEMIN Outdoor temperature below which the water flow temperature will be TIMAX 5 2 LIMITING BOILER MAXIMUM OUTPUT The boiler is supplie...

Page 31: ...IMPORTANT NOT TO USE THE BOILER PRESSURE RELIEF VALVE TO DRAIN OR FLUSH THE SYSTEM AS TRAPPED DEBRIS WILL CAUSE INCORRECT OPERATION A PURPOSE PROVIDED DRAIN POINT SHOULD BE USED Maximum output limited to MAXIMUM CURRENT L1 MAXIMUM CURRENT L2 MAXIMUM CURRENT L3 18kW 26 0A 26 0A 26 0A 15kW 26 0A 26 0A 13 0A 12kW 26 0A 13 0A 13 0A 9kW 13 0A 13 0A 13 0A 6kW 13 0A 13 0A 3kW 13 0A Maximum output limited...

Page 32: ...display fault E3 it is necessary to check that the pump is properly vented and spinning freely To purge the pump turn on the boiler and with the pump selector alternate between positions III and Min every fifteen seconds Keep this operation for 5 minutes If excess air remains in the system or there is insufficient pressure or flow rate the boiler will fail to operate and display fault E3 A LED ind...

Page 33: ...ION Push the button to start the boiler up The same button will turn the boiler off when pushed again If the heating function is not selected the screen will not display a value but just a red dot 6 3 CENTRAL HEATING OPERATION First ensure that any external controls such as room thermostat or time clock are demanding heat To select the heating function push the button Pushing again will switch the...

Page 34: ...eeze mode i e if the boiler temperature falls to 7ºC the heating will activate automatically 6 5 USER PARAMETERS The user can change a number of parameters to set some functions of the boiler to the needs of each customer To access the user parameters menu with front display OFF press and hold the and buttons for at least 5 seconds To move forward or backward through the menu use the and buttons r...

Page 35: ... of the house The room thermostat continues to regulate the temperature inside the house To activate this mode of heating the installer will need to connect an external temperature sensor not supplied and activate the P05 and P11 parameters There are four parameters that define this function TIMAX Maximum water flow temperature in AUTO heating mode In the above example TIMAX 80ºC TIMIN Minimum wat...

Page 36: ...conds At any time it is possible to cancel this state just by turning off and restarting the boiler 6 8 BLOCKING THE CONTROLS It is possible to lock the buttons of the control panel to prevent any adjustment By keeping the button pressed down for a few seconds the control panel will be locked The control buttons of the boiler will be locked and no button will respond when pressed Internally all th...

Page 37: ...e thoroughly Check automatic air valve open Vent pump sect 5 5 System resistance too high or blockage Check pump speed 3 Check pump duty sect 4 9 Open all radiator valves Install system by pass Fault E8 displayed Outdoor temperature sensor Defective outdoor temperature sensor or not present This sensor is optional Check connections Replace sensor if necessary Heating system water discharging from ...

Page 38: ...illing to 1 5bar Pump not circulating or seized Check as shown Sect 5 5 Blockage in heating circuit from debris or a foreign object in the boiler or pipe work Insufficient flow rate caused by restrictions such as insufficient size pipe work too many bends or isolation valves with restricted bore Closed radiator valves Thermostatic It may be sufficient to maintain one radiator with permanently open...

Page 39: ...factured within a certified environmental management system From the design stage all the production phases are performed taking into account the most rigorous environmental requirements For example the selection of materials involves guaranteeing their biodegradability re use and recycling When this boiler s long useful life is over it must be handed in to an electrical equipment collection point...

Page 40: ...2 Maximum converted intensity at 11kW A 47 8 Maximum converted intensity at 10kW A 43 5 Maximum converted intensity at 9kW A 39 1 39 1 Maximum converted intensity at 8kW A 34 8 Maximum converted intensity at 7kW A 30 4 Maximum converted intensity at 6kW A 26 1 26 1 Maximum converted intensity at 5kW A 21 7 Maximum converted intensity at 4kW A 17 4 Maximum converted intensity at 3kW A 13 0 13 0 Wei...

Page 41: ...FACCION TR3 TR4 TR5 TR6 TR2 TR1 R6 R5 R4 R3 R2 R1 K1 2000W 3000W 2000W 3000W 2000W 3000W 230V N L PE 230V PE L1 L2 L3 N 3X400V N BOMBA Use connecting bridges when connection is 230V single phase HEATING flow temp probe HEATING return temp probe heating flow detector ambient thermostat FUSE CIRCULATING PUMP HEATING models CM18i have the six heating elements of 3000W HEATING RESISTANCE DHW thermal l...

Page 42: ...21 NOTAS NOTES ...

Page 43: ...ndards and regulations in force and especially to Seguridad EN 60335 1 2012 A11 2014 Safety EN 60335 2 35 2002 A1 2007 A2 2011 EN 50106 2008 EMC EN 55014 1 2006 A1 2009 A2 2011 EN 55014 2 1997 A1 2001 A2 2008 EN 61000 3 2 2006 A1 2009 A2 2009 EN 61000 3 3 2008 Información adicional Additional information El producto aquí citado se halla en conformidad con la Directiva de Baja Tensión 2014 35 UE y ...

Page 44: ...i este producto no se manipula de forma adecuada Para obtener información más detallada sobre el reciclaje de este producto póngase en contacto con la administración de su ciudad con su servicio de desechos del hogar o con la tienda donde compró el producto Estas disposiciones solamente son válidas en los países miembros de la UE The symbol on the product or in its packaging indicates that this pr...

Reviews: