Wooden studs run vertically inside the wall, 16 inches
apart, behind the drywall or plaster. The wall bracket
must be mounted to a wooden stud, or the bracket could
fall out and damage your display or cause personal harm.
1.
Use a stud finder to locate the edges of the
wooden stud, and mark the center.
2.
Place the wall bracket template up to the
marked locations, and tape it to the wall. Use the
included bubble level to make sure the template
is level before drilling. Use a pencil to mark the
two drilling holes for the anchor screws, and then
apply a piece of tape over the marks.
3.
Use a 3/16-inch (4.5 mm) wood drill bit to
predrill the marked spots 2.2 inches (55 mm)
deep, and then clean out the debris from the
holes. Remove the template from the wall.
4.
Attach the bracket to the wall by inserting the
two anchor screws through the washers and
the wall bracket’s mounting holes, and screw
them into the predrilled support holes until
secure. Do not overtighten the screws.
8
Attaching the Display
Mounting Plate
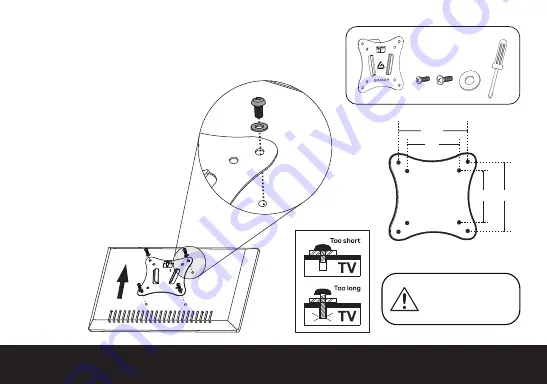
Selecting the Right VESA
Mounting Hardware for Your
Display
A variety of screws are included to
fit VESA standards on the backs of
most displays. Select the M4 or M5
screws that best fit your display.
Hand-thread the screws to
determine the correct diameter.
Install the mounting plate directly
to your display.
B
C
A
4X
4X
4X
VESA
PATTERNS
75
100
100
75
If the screw is too short,
it may not hold the
display. If it’s too long, it
may damage the display.


