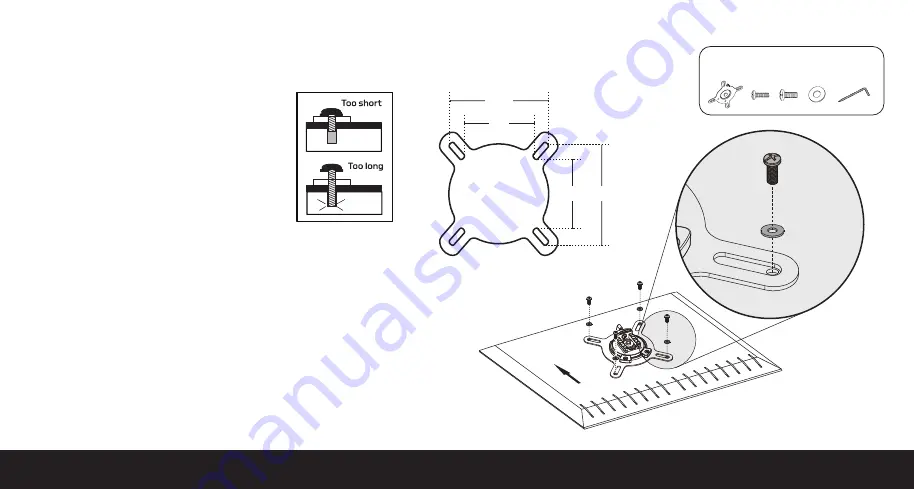
Important!
Before you attach the VESA plate,
hand thread one of the M-A or M-B screws to
determine which one fits your monitor.
Make sure the screw is also not too long or too
short. If the screw is too long, it may damage
the display. If it’s too short, it may not hold it.
Place an M-C washer on each of the screws, and install the VESA
plate directly to your monitor by tightening the screws with hex
key (N).
Important!
The screws should be tightened until snug. Don’t
overtighten.
10
1.
Once the VESA plate is securely attached to the
monitor, slide it into the VESA receiver.
2.
Turn the VESA lock to the locked position.
Important!
The VESA lock secures the VESA plate
inside the VESA mount and ensures the monitor won’t
lift out of the mount when you adjust the monitor
height.
To remove the monitor, unlock the VESA lock and lift
the monitor off the mount.
You can adjust the arm tension to balance the arm according to the weight of your monitor.
Attaching the VESA Plate to the Monitor
M-C
1X
M-A
4X
M-B
4X
C
1X
N
1X
VESA
PATTERNS
75
100
75 100
1.
Remove the end cap from the arm to expose
the arm tension screw.
2.
With the monitor attached, hold the arm
horizontally so it’s parallel with the desktop.
•
If the arm drops, tighten the arm tension screw by
turning it clockwise with hex key (O) until the monitor
stays in the horizontal position.
•
If the arm rises, loosen the arm tension screw by
turning it counterclockwise with hex key (O) until the
monitor stays in the horizontal position.
Important!
Do not overtighten the tension screws.
To prevent damage to the tension indicator, never let the
red indicator line move beyond the + and – signs at the
ends of the indicator.
Tip:
Always use one hand to support the monitor from
below while adjusting the arm tension.
3.
When the arm is balanced, replace the end cap.


