
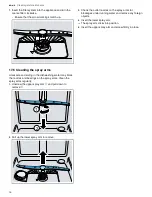

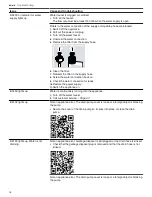


STATEMENT OF LIMITED PRODUCT WARRANTY
en-us
49
¡
5 year limited warranty on dish racks: BSH will replace
the upper or lower dish rack (excluding rack
components), if the rack proves defective in materials or
workmanship (excludes labor charges).
¡
Lifetime warranty against stainless steel rust through:
BSH will repair or replace your dishwasher with the
same model or a current model that is substantially
equivalent or better in functionality, if the inner liner
should rust through (excludes labor charges).
¡
BSH will repair or replace the stainless steel door if the
door should rust through (excludes labor charges).
22.4 Repair/replace as your exclusive
remedy
During this warranty period, Gaggenau or one of its
authorized service providers will repair your Product
without charge to you (subject to certain limitations stated
herein) if your Product proves to have been manufactured
with a defect in materials or workmanship. If reasonable
attempts to repair the Product have been made without
success, then Gaggenau will replace your Product
(upgraded models may be available to you, in Gaggenau's
sole discretion, for an additional charge). Nothing in this
warranty requires damaged or defective parts to be
replaced with parts of a different type or design than the
original parts. All removed parts and components shall
become the property of Gaggenau at its sole option. All
replaced and/or repaired parts shall assume the identity of
the original part for purposes of this warranty and this
warranty shall not be extended with respect to such parts.
Gaggenau's sole liability and responsibility hereunder is to
repair manufacturer-defective Product only, using a
Gaggenau authorized service provider during normal
business hours. For safety and property damage
concerns, Gaggenau highly recommends that you do not
attempt to repair the Product yourself, or use a non-
authorized service provider; Gaggenau will have no
responsibility or liability for damage resulting from repairs
or work performed by a non-authorized service provider.
Authorized service providers are those persons or
companies that have been specially trained on Gaggenau
products, and who possess, in Gaggenau's opinion, a
superior reputation for customer service and technical
ability (note that they are independent entities and are not
agents, partners, affiliates or representatives of
Gaggenau). Nevertheless, taking your product to be
serviced by a repair shop that is not affiliated with or an
authorized dealer of Gaggenau will not void this warranty.
Also, using third-party parts will not void this warranty.
Notwithstanding the foregoing, Gaggenau will not incur
any liability, or have responsibility, for the Product if it is
located in a remote area (more than 100 miles from an
authorized service provider) or is reasonably inaccessible,
hazardous, threatening, or treacherous locale,
surroundings, or environment; in any such event, if you
request, Gaggenau would still pay for labor and parts and
ship the parts to the nearest authorized service provider,
but you would still be fully liable and responsible for any
travel time or other special charges by the service
company, assuming they agree to make the service call.
Further, to the extent you have installed the Product in a
difficult-to-access location or have otherwise installed
temporary or permanent fixtures that create barriers to
accessing or removing the Product, Gaggenau will not
incur any liability for, or have responsibility, for work or
costs associated with moving the Product or otherwise
creating access to the Product in order to repair or replace
it. All such costs shall be your sole responsibility.
22.5 Out of warranty product
Gaggenau is under no obligation, at law or otherwise, to
provide you with any concessions, including repairs,
prorates, or Product replacement, once this warranty has
expired.
22.6 Warranty exclusions
The warranty coverage described herein excludes all
defects or damage that are not the direct fault of
Gaggenau, including without limitation, one or more of the
following:
¡
Use of the Product in anything other than its normal,
customary and intended manner (including without
limitation, any form of commercial use, use or storage of
an indoor product outdoors, use of the Product in
conjunction with air or water-going vessels).
¡
Any party's willful misconduct, negligence, misuse,
abuse, accidents, neglect, improper operation, failure to
maintain, improper or negligent installation, tampering,
failure to follow operating instructions, mishandling,
unauthorized service (including selfperformed "fixing" or
exploration of the appliance's internal workings).
¡
Adjustment, alteration or modification of any kind.
¡
A failure to comply with any applicable state, local, city,
or county electrical, plumbing and/or building codes,
regulations, or laws, including failure to install the
product in strict conformity with local fire and building
codes and regulations.
¡
Ordinary wear and tear, spills of food, liquid, grease
accumulations, or other substances that accumulate on,
in, or around the Product.
¡
Any external, elemental and/or environmental forces
and factors, including without limitation, rain, wind,
sand, floods, fires, mud slides, freezing temperatures,
excessive moisture or extended exposure to humidity,
lightning, power surges, structural failures surrounding
the appliance, and acts of God.
¡
Service calls to correct the installation of your Product,
to instruct you how to use your Product, to replace
house fuses or correct house wiring or plumbing.
¡
Removal and replacement of trim or decorative panels
that interfere with servicing the Product.
¡
Damage or defects caused by labor or parts installed by
any non-authorized service provider, unless approved
by Gaggenau before service is performed.
In no event shall Gaggenau have any liability or
responsibility whatsoever for damage to surrounding
property, including cabinetry, floors, ceilings, and other
Summary of Contents for 400 Series
Page 1: ...en us Use and Care Manual DF480700F Dishwasher Gaggenau...
Page 51: ......


