background image

3

Important safety information

Read these instructions carefully. Only then will 
you be able to operate your appliance safely and 
correctly. Retain the instruction manual and 
installation instructions for future use or for 
subsequent owners.
The appliance can only be used safely if it is 
correctly installed according to the safety 
instructions. The installer is responsible for 
ensuring that the appliance works perfectly at its 
installation location.
This appliance is intended for domestic use and 
the household environment only. The appliance 
is not intended for use outside. Do not leave the 
appliance unattended during operation. The 
manufacturer is not liable for damage which is 
caused by improper use or incorrect operation.
This appliance is intended for use up to a 
maximum height of 2000 metres above sea level.
This appliance may be used by children over the 
age of 8 years old and by persons with reduced 
physical, sensory or mental capabilities or by 
persons with a lack of experience or knowledge 
if they are supervised or are instructed by a 
person responsible for their safety how to use 
the appliance safely and have understood the 
associated hazards.
Children must not play with, on, or around the 
appliance. Children must not clean the 
appliance or carry out general maintenance 
unless they are at least 15 years old and are 
being supervised.
Keep children below the age of 8 years old at a 
safe distance from the appliance and power 
cable.
Check the appliance for damage after 
unpacking it. Do not connect the appliance if it 
has been damaged in transport.
This appliance is not intended for operation with 
an external clock timer or a remote control.

Danger of suffocation!

Packaging material is dangerous to children. 
Never allow children to play with packaging 
material.

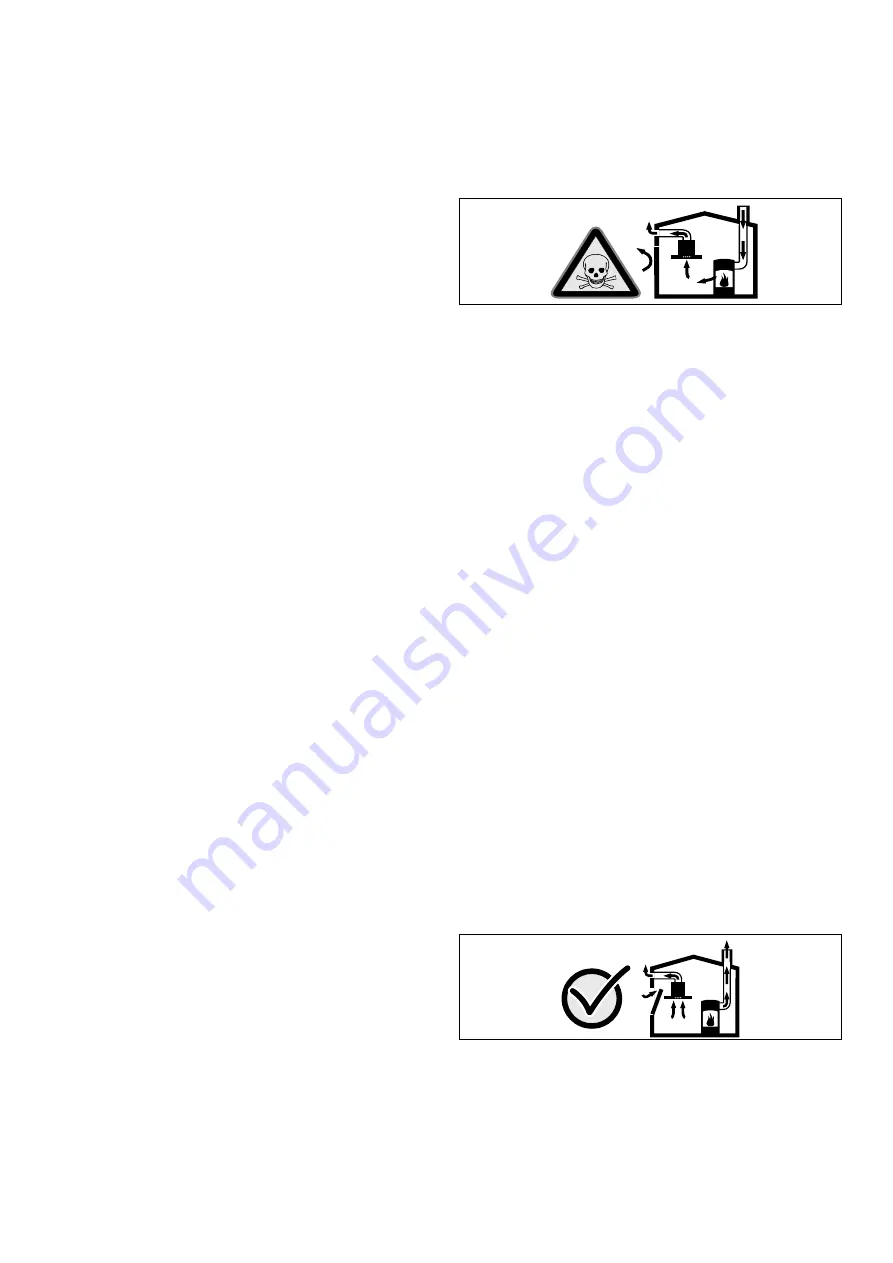
Danger of death!

Risk of poisoning from flue gases that are drawn 
back in.

Always ensure an adequate air supply in the 
room if the appliance is being operated in air 
extraction mode at the same time as a non-room-
sealed heat-producing appliance.

Non-room-sealed heat-producing appliances 
(e.g. gas-, oil-, wood- or coal-powered heaters, 
continuous flow heaters or water heaters) draw 
in combustion air from the room in which they 
are installed and discharge the exhaust gases 
into the open through an exhaust gas system 
(e.g. a chimney).
While the ceiling ventilation is switched on, air is 
extracted from the kitchen and adjacent rooms – 
without sufficient supply air, this causes a 
vacuum. Poisonous gases from the chimney or 
the extraction shaft are drawn back into the 
living space.

Therefore, there must always be an 
adequate air supply.

A supply-/exhaust-air wall box alone will not 
ensure compliance with the limit.

It is therefore only possible to safely operate the 
appliance if the vacuum in the installation room 
of the heat-producing appliance does not 
exceed 4 Pa (0.04 mbar). This can be achieved 
when the air needed for combustion is able to 
enter through openings that cannot be sealed, 
for example through doors, windows, supply-/
exhaust-air wall boxes or by other technical 
means.

In any case, consult a chimney sweep. They are 
able to assess the house's entire ventilation 
setup and will suggest the ventilation measures 
suitable for you.

Summary of Contents for AC 402

Page 1: ...Gaggenau Gaggenau Instruction manual Instrucciones de uso Instru es de servi o AC 402 462 472 482 Ceiling ventilation Ventilaci n del techo Ventila o de teto...

Page 2: ...l 7 Remote control 7 Setting the fan 7 Intensive setting 7 Run on function 8 Interval ventilation 8 Saturation display 8 Lighting 8 Safety shut off 8 Cleaning and maintenance 9 Trouble shooting 12 Rep...

Page 3: ...Do not connect the appliance if it has been damaged in transport This appliance is not intended for operation with an external clock timer or a remote control Danger of suffocation Packaging material...

Page 4: ...ers that do not exceed the maximum total output of 18 kW If the total output exceeds 12 kW the local regulations regarding room ventilation room size and the combination of ventilation appliances with...

Page 5: ...into the electronic circuitry Never clean operator controls with a wet cloth Surface damage due to incorrect cleaning Clean stainless steel surfaces in the direction of the grain only Do not use any s...

Page 6: ...installation rooms which contain heating appliances Before conveying the exhaust air into a non functioning smoke or exhaust gas flue obtain the consent of the heating engineer responsible If the exh...

Page 7: ...corresponding fan setting Note When using the remote control you can only switch the fan on by pressing button 1 2 3 or Press the button to switch the fan off Switching off Press the button Intensive...

Page 8: ...3 2 Press the button twice The button and the button for the fan setting selected flash alternately The interval ventilation is switched on Switching off Press the button The interval ventilation is...

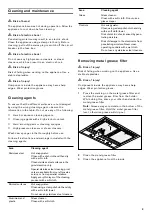
Page 9: ...stepladder m Risk of injury Components inside the appliance may have sharp edges Wear protective gloves 1 Press the marking on the metal grease filter and remove the metal grease filter from the holde...

Page 10: ...e ordered via the online shop product no 00311297 Spray the dirty metal grease filters with the degreaser and leave it to work for up to five minutes Then rinse thoroughly Observe the instructions for...

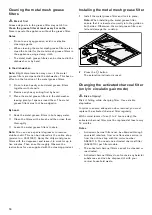
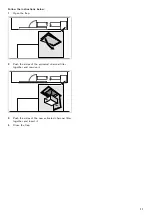
Page 11: ...w the instructions below 1 Open the flap 2 Push the sides of the activated charcoal filter together and remove it 3 Push the sides of the new activated charcoal filter together and insert it 4 Close t...

Page 12: ...tricity supply Power failure Check whether other kitchen appliances are working Faulty fuse Check in the fuse box to make sure that the fuse for the appliance is OK The appliance is not working all th...

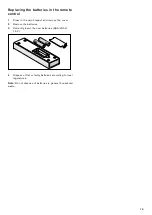
Page 13: ...Press in the catch tappet and remove the cover 2 Remove the batteries 3 Correctly insert the new batteries AAA LR03 1 5 V 4 Dispose of flat or faulty batteries according to local regulations Note Do n...

Page 14: ...sit from an after sales service engineer is not free of charge even during the warranty period Please find the contact data of all countries in the enclosed customer service list To book an engineer v...

Page 15: ...l de mando 20 Mando a distancia 20 Ajustar el ventilador 20 Nivel intensivo 20 Funci n de marcha en inercia 21 Ventilaci n a intervalos 21 Indicador de saturaci n 21 Iluminaci n 21 Desconexi n de segu...

Page 16: ...haber sufrido da os durante el transporte Este aparato no est previsto para el funcionamiento con un reloj temporizador externo o un mando a distancia Peligro de asfixia El material de embalaje es pel...

Page 17: ...de ventilaci n solo puede combinarse con fogones de gas que no superen una potencia total m xima de18 kW Al exceder la potencia total de 12 kW se deben tener en cuenta los reglamentos locales respecto...

Page 18: ...nunca los elementos de mando con un pa o h medo Da os en la superficie en caso de limpieza indebida Limpiar las superficies de acero inoxidable siempre en la direcci n del pulido No utilizar limpiado...

Page 19: ...esario contar previamente con la aprobaci n correspondiente del t cnico competente de la zona Si la salida de aire se evacua mediante la pared exterior se deber utilizar un pasamuros telesc pico Funci...

Page 20: ...para ajustar el nivel de ventilador correspondiente Nota Con el mando a distancia el ventilador se puede conectar solo con la tecla 1 2 3 o Con la tecla se apaga el ventilador Desactivaci n Pulsar la...

Page 21: ...e 6 minutos cada hora 1 Pulsar el nivel de ventilador 1 2 o 3 2 Pulsar dos veces la tecla La tecla y la tecla del nivel de ventilador seleccionado parpadean alternadamente La ventilaci n a intervalos...

Page 22: ...luyen los productos de limpieza Desmontar el filtro de metal antigrasa m Peligro de lesiones Peligro de ca da al realizar trabajos en el aparato Utilizar una escalera plegable que sea segura m Peligro...

Page 23: ...grasa junto con el resto de la vajilla si est n muy sucios Eliminar primero a mano la suciedad m s incrustada Colocar debidamente los filtros de metal antigrasa en el lavavajillas Los filtros de metal...

Page 24: ...m nimo Notas Los filtros de carb n activo pueden conseguirse en comercios especializados en el Servicio de Atenci n al Cliente o en la tienda online con el n mero de pedido AA200110 Se necesita 1 filt...

Page 25: ...ufe no est conectado a la red Enchufar el aparato a la red el ctrica Corte de corriente Comprobar si los dem s electrodom s ticos de cocina funcionan El fusible est defectuoso Comprobar en la caja de...

Page 26: ...a pesta a y retirar la tapa 2 Sacar las pilas 3 Introducir pilas nuevas de tipo AAA LR03 1 5 V en la posici n correcta 4 Desechar las pilas descargadas o defectuosas conforme a la normativa local Nota...

Page 27: ...correcto la asistencia del personal del Servicio de Asistencia T cnica no es gratuita incluso aunque est dentro del per odo de garant a Las se as de las delegaciones internacionales figuran en la list...

Page 28: ...33 Telecomando 33 Regular o ventilador 33 Fase intensiva 33 Fun o de paragem 34 Ventila o intermitente 34 Indica o de satura o 34 Ilumina o 34 Bloqueio de seguran a 34 Limpeza e manuten o 35 Anomalia...

Page 29: ...parelho depois de o desembalar Se forem detectados danos de transporte n o ligue o aparelho Este aparelho n o foi previsto para ser utilizado com um temporizador externo ou um telecomando externo Peri...

Page 30: ...do com zonas de cozinhar a g s que n o excedam uma pot ncia total m xima de 18 kW Caso seja excedida a pot ncia total de 12 kW devem respeitar se as normas locais em mat ria de ventila o e dimens o de...

Page 31: ...a humidade que penetra no sistema eletr nico Nunca limpar os elementos de comando com um pano h mido Danos na superf cie devido a uma limpeza incorreta Limpar as superf cies de a o inoxid vel apenas...

Page 32: ...mos ou de gases queimados que n o esteja em funcionamento necess ria uma autoriza o da entidade supervisora da instala o dos aparelhos de queima Se o ar evacuado for encaminhado atrav s da parede exte...

Page 33: ...la 1 2 3 ou para regular o n vel do ventilador correspondente Nota Com o comando s pode ligar o ventilador com as teclas 1 2 3 ou A tecla permite desligar o ventilador Desligar Prima a tecla Fase inte...

Page 34: ...ante 6 minutos de hora em hora 1 Prima o n vel 1 2 ou 3 do ventilador 2 Prima a tecla duas vezes A tecla e a tecla do n vel do ventilador selecionado piscam alternadamente A ventila o intermitente est...

Page 35: ...brasivas aparelhos de limpeza a alta press o ou de limpeza a vapor Lave bem os panos de esponja novos antes de os utilizar Tenha em aten o todas as instru es e advert ncias que acompanham os produtos...

Page 36: ...nte Na m quina de lavar lou a Nota Durante a limpeza na m quina de lavar lou a podem ocorrer ligeiras altera es de cor Isso n o influencia o funcionamento dos filtros met licos de gorduras N o limpe f...

Page 37: ...ais tardar ap s 12 meses Notas Poder adquirir os filtros de carv o ativo no com rcio especializado junto da Assist ncia T cnica ou na loja online com a refer ncia AA200110 Necessita de 1 filtro de car...

Page 38: ...igada corrente Ligue o aparelho corrente el trica Falha de corrente Verifique se os outros eletrodom sticos funcionam Falha do fus vel Verifique na caixa de fus veis se o fus vel correspondente ao apa...

Page 39: ...encontra se no aparelho Para que em caso de necessidade n o perca tempo a procurar poder inserir aqui os dados do seu aparelho e o n mero de telefone da assist ncia t cnica Tenha em aten o que a deslo...

Page 40: ...40 41 43 43 43 44 44 44 44 44 44 45 45 45 45 46 46 46 46 49 50 50 51 Internet www gaggenau com online shop www gaggenau com zz store...

Page 41: ...41 m 2 000 8 15 8 4 Pa 0 04 mbar...

Page 42: ...42 2 18 kW 12 kW...

Page 43: ...43 1 2012 19 E waste electrical and electronic equipment WEEE...

Page 44: ...44 online shop 1 1 2 2 3 3 1 1 2 2 3 3...

Page 45: ...45 1 2 2 1 2 3 1 2 3 1 2 2 6 1 1 2 3 2 6 6 1 1 2 3 2...

Page 46: ...46 12 4 m m m m m...

Page 47: ...47 m m 1 2 3 m 2...

Page 48: ...48 Online Shop 00311297 5 1 2 m 1 2 12 Online Shop AA200110 1 AA200110 1 2 3 4...

Page 49: ...49 m m LED 1 100 LED LED LED 4...

Page 50: ...50 1 2 3 AAA LR03 1 5 V 4 E FD E Nr FD Nr O GR 18 182...

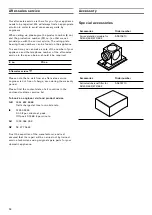
Page 51: ...51 AC402 462 472 482 AA010810 AC402 462 472 482 AA200110...

Page 52: ...Gaggenau Hausger te GmbH Carl Wery Stra e 34 81739 M nchen GERMANY www gaggenau com 9000961156 9000961156 en es pt el 981205...

Reviews: