7
4.
Die Funktion der Anlage prüfen.
en
General information
¡
Keep the instruction manual and the
product information safe for future refer-
ence or for the next owner.
¡
The appliance can only be used safely if it
is correctly installed according to the
safety instructions. The installer is re-
sponsible for ensuring that the appliance
works perfectly at its installation location.
¡
This instruction manual is intended for the
installer of the optional accessory.
¡
Only a licensed expert may connect the
appliance.
¡
Switch off the power supply before carry-
ing out any work.
Safe installation
Follow these safety instructions when installing the
appliance.
WARNING ‒ Risk of suffocation!
Children may put packaging material over their
heads or wrap themselves up in it and suffocate.
▶
Keep packaging material away from children.
▶
Do not let children play with packaging material.
WARNING ‒ Risk of electric shock!
It must always be possible to disconnect the appli-
ance from the electricity supply. The appliance must
only be connected to a protective contact socket
that has been correctly installed.
▶
The mains plug for the mains power cable must
be easily accessible after the appliance is in-
stalled.
▶
If this is not possible, an all-pole isolating switch
must be integrated into the permanent electrical
installation according to the conditions of over-
voltage category III and according to the installa-
tion regulations.
▶
The permanent electrical installation must only be
wired by a professional electrician. We recom-
mend installing a residual-current circuit breaker
(RCCB) in the appliance's power supply circuit.
WARNING ‒ Risk of injury!
Changes to the electrical or mechanical assembly
are dangerous and may lead to malfunctions.
▶
Do not make any changes to the electrical or
mechanical assembly.
Components inside the appliance may have sharp
edges.
▶
Wear protective gloves.
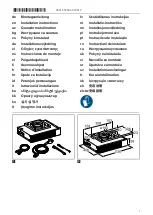
Scope of delivery
After unpacking all parts, check for any damage in
transit and completeness of the delivery.
→
Appliance dimensions
You will find the dimensions of the appliance here
→
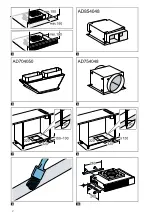
Minimum clearances
Observe the minimum clearances for the appliance.
Observe a minimum clearance of 150 mm between
the air outlet and the base panel and the air outlet
and the side wall.
→
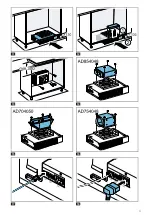
Optional accessories
This is where you can find an overview of the op-
tional accessories for different installation variants.
Air collector box for flat ducts
Order number
¡
AD854048
Air collector box for flat ducts
Order number
¡
AD704050
Air collector box for round ducts
Order number
¡
AD754048
Information about the electrical
connection
In order to safely connect the appliance to the elec-
trical system, follow these instructions.
WARNING ‒ Risk of electric shock!
Sharp-edged components inside the appliance may
damage the connecting cable.
▶
Do not kink or trap the connecting cable.
¡
The connection data can be found on the rating
plate.
¡
This appliance complies with the EC interference
suppression regulations.
¡
The appliance corresponds to protection class 1.
You should therefore only use the appliance with
a protective earth connection.
¡
Do not connect the appliance to the power supply
during installation.
General information
Follow these general instructions during the installa-
tion.
The currently valid building regulations and the regu-
lations of the local electricity and gas suppliers must
be observed during installation.
Installation
Checking the wall
1.
Check whether the wall is vertical and has suffi-
cient load-bearing capacity.
The weight of the appliance is approx. 10 kg.
2.
Ensure that there are no electrical wires, gas
pipes or water pipes in the area where holes are
to be drilled.
3.
Drill the hole depth in accordance with the length
of the screws.
4.
Ensure that the wall plugs are firmly in place.
5.
Use suitable fixing material depending on the con-
struction type, e.g. solid brickwork, plasterboard,
porous concrete, Poroton brick.
Checking the unit
1.
Check whether the fitted unit is level and has suffi-
cient load-bearing capacity.
Summary of Contents for AR413122 AD854048
Page 2: ...2 3 4 5 6 7 8 9 10...
Page 3: ...3 11 12 13 14 15 16 17 18...
Page 19: ...19 III FI 1 2 150 mm 3 AD854048 4 AD704050 5 AD754048 6 1 1 10 kg 2 3 4 5 Poroton 1...
Page 37: ...37 ka III FI 1 2 150 3 AD854048 4 AD704050 5 AD754048 6 1 1 10...
Page 78: ...78 1 23 2 Reset LED Reset 5 5 Reset 24 3 4...
Page 79: ...79...
Page 80: ...80...

