background image

6

Operating the appliance

Note: 

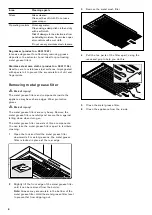
Switch on the extractor hood when you start 

cooking and switch it off again several minutes after you 
have finished cooking. This is the most effective way of 
removing the kitchen fumes.

Operating the appliance

Control panel

Setting the fan

Note: 

Always adjust the fan strength to meet current 

conditions. If there is a large build-up of steam or fumes, 
select a high fan setting.

Switching on

1

Press the 

#

 button.

The fan starts at setting 2.

2

Press the 1, 2, 3 or 

Ž

 button to set the 

corresponding fan setting.

Switching off

Press the 

#

 button.

Intensive setting

You can use the intensive setting if there is a large build-
up of odours and fumes/vapours.

Switching on

1

Press the 

#

 button.

The fan starts at setting 2.

2

Press the 

Ž

 button.

Intensive mode is activated.

Switching off

Press the 

#

 button or the button for another fan 

setting.

Intensive mode is deactivated.

Automatic mode

Switching on

1

Press the 

#

 button.

The fan starts in fan setting 2.

2

Press the 

<

 button.

The optimum fan setting 1, 2 or 3 is set 
automatically by a sensor.

Switching off

Press the 

<

 or 

#

 button.

Automatic mode is switched off.

The fan switches off automatically if the air quality in the 
room exceeds a certain level. Automatic  mode can run 
for a maximum of four hours.

Sensor control

In automatic mode, a sensor in the extractor hood 
detects the intensity of the cooking and roasting fumes. 
Depending on the setting of the sensor, the fan 
automatically switches to another fan speed.

Default sensitivity setting: 2

Lowest sensitivity setting: 1

Highest sensitivity setting: 4

Changing the sensitivity of the sensor

If the sensor control reacts too quickly or too slowly, 
change the sensitivity setting.

1

When the fan is switched off, press and hold the 

<


button for approx. 4 seconds.
The setting is displayed.

2

Press button 1, 2, 3 or the 

Ž

 button to change the 

sensitivity setting.

3

Press and hold the 

<

 button for approx. 

4 seconds.
The change is saved.

Explanation

#

Fan on/off

1

Fan speed 1

2

Fan speed 2

3

Fan speed 3

Ž

Intensive setting

<

Automatic mode

œ

Saturation indicator

c

Light on/off/dimming

Button 1

= Sensitivity 1

Button 2

= Sensitivity 2

Button 3

= Sensitivity 3

Ž

 button = Sensitivity 4

Summary of Contents for AW 442 190 CN

Page 1: ...Gaggenau Instruction manual AW 442 120 190 CN Extractor hood...

Page 2: ...perating the appliance 6 Setting the fan 6 Intensive setting 6 Automatic mode 6 Sensor control 6 Saturation display 7 Lighting 7 Safety shut off 7 Cleaning and maintenance 7 Trouble shooting 10 After...

Page 3: ...wer cable Check the appliance for damage after unpacking it Do not connect the appliance if it has been damaged in transport This appliance is not intended for operation with an external clock timer o...

Page 4: ...nce installed above the cooker may become damaged or catch fire Never operate two gas burners simultaneously on the highest flame for longer than 15 minutes One large burner of more than 5 kW wok is e...

Page 5: ...y efficient Here you can find tips on how to save even more energy when using the appliance and how to dispose of your appliance properly Saving energy Only switch the ventilation on when necessary Yo...

Page 6: ...on The optimum fan setting 1 2 or 3 is set automatically by a sensor Switching off Press the or button Automatic mode is switched off The fan switches off automatically if the air quality in the room...

Page 7: ...a damp cloth only Before cleaning pull out the mains plug or switch off the circuit breaker in the fuse box m Risk of electric shock Do not use any high pressure cleaners or steam cleaners which can...

Page 8: ...rs apart to facilitate cleaning 1 Open the lock and fold the metal grease filter downwards For safety reasons the metal grease filter is locked in place at the rear edge 2 Slightly lift the front edge...

Page 9: ...ty of space around them The metal grease filters must not be wedged in By hand Soak the metal grease filters in hot soapy water Clean the filters with a brush and then rinse them thoroughly Leave the...

Page 10: ...g is not plugged into the mains Connect the appliance to the electricity supply Power failure Check whether other kitchen appliances are working Faulty fuse Check in the fuse box to make sure that the...

Page 11: ...number of the after sales service in the space below should it be required Please note that a visit from an after sales service engineer is not free of charge even during the warranty period Please f...

Page 12: ...Gaggenau Hausger te GmbH Carl Wery Stra e 34 D 81739 M nchen www gaggenau com 9001102431 9001102431 en 950401...

Reviews: