background image

16

8

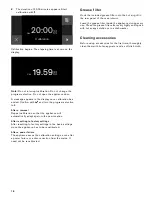
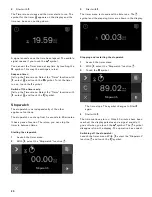
The duration of 20.00 minutes appears. Start 
calibration with 

I

.

Calibration begins. The elapsing time is shown on the 
display.

Note: 

Do not interrupt calibration. Do not change the 

program selection. Do not open the appliance door.

A message appears in the display once calibration has 
ended. Confirm with 

 and turn the program selection 

to 

0

.

After a removal


Repeat calibration so that the appliance will 
automatically adapt again to the new location.

After resetting to factory settings


After resetting to factory settings in the basic settings 
menu the appliance has to be recalibrated.

After a power failure


The appliance saves the calibration settings, even after 
a power failure or a disconnection from the mains. It 
need not be recalibrated.

Grease filter

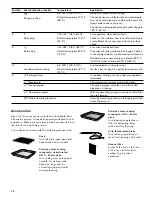
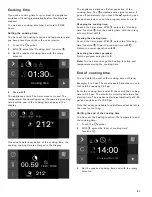
Hook the included grease filter onto the hot air grill in 
the rear panel of the oven interior.

Leave the grease filter inside the appliance during every 
use. Clean the grease filter after every highly soiling use 
with hot soapy solution or in a dishwasher.

Cleaning accessories 

Before using accessories for the first time, thoroughly 
clean them with hot soapy water and a soft dish cloth.

&DOLEUDWLRQ

&$/

&$/

Summary of Contents for BS 464 610

Page 1: ...Gaggenau Use and care manual BS 464 610 BS 465 610 Combi steam oven...

Page 2: ...16 Cleaning accessories 16 Activating the appliance 17 Standby 17 Activate appliance 17 Operating the appliance 17 Filling the water tank 17 Oven interior 18 Inserting accessories 18 Turning on 18 Aft...

Page 3: ...oodstuffs 48 Additional information on products accessories replacement parts and services can be found at www gaggenau com and in the online shop www gaggenau com zz store Safety Definitions 9 WARNIN...

Page 4: ...pliance if it is not working properly or if it has been damaged Contact an authorized servicer Do not obstruct oven vents Do not repair or replace any part of the appliance unless specifically recomme...

Page 5: ...urfaces of an oven become hot enough to cause burns During and after use do not touch or let clothing potholders or other flammable materials contact heating elements or interior surfaces of oven unti...

Page 6: ...Allow the appliance to cool down before cleaning it Child Safety When children become old enough to use the appliance it is the responsibility of the parents or legal guardians to ensure that they ar...

Page 7: ...tant Silicone baking pans are not suitable for Combination mode When using Steam mode with a perforated cooking pan always slide the baking pan underneath it The pan will catch any drippings The oven...

Page 8: ...Always remove residues immediately Fruit juice can leave stains in the oven Always remove fruit juice immediately when safe to touch and wipe up first with a damp and then a dry cloth Your appliance...

Page 9: ...oven These instructions apply to different versions of the appliance Slight deviations are possible depending on the appliance type Operation is identical for all appliance versions Do not obstruct ov...

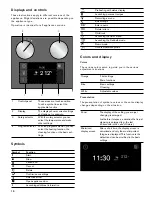
Page 10: ...or you can select the heating function the cleaning function or the basic set tings Symbol Function I Start Stop H Pause end Cancel Delete Confirm save settings C Selection arrow Open appliance door L...

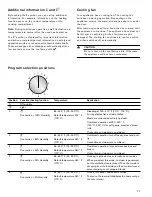
Page 11: ...me overheated Program selection positions Position Function heating function Temperature Application 0 Off position Light 2 Convection 100 Humidity 85 450 F 30 230 C Default temperature 212 F 100 C St...

Page 12: ...C and baked items at 360 F 180 C 10 Low temperature cooking 85 200 F 30 90 C Default temperature 160 F 70 C Low temperature cooking for meat Gentle slow cooking for a particularly tender result S t Fa...

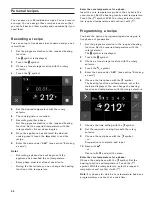
Page 13: ...r new appliance Language Time format Time Date format Date Temperature format Water hardness The appliance must be completely fitted and connected Notes The Initial settings menu only appears when you...

Page 14: ...ars in the display 1 Set the required time with the rotary selector 2 Confirm with Setting the date format The three possible formats D M Y D M Y and M D Y appear in the display The D M Y is the defau...

Page 15: ...y mode and the standby display appears The appliance is now ready for operation Calibrate the appliance before steaming for the first time The appliance sets the boiling point Calibrating The boiling...

Page 16: ...settings After resetting to factory settings in the basic settings menu the appliance has to be recalibrated After a power failure The appliance saves the calibration settings even after a power failu...

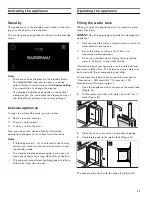
Page 17: ...again if you have not made any settings for a long while after activation The cooking compartment lighting goes out after a little while if the door is open Operating the appliance Filling the water t...

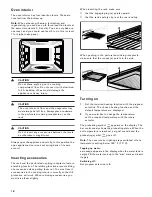
Page 18: ...The latching function prevents tilting of accessories when pulling them out You must insert accessories in the cooking interior correctly so that tilt protection will work When removing accessories y...

Page 19: ...rying program or leave the appliance door open until the interior has dried completely Safety shut off For your protection the appliance has a safety shut off feature Every heating operation is switch...

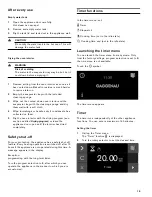
Page 20: ...ctions The stopwatch counts up from 0 seconds to 90 minutes It has a pause function Therefore you can stop the timer in between times Starting the stopwatch 1 Launch the timer menu 2 With C select the...

Page 21: ...king time Launch the timer menu With C select the Cooking time function 6 Set the cooking time with the rotary selector Start with I Clearing the cooking time Launch the timer menu With C select the C...

Page 22: ...0 and 230 C with the convection heating function You can keep dishes warm for up to 74 hours without having to switch on or off Note that easily perishable foodstuffs must not be left in the oven for...

Page 23: ...lights will be on during this time Note that easily perishable foodstuffs must not be left in the oven for too long Setting the Yom Tov mode 1 Set the program selector to 2 Touch the symbol The sugges...

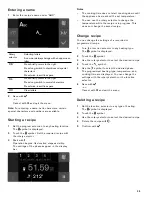
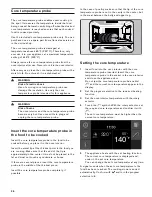
Page 24: ...Insert the core temperature probe in the socket in the oven interior Set the heating function and temperature Touch the symbol With the rotary selector enter the required temperature and confirm it w...

Page 25: ...rogrammed recipe 1 Turn the function selector to any heating type The i symbol is displayed 2 Touch the i symbol 3 Use the rotary selector to select the desired recipe 4 Touch the symbol 5 Use the C s...

Page 26: ...tip at the thickest point in the food you are cooking Make sure that the end of the tip is approximately in the center It must not be placed in the fat and must not touch any cookware or bones If ther...

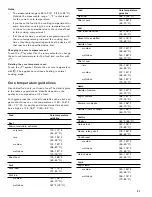
Page 27: ...stuffs such as fish and game should reach a core temperature of 143 158 F 62 70 C for poultry and minced meat this should be as high as 176 185 F 80 85 C Food Core temperature guideline Beef Sirloin t...

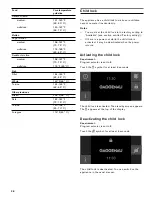
Page 28: ...creen appears The 0 appears at the top of the display Deactivating the child lock Requirement Program selector is set to 0 Touch the 1 symbol for at least 6 seconds The child lock is deactivated You c...

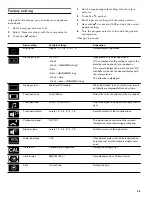
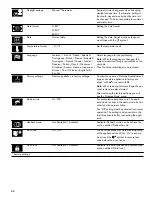
Page 29: ...by consumption of your appliance On several displays can be set confirm On with and choose the desired display with the rotary selector The selection is displayed Display screen Minimized Standard Whe...

Page 30: ...ry settings Restore appliance to factory settings Confirm the question Delete all individual set tings and restore appliance to factory set tings with or cancel with Note When restoring factory settin...

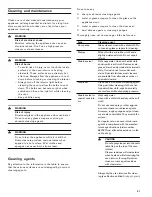
Page 31: ...he appliance door metal or glass scrapers to clean the door seal hard abrasive pads or cleaning sponges Thoroughly rinse out new sponge cloths before use Area Cleaning agent Door panes Glass cleaner c...

Page 32: ...minutes A message appears in the display 7 Wipe out the oven interior Remove cleaner residues Fill the water tank with fresh water Confirm with G 8 The first rinsing operation appears Start with I Th...

Page 33: ...inutes A message appears in the display Confirm with G The drying program has ended Allow the appliance to cool down Then polish the oven interior and the pane with a soft cloth Descaling program Your...

Page 34: ...n completely and can not be cancelled Before cooking remove any descaler residue from the cooking compartment If the descaling programme was cancelled due to a power cut it must be restarted before us...

Page 35: ...nce switches off automatically Safety deactivation the appliance has not been operated for longer than 12 hours Confirm the message with switch off the appliance and set it again Appliance does not he...

Page 36: ...rs our customer service is there for you We work hard to help solve problems quickly and without unnecessary service calls getting your appliance back up and running correctly in the least amount of t...

Page 37: ...ottom Do not allow the food to touch the cooking compartment grease filter or back wall of the oven The steam baking oven door must close securely Always keep the sealing surfaces clean Do not crowd t...

Page 38: ...Jacket potatoes about 100 g approx 3 5 oz each Perforated 212 100 100 40 45 Brussels sprouts Perforated 212 100 100 15 20 Asparagus green Perforated 212 100 100 10 15 Asparagus white Perforated 212 10...

Page 39: ...in broth Tilapia 150 g 5 oz perforated 180 190 80 90 100 10 12 Gilthead bream 200 g 7 oz perforated 180 190 80 90 100 12 15 Fish fillet 200 300 g 7 11 oz perforated 180 190 80 90 100 12 15 Fish terrin...

Page 40: ...stuff Cooking receptacle Temperature in F C Humidity in Cooking time in min Remarks Entrecote browned medium rare 350 g 12 oz each Unperforated 340 355 170 180 0 30 10 20 Filet browned medium rare in...

Page 41: ...om drying out Please note that you cannot reach any core temperatures above the cooking compartment temperature The rule of thumb is the set cooking compartment temperature should be 50 60 F 10 15 C a...

Page 42: ...ated 1 300 320 150 160 2 430 220 60 0 80 90 20 30 Start cooking with the breast pointing down Turn the duck round after half of the cooking time In this way the sensitive breast meat will not dry out...

Page 43: ...udding 250 g 9 oz of rice 625 ml 1 3 pint of milk unperforated 212 100 100 35 45 Recipe tip add fruits sugar or cinnamon Sweet bake unperforated 355 390 180 200 0 60 20 40 e g semolina quark or pre co...

Page 44: ...agels 100 g 3 5 oz each Unperforated 375 410 190 210 80 100 20 25 Baguette prebaked Rack 375 390 190 200 60 100 10 15 Sponge cake base high 6 eggs Springform 320 340 160 170 0 30 35 Jelly roll 2 eggs...

Page 45: ...rated 300 320 150 160 0 35 45 Cookies Unperforated 300 320 150 160 0 25 30 Tart Tart form rack 375 410 190 210 0 30 30 45 Cream puffs eclairs Unperforated 340 355 170 180 0 30 40 45 Foodstuff Cooking...

Page 46: ...ring thawing It must never come into contact with other foodstuffs Germs could be transmitted Slide the unperforated cooking insert underneath the food Pour away the collected thawing liquid from meat...

Page 47: ...elapsed Do not remove the canning jars from the appliance until they have completely cooled down Extracting juice soft fruits You can effortlessly and cleanly extract berry juice in the steam oven Pl...

Page 48: ...tray To do this loosen the knurled screws at the front of the slide in tray and pull the tray out toward the front Place the wire rack directly on the bottom of the cooking compartment and place the f...

Page 49: ......

Page 50: ......

Page 51: ......

Page 52: ...ce Corporation 1901 Main Street Suite 600 Irvine CA 92614 1 877 442 4436 USA www gaggenau usa com 2017 BSH Home Appliances Gaggenau Hausger te GmbH Carl Wery Stra e 34 81739 M nchen GERMANY 9000880517...

Reviews: