background image

11

 Operating the appliance      

en

Operating the appliance

Operating the appliance

Notes

Only use the accessories specified. Do not line the 
stainless steel recess (e.g. with aluminium foil).

The burner and ignition plug must be clean and dry.

Only light the hotplates if the pan supports and all 
burner parts are correctly fitted.

When one burner is ignited, an ignition spark will 
also be generated at all the other burners.

Do not touch the ignition plug while the gas 
appliance is being lit.

It is important to keep the appliance clean. If the 
ignition plugs are dirty, this may cause ignition 
problems. Clean the ignition plugs regularly with a 
small, non-metallic brush. Take care to prevent the 
ignition plugs from suffering any heavy knocks.

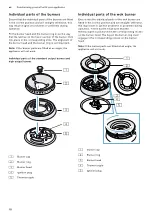
When you cook using a wok, place the wok ring 
onto the pan support over the wok burner. Make 
sure that the wok is stable on the wok ring when 
you are cooking.

When you switch from setting 3 to setting 4 or 
higher, the burner will briefly switch to its maximum 
output. This is to optimise ignition between the 
burner rings.

Do not cover the ventilation openings on the rear of 
the gas hob.

When the gas cooktop is switched on, the 
electronics open up the gas supply, which 
produces a short sound. This is normal.

In the event of a power failure, the appliance will 
not work. The gas supply is shut off.
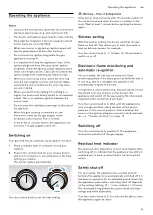
Switching on

Your gas hob has an automatic quick-ignition function.

1

Place a suitable item of cookware on the pan 
support.

2

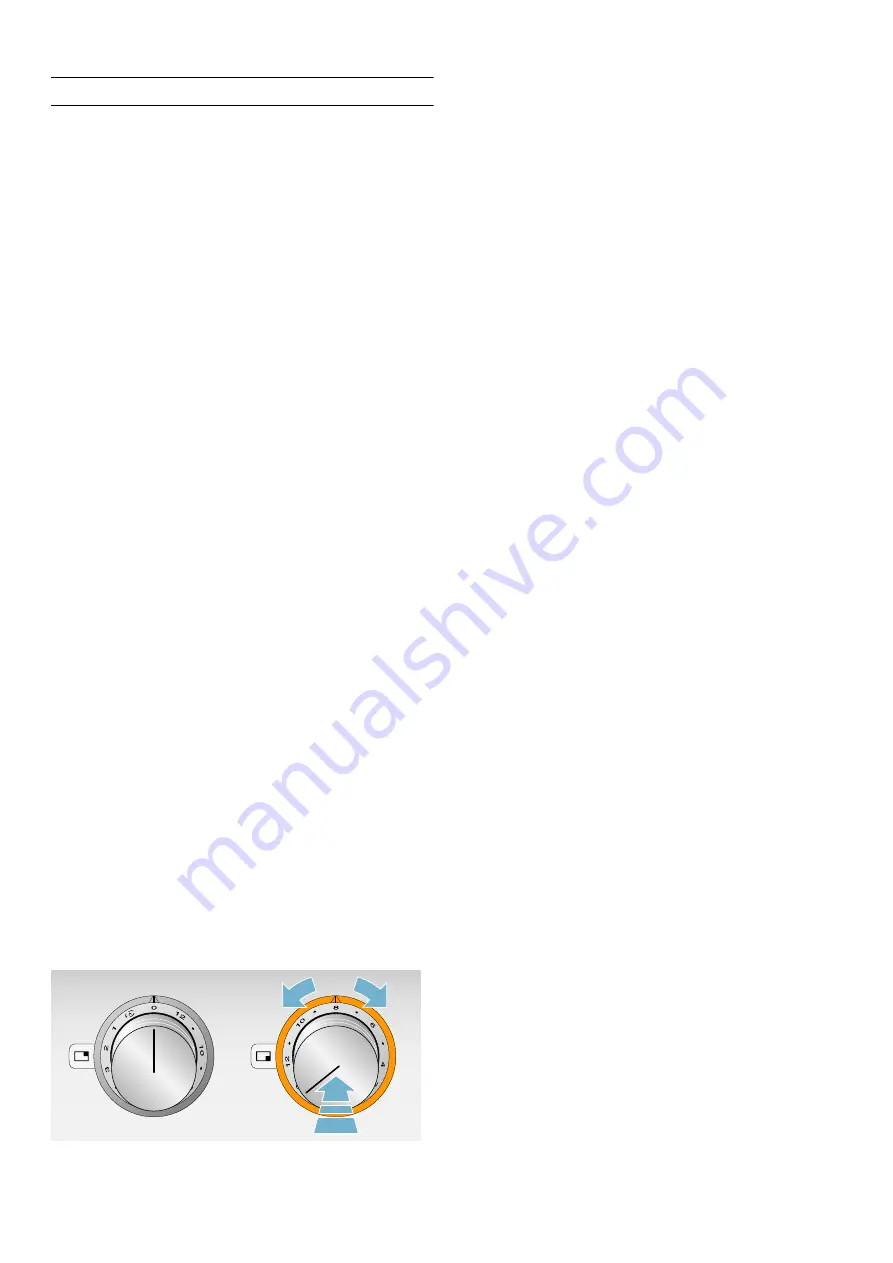
Push in the control knob for your chosen burner 
and turn it clockwise or anti-clockwise to the heat 
setting you require. 
The burner ignites automatically.

Turn the control knob to set the heat setting.

m

Warning – Risk of deflagration! 

If the burner does not ignite after 15  seconds, switch off 
the control knob and open the door or window in the 
room. Wait at least 1 minute before igniting the burner 
again.

Simmer setting

With the simmer setting, the burner switches the gas 
flame on and off. This allows you to melt chocolate or 
heat up delicate sauces, for example.

Turn the control knob to 

Â

. It takes 10 - 50 seconds to 

switch on or off.

Electronic flame monitoring and 
automatic re-ignition

For your safety, the hob has an electronic flame 
monitoring system. If the flame goes out while the hob is 
in use (e.g. due to a draught), the appliance will 
automatically re-ignite the burner.

If re-ignition is unsuccessful (e.g. because liquid or food 
has boiled over and remains on the burner), the 
appliance will switch off the gas supply.The illuminated 
ring behind the control knob will flash.

Turn the control knob to 0. Wait until the appliance is 
cool enough and then check whether all the burner 
parts are in the correct position. Check whether the 
burner or the ignition plug are covered in food remnants 
etc.

~

 "Trouble shooting" on page 15

Switching off

Turn the control knob to position 0. The appliance 
electronics will shut off the gas supply.

Residual heat indicator

The luminous disc behind the control knob flashes after 
switching off, to indicate that the appliance has still not 
cooled down to such an extent that it can be touched 
safely.

Safety shut-off

For your safety, the appliance has a safety shut-off 
function.The appliance is automatically switched off if it 
has been in operation for an extended period. How long 
the appliance waits before switching itself off depends 
on the setting (setting 12 = 1 hour, setting 1 = 4 hours). 
The illuminated ring behind the control knob will flash 
orange and white alternately.

Turn the control knob to 0. You will now be able to start 
the appliance again as usual.

Summary of Contents for CG 492 211

Page 1: ...es de servi o CG 492 Gas cooktop Encimera a gas Placa de fog o a g s Questo manuale d istruzione fornito da trovaprezzi it Scopri tutte le offerte per Gaggenau CG 492 211 o cerca il tuo prodotto tra...

Page 2: ...2 Table of contents 3 ndice 17 ndice 33 48...

Page 3: ...setting 11 Electronic flame monitoring and automatic re ignition 11 Switching off 11 Residual heat indicator 11 Safety shut off 11 Table of settings and tips 12 Burner recommendation 12 Tips for cook...

Page 4: ...oors Do not install this appliance on boats or in vehicles This appliance is intended for use up to a maximum height of 2000 metres above sea level This appliance is not intended for operation with an...

Page 5: ...fire blanket or something similar Risk of fire The hotplates become very hot Never place combustible items on the hob Never place objects on the hob Risk of fire The appliance becomes very hot and fl...

Page 6: ...ff the fuse in the fuse box Shut off the gas supply Contact the after sales service Risk of injury Faults or damage to the appliance are dangerous Never switch on a faulty appliance Unplug the applian...

Page 7: ...appliance Saving energy Choose a burner of roughly the same size as your pan Place the cookware in the middle Use small saucepans for small quantities Using a large saucepan with little in it consume...

Page 8: ...e control knobs show which burner they operate and the heat setting from 1 to 12 or Simmer setting 3 3 Ventilation openings underneath pan support 0 Pan support 8 Wok ring Wok burner 6 0 5 8 kW H High...

Page 9: ...essories are used incorrectly Indicator Meaning Off Appliance off Lit continuously orange Appliance on Flashing orange Appliance off Residual heat indicator Flashing orange and white alternately Safet...

Page 10: ...gle the appliance will not work Individual parts of the standard output burner and high output burner Individual parts of the wok burner Ensure that the individual parts of the wok burner are fitted i...

Page 11: ...flagration If the burner does not ignite after 15 seconds switch off the control knob and open the door or window in the room Wait at least 1 minute before igniting the burner again Simmer setting Wit...

Page 12: ...domed base You can order a high quality wok as an optional accessory WP 400 001 When cooking with the wok use only cooking oil that is suitable for heating to high temperatures such as groundnut oil C...

Page 13: ...mall pots or pans on large burners The flame should not touch the sides of the pot Do not use damaged pots or pans which do not sit evenly on the cooktoop they may tip over Only use pots or pans with...

Page 14: ...cialist retailer or our after sales service item number 00311859 It is suitable for pan supports and the stainless steel recess If necessary let the dirt soak overnight Follow the instructions on the...

Page 15: ...rner will not ignite when it is switched on The illuminated ring behind the control knob is flashing yellow and magenta alternately Electronics fault Turn all control knobs to 0 and disconnect the app...

Page 16: ...7 Turn the control knob to 0 Then turn the control knob anti clockwise to position 12 Turn the control knob clockwise to position 1 Turn the control knob anti clockwise to position 0 Wait until the il...

Page 17: ...lectr nico de la llama y reignici n autom tica 26 Apagar 26 Indicador de calor residual 26 Desconexi n de seguridad 26 Tabla de ajustes y consejos 27 Recomendaci n sobre los quemadores 27 Consejos par...

Page 18: ...to est previsto para ser utilizado a una altura m xima de 2 000 metros sobre el nivel del mar Este aparato no est previsto para el funcionamiento con un reloj temporizador externo o un mando a distanc...

Page 19: ...ar siempre pendiente del aceite caliente y de la grasa No apagar nunca con agua un fuego Apagar la zona de cocci n Sofocar con cuidado las llamas con una tapa una tapa extintora u otro medio similar P...

Page 20: ...ar botellas de gas l quido siempre en posici n vertical m Advertencia Peligro de lesiones Las reparaciones inadecuadas son peligrosas Las reparaciones y la sustituci n de cables el ctricos y conductos...

Page 21: ...ciones inadecuadas son peligrosas Las reparaciones solo pueden ser efectuadas por personal del Servicio de Asistencia T cnica debidamente instruido Si el aparato est defectuoso extraer el enchufe o de...

Page 22: ...ecipiente para cocinar centrado Utilizar una olla peque a para cantidades reducidas Una olla grande y poco llena requiere mucha energ a Utilizar siempre la tapa correspondiente a cada olla Cuando se c...

Page 23: ...nivel de fuego lento 3 3 Aberturas de ventilaci n bajo el soporte para ollas 0 Soporte para ollas 8 Accesorio para wok Quemador para wok de 6 0 5 8 kW H Quemador de gran potencia 4 0 kW P Quemador es...

Page 24: ...del c rculo de llama del quemador no es importante Nota Si los componentes del quemador no se colocan rectos el aparato no funcionar Componentes del quemador est ndar y el quemador de gran potencia In...

Page 25: ...hispa en todos los quemadores No tocar la buj a mientras el aparato de gas est encendiendo Mantener la m xima limpieza Si las buj as est n sucias el encendido ser defectuoso Limpiarlas peri dicamente...

Page 26: ...ncender el quemador de forma autom tica Si la reignici n no se produce p ej debido a que el quemador est sucio por restos de l quidos derramados el aparato corta el suministro de gas Parpadea el anill...

Page 27: ...abombado Se puede adquirir una sart n wok de gran calidad como accesorio especial n de referencia WP 400 001 Para cocinar con la sart n wok utilizar nicamente un aceite de cocina que alcance elevadas...

Page 28: ...La llama no deber tocar los laterales del recipiente de cocci n No utilice recipientes de cocci n deformados que no asienten de forma estable sobre la placa de cocci n Los recipientes podr an volcar U...

Page 29: ...859 en nuestra tienda en l nea o a trav s de un comercio especializado o de nuestro servicio de atenci n al cliente Este gel est indicado para los soportes para ollas y las placas de acero inoxidable...

Page 30: ...os los mandos de control hasta 0 Comprobar Los componentes del quemador est n bien colocados La llave de paso del gas est abierta El quemador est limpio y seco Ha quedado aire en la tuber a tras conec...

Page 31: ...transcurrido mucho tiempo sin realizar ninguna acci n Girar todos los mandos de control hasta 0 y despu s en caso necesario volver a encender el quemador El quemador se apaga cuando est en uso El anil...

Page 32: ...erda hasta la posici n 12 Girar el mando de control hacia la derecha hasta la posici n 1 Girar el mando de control hacia la izquierda hasta la posici n 0 Esperar a que el anillo luminoso se apague Ser...

Page 33: ...Monitoriza o eletr nica da chama e re igni o autom tica 41 Desligar 41 Indicador de calor residual 41 Bloqueio de seguran a 41 Tabela de regula es e conselhos 42 Recomenda o relativa ao queimador 42...

Page 34: ...culos O aparelho foi concebido para ser utilizado at a uma altitude de 2000 metros acima do n vel do mar no m ximo Este aparelho n o foi previsto para ser utilizado com um temporizador externo ou um t...

Page 35: ...zonas de cozinhar ficam muito quentes Nunca coloque objectos inflam veis sobre a placa de cozinhar N o guarde objectos sobre a placa de cozinhar Perigo de inc ndio O aparelho fica muito quente os mate...

Page 36: ...izados do servi o de assist ncia t cnica Se o aparelho estiver avariado desligue a ficha da tomada ou desligue o disjuntor no quadro el ctrico e feche a alimenta o de g s Contacte o servi o de assist...

Page 37: ...cipiente para cozinhar ao centro Para pequenas por es utilize um tacho pequeno Um tacho grande pouco cheio necessita de muita energia Tape sempre os tachos com uma tampa adequada Cozinhar sem tampa co...

Page 38: ...o da pot ncia de cozedura de 1 a 12 ou o n vel de cozedura lenta 3 3 Orif cios de ventila o por baixo das grelhas 0 Grelhas 8 Anel wok Queimador para wok 6 0 5 8 kW H Queimador r pido 4 0 kW P Queima...

Page 39: ...vos rebaixos A orienta o da cabe a e do anel do queimador irrelevante Conselho Se os componentes do queimador forem colocados de forma inclinada o aparelho n o funciona Componentes individuais do quei...

Page 40: ...ueimador ocorre uma fa sca de igni o em todos os queimadores N o toque na ficha enquanto o aparelho a g s estiver a acender Garanta a m xima limpeza Se as fichas estiverem sujas pode ocorrer uma igni...

Page 41: ...ra o p ex devido ventila o o aparelho volta a acender automaticamente o queimador Se a re igni o n o for suficiente p ex sujidade do queimador devido a l quido derramado o aparelho desliga a admiss o...

Page 42: ...Pode encomendar uma frigideira wok de alta qualidade como acess rio especial n mero de encomenda WP 400 001 Para cozinhar com a frigideira wok utilize apenas leo para cozinhar com alta capacidade de d...

Page 43: ...es grandes A chama n o dever tocar nas partes laterais dos tachos panelas N o use tachos panelas que n o tenham um apoio est vel sobre a placa de fog o pois estes poder o tombar Utilize apenas tachos...

Page 44: ...reta Sujidade incrustada Para remover a sujidade dif cil e incrustada poss vel encomendar na nossa loja online em lojas especializadas ou atrav s do nosso servi o de apoio ao cliente um gel de limpeza...

Page 45: ...a e manuten o pt Descolora o dos queimadores Com a utiliza o continuada as pe as dos queimadores em lat o escurecem devido a um processo natural de oxida o Esta altera o da cor n o afeta a respetiva u...

Page 46: ...do de demonstra o O queimador n o acende ao ligar O anel luminoso atr s dos comandos pisca alternadamente a amarelo e magenta Falha eletr nica Rode todos os comandos para 0 e desligue o aparelho da re...

Page 47: ...O anel luminoso muda para amarelo O modo de demonstra o foi desativado Para guardar a regula o saia do menu impreterivelmente do seguinte modo 7 Rode o comando para 0 Em seguida rode os comandos para...

Page 48: ...48 el 49 50 53 53 53 53 54 54 54 55 55 55 55 Wok 56 56 57 57 57 57 57 57 58 58 58 Wok 58 59 59 59 60 60 60 61 61 63 63 E FD 63 Internet www gaggenau com online shop www gaggenau com zz store...

Page 49: ...49 el 2 000 8 15 8...

Page 50: ...50 el m m m m...

Page 51: ...51 el 15 m m...

Page 52: ...52 el m...

Page 53: ...53 el 2012 19 E waste electrical and electronic equipment WEEE...

Page 54: ...54 el 1 12 3 3 0 8 Wok Wok 6 0 5 8 kW H 4 0 kW P 2 0 kW X u v Wok x y...

Page 55: ...55 el Off OFF ON OFF CA 429 410 WP 400 001 Wok 36 cm 6 10 cm 0 8 H...

Page 56: ...56 el Wok Wok Wok Wok Wok Wok Wok 3 4 0 8 H...

Page 57: ...57 el 1 2 m 15 10 50 0 61 0 12 1 1 4 0...

Page 58: ...58 el Wok Wok Wok Wok Wok Wok Wok Wok Wok Wok WP 400 001 Wok 12 10 12 Wok 7 10 6 8 4 6 3 4 2 4 3...

Page 59: ...59 el 90 mm 280 mm 320 mm Wok 200 240 mm 90 mm 240 280 mm 90 mm Wok 240 320 mm Wok Wok 160 mm...

Page 60: ...60 el m m Online Shop 00311859 00311499 Wok...

Page 61: ...61 el m 0 0 10 0 0...

Page 62: ...62 el 0 0...

Page 63: ...63 el 10 1 0 30 2 3 3 12 4 1 5 0 6 1 5 7 0 12 1 0 E FD E FD E Nr FD Nr O GR 210 4277 601 1U 1U 7 SH...

Page 64: ...DJJHQDX DXVJHUlWH PE DUO HU 6WUD H 0 QFKHQ 50 1 ZZZ JDJJHQDX FRP 9001154619 9001154619 990308 en es pt el...

Reviews: